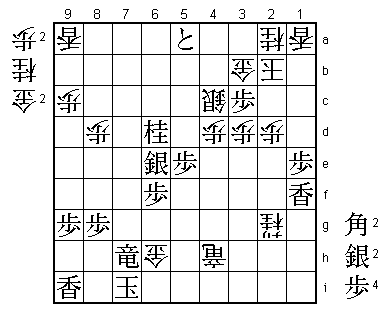
76th Kisei Match Game 4
[Black "Sato Yasumitsu, Kisei"]
[White "Habu Yoshiharu, Challenger"]
[Event "76th Kisei-sen, Game 4"]
[Date "July 18th 2005"]
1.P7g-7f     00:00:00  00:00:00
2.P8c-8d     00:00:00  00:00:00
3.S7i-6h     00:00:00  00:00:00
4.P3c-3d     00:00:00  00:00:00
5.S6h-7g     00:00:00  00:00:00
6.S7a-6b     00:00:00  00:00:00
7.P5g-5f     00:00:00  00:00:00
8.P5c-5d     00:00:00  00:01:00
9.S3i-4h     00:00:00  00:01:00
10.S3a-4b    00:00:00  00:03:00
11.G6i-7h    00:00:00  00:03:00
12.G4a-3b    00:00:00  00:04:00
13.K5i-6i    00:00:00  00:04:00
14.K5a-4a    00:00:00  00:05:00
15.G4i-5h    00:00:00  00:05:00
16.G6a-5b    00:00:00  00:06:00
17.B8h-7i    00:02:00  00:06:00
18.S4b-3c    00:02:00  00:06:00
19.P3g-3f    00:02:00  00:06:00
20.B2b-3a    00:02:00  00:06:00
21.P3f-3e    00:05:00  00:06:00

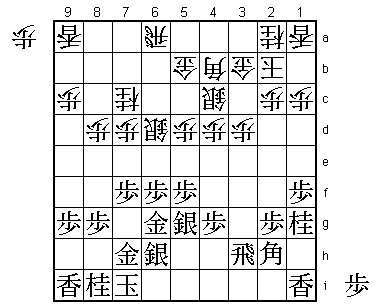
So far a classic Yagura, which was a little bit of a surprise
because Sato is a specialist in this opening and is extremely
hard to beat with the black pieces. Playing this with white in
a game he must win shows that Habu has nerves of steel. This
being said, Habu did exactly the same thing in the 6th games of
the Meijin match against Moriuchi. That game developed slowly,
but here Sato doesn't hesitate long before starting the hostilities.
21.P3e is not a new move, but it is the first time it is played in
a game between these two players. We now get into unknown territory
very quickly.

22.B3a-6d    00:05:00  00:13:00
23.R2h-1h    00:06:00  00:13:00
24.P4c-4d    00:06:00  00:14:00
25.P3ex3d    00:06:00  00:14:00
26.S3cx3d    00:06:00  00:14:00
27.P6g-6f    00:06:00  00:14:00
28.P7c-7d    00:06:00  00:23:00
29.P6f-6e    00:07:00  00:23:00
30.B6d-4b    00:07:00  00:25:00
31.R1h-3h    00:07:00  00:25:00
32.S3d-4c    00:07:00  00:26:00
33.B7i-4f    00:07:00  00:26:00
34.S6b-7c    00:07:00  00:26:00
35.B4f-2h    00:41:00  00:26:00
36.R8b-6b    00:41:00  00:31:00
37.K6i-7i    00:41:00  00:31:00
38.P6c-6d    00:41:00  00:43:00
39.P6ex6d    00:41:00  00:43:00
40.S7cx6d    00:41:00  00:43:00
41.S4h-5g    00:44:00  00:43:00
42.N8a-7c    00:44:00  00:45:00
43.S7g-6h    00:53:00  00:45:00
44.K4a-3a    00:53:00  00:57:00
45.P*6f      00:57:00  00:57:00
46.K3a-2b    00:57:00  01:22:00
47.G5h-6g    00:59:00  01:22:00
48.P*3d      00:59:00  01:35:00
49.P1g-1f    01:01:00  01:35:00

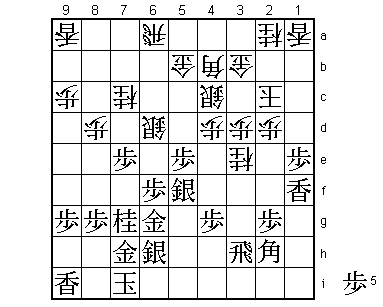
An alternative is 49.N7g. For example, 50.P5e Px5e P7e Px7e P*7f
Gx7f Sx7e and it seems that white gets a strong attack, but after
Gx7e Bx7e P*7f Bx6f Sx6f Rx6f the position is unclear.

50.R6b-6a    01:01:00  01:36:00
51.N2i-1g?   01:13:00  01:36:00

An important mistake. Somehow Sato thought that white had to play
52.P2d next. Correct was to extend at the edge with 51.P1e and only
then play N1g.

52.P1c-1d    01:13:00  01:41:00
53.N8i-7g    01:44:00  01:41:00
54.P5d-5e    01:44:00  01:57:00
55.P5fx5e    01:45:00  01:57:00
56.P1d-1e    01:45:00  01:57:00
57.P1fx1e?   02:12:00  01:57:00

Sato is again overlooking something, as he mistakenly thinks that
sacrificing the knight is his best option. Sacrificing material is
inevitable in this position, but Sato could have gotten much more
value for his pieces if he had played 57.R3f here. For example, after
58.Px1f P*1b Px1g+ Px1a+ +Px2h L1b+ K3c R1f white is a bishop ahead,
but the promotion of the rook can not be defended so black has good
chances to make a fight of it.

58.P*1f      02:12:00  01:58:00
59.N1g-2e    02:12:00  01:58:00
60.P2c-2d    02:12:00  01:58:00
61.N2e-1c+   02:13:00  01:58:00

Based on the same oversight. Had Sato seen it here, he would have
played the better 61.P*3c G2c P6e.

62.K2bx1c    02:13:00  02:04:00
63.S5g-5f    02:16:00  02:04:00
64.K1c-2c    02:16:00  02:10:00
65.L1ix1f    02:16:00  02:10:00
66.P7d-7e    02:16:00  02:15:00
67.P7fx7e    02:18:00  02:15:00
68.N*3e!     02:18:00  02:18:00

This is the move that Sato missed. The only defense against this fork
is 68.R3g, but blocking the bishop and putting the rook in this awkward
spot is too horrible to consider.

69.P7e-7d!   02:36:00  02:18:00

Sato gives a full bishop to set up a counter attack. His only option,
because 69.R5h Nx2g+ B3i gives black no hope of attack. Worse, even if
there is some attack, white can easily escape up the board and make
an entering king.

70.N3ex2g+   02:36:00  02:32:00
71.R3h-5h    02:36:00  02:32:00
72.P*7f      02:36:00  02:32:00
73.P7dx7c+   02:38:00  02:32:00
74.P7fx7g+   02:38:00  02:32:00
75.S6hx7g    02:38:00  02:32:00
76.+N2gx2h   02:38:00  02:32:00
77.+P7c-7d   02:47:00  02:32:00
78.+N2h-2g   02:47:00  02:35:00
79.P*7c      02:48:00  02:35:00
80.R6a-7a    02:48:00  02:37:00
81.+P7dx6d   03:21:00  02:37:00
82.B4bx6d    03:21:00  02:37:00
83.S5f-6e    03:21:00  02:37:00
84.B6d-3a    03:21:00  02:41:00
85.N*6d      03:23:00  02:41:00
86.G5b-6c    03:23:00  02:43:00
87.P7c-7b+   03:23:00  02:43:00
88.R7a-5a    03:23:00  02:43:00
89.S*6b      03:37:00  02:43:00
90.B*3e      03:37:00  03:06:00
91.P4g-4f    03:38:00  03:06:00
92.B3ex4f    03:38:00  03:06:00
93.K7i-8h    03:38:00  03:06:00
94.G6cx6b    03:38:00  03:06:00
95.+P7bx6b   03:38:00  03:06:00
96.S*6i      03:38:00  03:06:00
97.+P6bx5a   03:50:00  03:06:00
98.S6ix5h=   03:50:00  03:06:00
99.G6g-6h    03:50:00  03:06:00
100.R*1h     03:50:00  03:11:00
101.P*3c     03:50:00  03:11:00

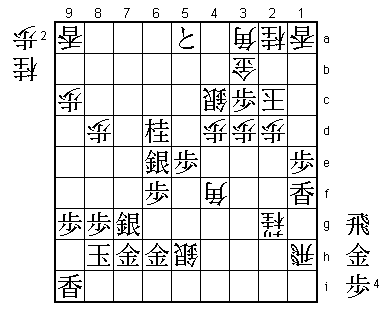
Black has really worked hard to get back in this game. Even Sato
thought here that he had made things interesting again. White has
three ways to take this pawn, but all three captures seriously
weaken his position.

102.P*6g!    03:50:00  03:28:00

If Habu has seen this in advance, it can only be considered brilliant.
Even at this point, it is very hard to see that white wins this close
endgame with one move difference.

103.P3cx3b+  03:56:00  03:28:00
104.P6gx6h+  03:56:00  03:28:00
105.G*2b     03:56:00  03:28:00
106.B3ax2b   03:56:00  03:28:00
107.+P3bx2b  03:56:00  03:28:00
108.K2cx2b   03:56:00  03:28:00
109.S7gx6h   03:58:00  03:28:00
110.S5h-6i=  03:58:00  03:31:00
111.R*7b     03:58:00  03:31:00
112.G*3b     03:58:00  03:32:00

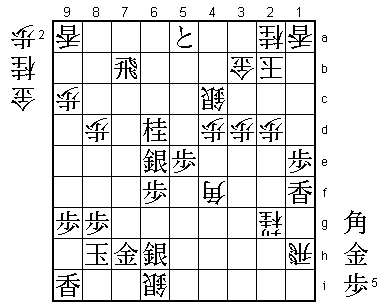
This is the point of the whole endgame. If black could play 113.P*3c
here, he would win, but white has 114.Sx7h+ Rx7h+ P*7g and black is
forced to black the rook file (also after +Rx7g P*7f). This is important,
because after Rx7h+ white can't play Bx6h+ Px3b+ Sx3b S*3a Kx3a G*4b
Kx4b +R7b and white is mated. One can only wonder when Habu saw this.
It is likely that he saw this when he played 102.P*6g, but he might
have seen it earlier.

113.P*4h     03:59:00  03:32:00

Sato decides to turn to defense, but this doesn't prolong the game much.

114.R1hx4h+  03:59:00  03:34:00
115.G*5i     03:59:00  03:34:00
116.P*6g     03:59:00  03:36:00

The second pawn drop on this square is decisive.

117.G5ix6i   03:59:00  03:36:00
118.P6gx6h+  03:59:00  03:36:00
119.P*3c     03:59:00  03:36:00
120.+P6hx7h  03:59:00  03:37:00
121.R7bx7h+  03:59:00  03:37:00
122.S*7i     03:59:00  03:37:00
123.G6ix7i   03:59:00  03:37:00
124.B4fx7i+  03:59:00  03:37:00
125.K8hx7i   03:59:00  03:37:00
126.G*6h     03:59:00  03:37:00
Resigns      03:59:00  03:37:00

Mate after 127.+Rx7h G*8h +Rx8h N*6g K8i G*7i K9h +Rx8h Kx8h R*7h. A game
that looked like an easy win for Habu turned into a very close endgame, but
in the end Sato was not able to completely turn the tables. The Kisei match
will be decided in the fifth and final game. Habu and Sato have played 12
title matches before this one, but it is the first time that a match between
them will be decided in the final game.
