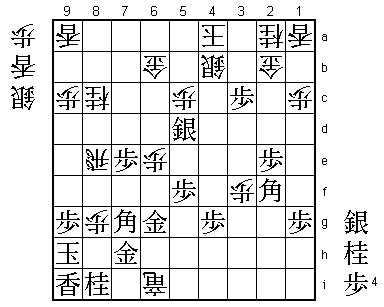
76th Kisei Match Game 3
[Black "Habu Yoshiharu, Challenger"]
[White "Sato Yasumitsu, Kisei"]
[Event "76th Kisei-sen, Game 3"]
[Date "July 5th 2005"]
1.P7g-7f     00:00:00  00:00:00
2.P8c-8d     00:00:00  00:00:00
3.S7i-6h     00:01:00  00:00:00
4.P3c-3d     00:01:00  00:00:00
5.P6g-6f     00:01:00  00:00:00
6.S7a-6b     00:01:00  00:00:00
7.P5g-5f     00:01:00  00:00:00
8.P6c-6d     00:01:00  00:00:00
9.G6i-7h     00:01:00  00:00:00
10.S6b-6c    00:01:00  00:00:00
11.S3i-4h    00:03:00  00:00:00
12.G4a-3b    00:03:00  00:00:00
13.G4i-5h    00:05:00  00:00:00
14.K5a-4a    00:05:00  00:00:00
15.K5i-6i    00:09:00  00:00:00
16.P7c-7d    00:09:00  00:00:00
17.G5h-6g    00:13:00  00:00:00
18.B2b-3c    00:13:00  00:01:00

The first two games were played with the Kakugawari with tempo loss.
Both games were won by black, so it was felt that white had to try
something else here. Sato plays the Three Bishop Move strategy. In the
Yagura, having the bishop on 8d and the knight on 7c is a good position
to start a counter attack by P6e from. Normally, to set this up, the bishop
needs four moves (3a-4b-5a-8d), but by playing the bishop to 3c early this
can be done in three moves (3c-5a-8d). Of course this is not Sato's idea,
as this opening was already played in the days of Oyama and Masuda. Recently,
this strategy is almost never seen because there is a risk that white is put
on the defensive. If black can attack early, white is not ready for a counter
attack through 6e and just has to wait for a mistake. Sato has prepared a new
way of playing that might open the discussion on the opening again.

19.P2g-2f    00:15:00  00:01:00
20.G6a-5b    00:15:00  00:04:00
21.P3g-3f    00:17:00  00:04:00
22.B3c-5a    00:17:00  00:21:00
23.S4h-5g    00:20:00  00:21:00
24.P8d-8e    00:20:00  00:23:00
25.S6h-7g    00:20:00  00:23:00
26.S3a-4b    00:20:00  00:23:00
27.S5g-4f    00:22:00  00:23:00
28.P4c-4d    00:22:00  00:25:00
29.B8h-7i    00:25:00  00:25:00
30.S6c-5d    00:25:00  00:49:00
31.N2i-3g    00:46:00  00:49:00
32.B5a-8d    00:46:00  00:53:00
33.R2h-3h    00:46:00  00:53:00
34.N8a-7c    00:46:00  00:54:00

The white moves look pretty straightforward, but the order in which they are
played is extremely important. First of all, Sato has put the bishop, silver
and knight in position before properly moving into the Yagura castle. This means
that he is ready to counter with P6e at any time. Furthermore, he has played the
silver to 4b instead of 2b, which is the normal way of playing. As a result, he
can start the fight at any time, because the Crab castle is strong enough to
withstand a reasonable assault. If the silver would be on 2b, a black attack
would be devastating.

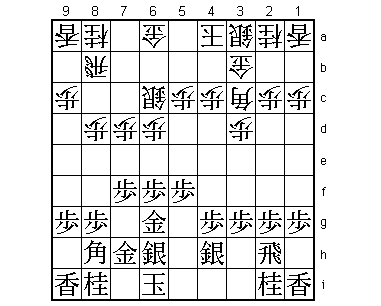
35.P3f-3e?   00:55:00  00:54:00

Putting theory into practice. Attack before white can complete his position or
it will be hard to win. However, in this position the king on 6i is very weak.
Actually, in the current position the white castle is stronger than the black
castle, so this was not the right time to start the hostilities. Better was
35.P5e and then 36.S5d-4c B6h K3a K7i R6b K8h is not bad for black, but white
has a solid formation and good attacking chances himself. It seems that Sato's
strategy has been a complete success.

36.P3dx3e    00:55:00  01:27:00
37.S4fx3e    00:56:00  01:27:00
38.P6d-6e    00:56:00  01:27:00
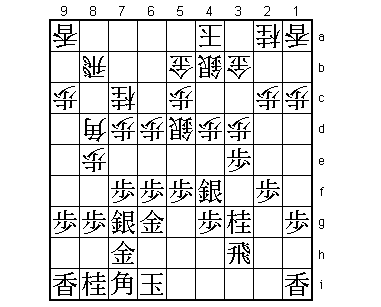
39.S3ex4d?   01:12:00  01:27:00

This is a very uncharacteristic blunder. In the Kisei there is a five minute time
frame after the lunch break in which the fans can enter the playing room and see
the players. Of course, there is no rule that they should actually see a move
being played, but Habu might have felt it as an obligation to the fans to show
them at least one actual move and rushed his decision. Still, from a professional
point of view, the following sequence is too easy. After the game, 39.N2e was
analyzed, which is much better. White still has moves like R6b and P*3g, but
there are many difficult variations and no conclusion about who was better
could be reached.

40.P6ex6f    01:12:00  01:38:00
41.S7gx6f    01:12:00  01:38:00
42.P*3f      01:12:00  01:39:00
43.N3g-2e    01:33:00  01:39:00
44.P*6e      01:33:00  01:39:00
45.S6f-7g    01:50:00  01:39:00

Also bad is 45.S5g because of P2d, killing the knight.

46.P3f-3g+   01:50:00  01:41:00
47.R3hx3g    01:50:00  01:41:00
48.B8d-4h+   01:50:00  01:41:00

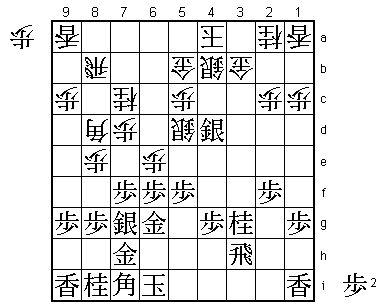
This bishop promotion gives white a big advantage.

49.B7i-4f    01:50:00  01:41:00
50.+B4hx3g   01:50:00  01:42:00
51.B4fx3g    01:50:00  01:42:00
52.R*3i      01:50:00  01:42:00
53.B*5i      01:54:00  01:42:00
54.G5b-6c    01:54:00  01:48:00
55.K6i-7i    02:26:00  01:48:00
56.P2c-2d    02:26:00  01:50:00

Black can not safe the knight now and it will be used against him soon.

57.P*6d      02:26:00  01:50:00
58.G6c-6b    02:26:00  01:50:00
59.P7f-7e    02:26:00  01:50:00
60.R8b-8d    02:26:00  01:55:00
61.P*3c      02:26:00  01:55:00
62.G3b-2b    02:26:00  01:57:00
63.S7g-7f    02:48:00  01:57:00
64.P2dx2e    02:48:00  01:57:00
65.K7i-8h    02:48:00  01:57:00
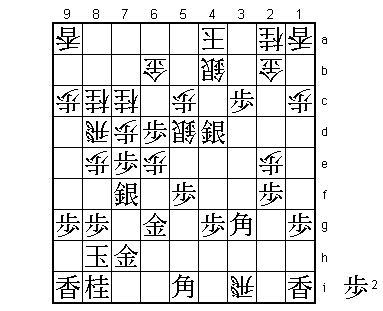
66.N*8c!     02:48:00  02:56:00

Decisive. This both threatens Px7e and defends against B9e. 66.N*6f is tempting,
but after Gx6f Px6f N*3d the situation is not so clear.

67.P7ex7d    02:50:00  02:56:00
68.R8dx7d    02:50:00  02:56:00
69.P*7e      02:50:00  02:56:00
70.R7d-8d    02:50:00  02:56:00
71.P2fx2e    02:50:00  02:56:00
72.P*3f      02:50:00  02:57:00
73.B3g-2f    02:51:00  02:57:00
74.R8dx6d    02:51:00  02:58:00
75.B5i-7g    03:04:00  02:58:00
76.P8e-8f    03:04:00  03:00:00
77.S4d-5e    03:05:00  03:00:00
78.R6d-8d    03:05:00  03:02:00
79.P8gx8f    03:15:00  03:02:00
80.P*8g      03:15:00  03:03:00
81.K8h-9h    03:16:00  03:03:00
82.R3ix1i+   03:16:00  03:05:00
83.P8f-8e    03:17:00  03:05:00
84.N7cx8e    03:17:00  03:12:00
85.S7fx8e    03:17:00  03:12:00
86.R8dx8e    03:17:00  03:12:00
87.S5ex5d    03:17:00  03:12:00
88.+R1i-6i   03:17:00  03:13:00
Resigns      03:17:00  03:13:00

Doesn't look that powerful, but there is not proper defense. 88.G6g-6h +Rx6h
or 88.S*7i +Rx7h leads to mate. A complete victory for Sato, but more importantly
a very bad loss for Habu who wasn't even able to put up a proper fight in this
game. He seemed to be going through the motions and the general opinion was
that the long Meijin match with Moriuchi had worn him out. Sato is now clearly
in the driving seat: 2-1 up and the black pieces in the fourth game. Can Habu
make a comeback?
