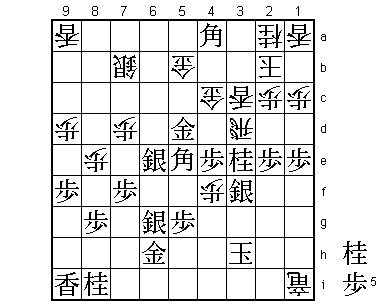
76th Kisei Match Game 2
[Black "Sato Yasumitsu, Kisei"]
[White "Habu Yoshiharu, Challenger"]
[Event "76th Kisei-sen, Game 2"]
[Date "June 20th 2005"]
1.P7g-7f     00:00:00  00:00:00
2.P3c-3d     00:00:00  00:01:00
3.P2g-2f     00:00:00  00:01:00
4.G4a-3b     00:00:00  00:01:00
5.P2f-2e     00:02:00  00:01:00
6.P8c-8d     00:02:00  00:02:00
7.G6i-7h     00:02:00  00:02:00
8.B2bx8h+    00:02:00  00:02:00

Like in the first game, the Kakugawari with tempo loss.

9.S7ix8h     00:02:00  00:02:00
10.S3a-2b    00:02:00  00:02:00
11.P1g-1f    00:04:00  00:02:00
12.S2b-3c    00:04:00  00:08:00
13.P1f-1e    00:04:00  00:08:00
14.S7a-7b    00:04:00  00:08:00
15.S3i-4h    00:04:00  00:08:00
16.P6c-6d    00:04:00  00:08:00
17.P4g-4f    00:04:00  00:08:00
18.S7b-6c    00:04:00  00:09:00
19.S4h-4g    00:04:00  00:09:00
20.P9c-9d    00:04:00  00:10:00
21.P9g-9f    00:04:00  00:10:00
22.K5a-4b    00:04:00  00:14:00
23.P3g-3f    00:04:00  00:14:00
24.G6a-5b    00:04:00  00:15:00
25.N2i-3g    00:04:00  00:15:00
26.P7c-7d    00:04:00  00:17:00
27.R2h-2i    00:08:00  00:17:00
28.N8a-7c    00:08:00  00:23:00
29.K5i-4h    00:19:00  00:23:00

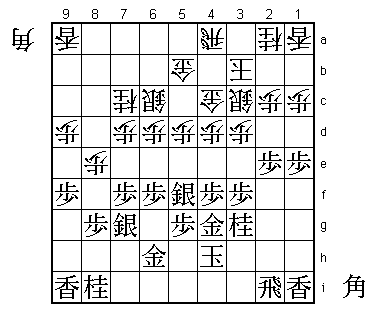
Now the game is clearly different from game 1. The right side king
is of course not a bad formation, but it is hard for black to set up
a good attack.

30.P8d-8e    00:19:00  00:37:00
31.G4i-5h    00:26:00  00:37:00
32.P4c-4d    00:26:00  00:42:00
33.S8h-7g    00:46:00  00:42:00
34.R8b-8a    00:46:00  00:54:00
35.S4g-5f    00:51:00  00:54:00
36.P5c-5d    00:51:00  00:57:00
37.P6g-6f    00:53:00  00:57:00
38.G3b-4c    00:53:00  00:59:00
39.G5h-4g    01:02:00  00:59:00
40.K4b-3b    01:02:00  01:00:00
41.G7h-6h    01:08:00  01:00:00
42.R8a-4a!   01:08:00  01:06:00

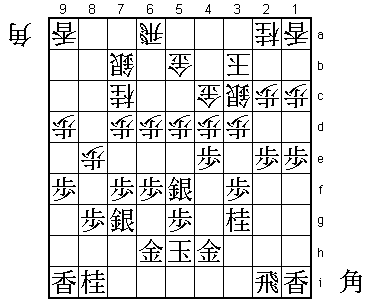
Very high level strategic shogi. Black wants to play the plan K3h
followed by G5h and G5h-4h, but then white can counter with S2b,
followed by N3c, L1b and R1a and white gets a very strong edge attack.
Therefore, the best black can do is to keep the king on 4h and move the
left gold to 5h. White could use this time to attack in the center:
42.G6b 43.G5h 44.R5a followed by P5e, but then black can strongly
counter with 45.P4e and the fact that G4g and G5h are connected is an
important defensive strength. Habu's 42.R4a puts black in a Zugzwang
situation: if 43.G5h then 44.G6b and black has no moves to improve his
position. If 45.G6h, then white plays R5a and if now P4e as before, the
gold is on 6h instead of 5h, which is an important weakness.

43.K4h-5h    01:30:00  01:06:00

Sato has seen the white plan and tries something different.

44.R4a-6a    01:30:00  01:11:00

The problem. With the king on 5h, a fight on the 6th file is much more
dangerous than with the king on 4h.

45.G4g-4h    01:31:00  01:11:00
46.S6c-7b    01:31:00  01:14:00
47.P4f-4e!   01:40:00  01:14:00

A move that requires a lot of courage. Starting the fight near the own
king is very dangerous. Even if black can set up a good attack, a counter
attack is always going to be strong. Sato realized that he had no choice
here.

48.P4dx4e    01:40:00  01:21:00
49.N3gx4e    01:41:00  01:21:00
50.S3c-4d    01:41:00  01:36:00

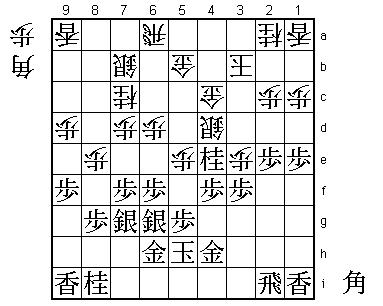
An obvious move seems to be 50.S2b, threatening to trap the knight with
P*4d next, but then 51.P7e is strong. For example, 52.B*8c Px7d Bx7d S7f
P5e S7e B9b Sx5e! Bx2i+ P*4d and even though black is a rook down, his
attack is unstoppable (for example, G4c-4b fails to B*5d). The silver on
2b, blocking the escape of the white king, is very important here.

51.P*4f      01:42:00  01:36:00
52.P5d-5e    01:42:00  01:43:00
53.S5f-6g    01:53:00  01:43:00
54.P3d-3e?   01:53:00  02:02:00

Hard to see, but this is mistake. Better was to go for a knight exchange
after 54.N3c, aiming to drop the knight on 5d, which threatens both Nx4f
and P6e next. After 55.Nx3c+ Kx3c, both players agreed that white has a
much better position than in the actual game.

55.G4h-3g!   02:23:00  02:02:00

A terrible looking move, but necessary and (fortunately for Sato) very
strong. 55.Px3e Sx3e is good for white, since he can play P*3f next and
the silver on 3e also defends against a pawn exchange on the 2nd file.

56.P6d-6e    02:23:00  02:11:00
57.P6fx6e    02:27:00  02:11:00
58.N7cx6e    02:27:00  02:23:00

An alternative seems 59.Px3f Gx3f B*3h, but after R2h Bx6e+ P*6f +B6d P2d
Px2d Rx2d P*2c R2f the white bishop on 6d is not working well and black
has the attacking options P*3c or P1d Px1d P*1c Lx1c B*1b.

59.S7g-6f    02:29:00  02:23:00
60.S4dx4e    02:29:00  02:24:00
61.P4fx4e    02:29:00  02:24:00
62.P3ex3f    02:29:00  02:24:00
63.G3gx3f    02:29:00  02:24:00
64.P*4f      02:29:00  02:24:00
65.G3fx4f    03:04:00  02:24:00
66.N*5d      03:04:00  02:24:00
67.G4fx5e    03:29:00  02:24:00
68.P*4f      03:29:00  02:31:00
69.R2i-3i    03:29:00  02:31:00
70.P*3h      03:29:00  02:32:00
71.R3ix3h    03:29:00  02:32:00
72.K3b-2b    03:29:00  02:32:00
73.S6fx6e!   03:34:00  02:32:00

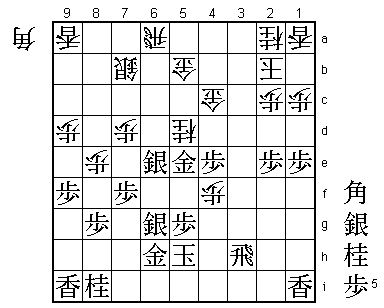
The only move. Again very dangerous looking, but black can just survive.

74.B*4g      03:34:00  03:17:00
75.K5h-4i    03:34:00  03:17:00
76.B4gx3h+   03:34:00  03:27:00

Alternatives were 76.Bx2e+ (aiming at P4g+ next) or 76.Bx6e+ Gx6e P4g+.
However, 76.Bx2e+ is answered by 77.P2d P4g+ (+Bx2d ends the white attack)
B*3a! Rx3a Px2c+ Kx2c Rx3a+ N3c P*2f and black wins, while 76.Bx6e+ Gx6e
P4g+ is answered by B*5e S*3c P*6d and after +Px3h Kx3h, the white attack
runs out of steam.

77.K4ix3h    03:34:00  03:27:00
78.R*5i      03:34:00  03:27:00
79.N*3e      03:52:00  03:27:00
80.R6a-3a    03:52:00  03:30:00
81.S*3f      03:56:00  03:30:00
82.R5ix1i+   03:56:00  03:31:00
83.G5ex5d    03:56:00  03:31:00
84.R3a-3d    03:56:00  03:52:00
85.B*5e      03:57:00  03:52:00
86.L*3c      03:57:00  03:52:00
87.B*4a      03:59:00  03:52:00
Resigns      03:59:00  03:54:00

No defense. 88.Rx3e Sx3e K3a is mate after R*3b Kx4a Rx5b+ Kx5b Gx4c Kx4c
S5d etc. A very good game by Sato, who seemed to be on his heels after
the opening, but he never gave in to the pressure and with some courageous
moves turned the game around. Very important, because 2-0 down in a short
match is hard to come back from.
