76th Kisei Match Game 1
[Black "Habu Yoshiharu, Challenger"]
[White "Sato Yasumitsu, Kisei"]
[Event "76th Kisei-sen, Game 1"]
[Date "June 11th 2005"]
1.P7g-7f     00:00:00  00:00:00
2.P3c-3d     00:00:00  00:01:00
3.P2g-2f     00:00:00  00:01:00
4.G4a-3b     00:00:00  00:01:00
5.G6i-7h     00:01:00  00:01:00
6.P8c-8d     00:01:00  00:01:00
7.P2f-2e     00:02:00  00:01:00
8.B2bx8h+    00:02:00  00:01:00

Sato plays the Kakugawari with tempo loss in this opening game. A strange
opening, because white voluntarily gives black an extra move to build an
attack. The difference of having the pawn on 8d instead of 8e is the
compensation that white is supposed to have, but in actual play the
white winning percentage is pretty bad. Despite this, the opening
continues to be very popular among professionals. The reason for this
is that even though the black winning percentage is good, there is no
clear winning strategy for black and the chances of ending up in an
unknown position are pretty high. For players who want a straight fight
instead of an opening preparation battle, this opening is a good choice.

9.S7ix8h     00:02:00  00:01:00
10.S3a-2b    00:02:00  00:01:00
11.S3i-3h    00:05:00  00:01:00
12.S2b-3c    00:05:00  00:01:00
13.P4g-4f    00:07:00  00:01:00
14.S7a-7b    00:07:00  00:02:00
15.S3h-4g    00:07:00  00:02:00
16.P6c-6d    00:07:00  00:02:00
17.K5i-6h    00:08:00  00:02:00
18.S7b-6c    00:08:00  00:02:00
19.S8h-7g    00:10:00  00:02:00
20.P9c-9d    00:10:00  00:02:00
21.P9g-9f    00:11:00  00:02:00
22.K5a-4b    00:11:00  00:03:00
23.P1g-1f    00:12:00  00:03:00
24.P1c-1d    00:12:00  00:04:00
25.G4i-5h    00:16:00  00:04:00
26.P7c-7d    00:16:00  00:07:00
27.P3g-3f    00:17:00  00:07:00
28.G6a-5b    00:17:00  00:09:00
29.S4g-5f    00:22:00  00:09:00
30.S6c-5d    00:22:00  00:09:00
31.K6h-7i    00:22:00  00:09:00
32.K4b-3a    00:22:00  00:26:00
33.N2i-3g    00:26:00  00:26:00
34.P4c-4d    00:26:00  00:27:00
35.P6g-6f    00:44:00  00:27:00
36.G5b-4c    00:44:00  00:40:00
37.R2h-4h    01:14:00  00:40:00
38.N8a-7c    01:14:00  00:43:00
39.K7i-8h    01:17:00  00:43:00
40.K3a-2b    01:17:00  00:52:00
41.P4f-4e    01:27:00  00:52:00
42.N7c-8e    01:27:00  00:59:00

Anyone but Sato would be criticized for this. The combination of the
defensive 36.G5b-4c and the attacking 42.N8e is considered bad playing
style. However, Sato likes this kind of mixed strategy and he is having
a lot of success with it. Maybe it puts his opponents off balance as
well...

43.S7g-8f    01:41:00  00:59:00
44.P6d-6e    01:41:00  01:55:00
45.P4ex4d    02:07:00  01:55:00
46.S3cx4d    02:07:00  01:55:00
47.B*7c      02:07:00  01:55:00
48.R8b-8a    02:07:00  01:55:00
49.P*4e      02:07:00  01:55:00
50.S4d-3c    02:07:00  01:55:00
51.P6fx6e    02:07:00  01:55:00
52.P9d-9e    02:07:00  02:07:00
53.P9fx9e    02:07:00  02:07:00
54.P7d-7e    02:07:00  02:13:00
55.S8fx7e    02:09:00  02:13:00
56.R8a-7a    02:09:00  02:15:00
57.B7cx8d+   02:12:00  02:15:00
58.R7a-8a    02:12:00  02:15:00
59.+B8d-7c   02:13:00  02:15:00
60.R8a-7a    02:13:00  02:16:00
61.+B7c-6d   02:29:00  02:16:00
62.P3d-3e    02:29:00  02:45:00
63.P3fx3e    02:50:00  02:45:00
64.P*3f      02:50:00  02:46:00
65.P4e-4d    02:50:00  02:46:00

66.P3fx3g+!? 02:50:00  03:05:00

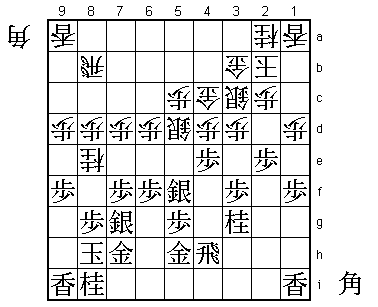
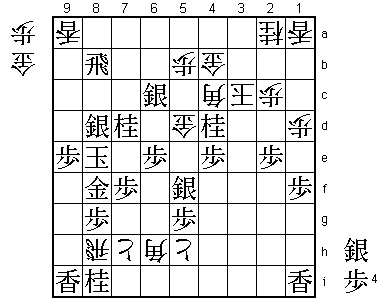
Now the game suddenly becomes very violent. This is a very interesting
position. Even though white has roughened up the black castle a little,
the main fighting is being done at the other side of the board. In general
this is not a good sign for the white position, but here things are a
little more complicated. White had the choice between 66.Px3g+ and
66.S3cx4d here. For example, 66.S3cx4d Rx4d Gx4d +Bx5c R4a P*4b Rx4b
+Bx4b Gx4b R*8b and because white can defend with P*5b or P*4a this is
unclear. It may be unclear which is better 66.Px3g+ or 66.S3cx4d, the point
is that white has a choice here. Despite his unbalanced looking position,
Sato managed to get into a position where he can decide how this game will
continue. Quite a strategic achievement from the Kakugawari with tempo loss.
Unfortunately, 66.Px3g+ is based on an important oversight.

67.P4dx4c+   02:53:00  03:05:00
68.+P3gx4h   02:53:00  03:05:00
69.+P4cx3b   02:53:00  03:05:00
70.K2bx3b    02:53:00  03:05:00
71.+B6dx5c   02:55:00  03:05:00
72.R7a-5a    02:55:00  03:15:00
73.G*5b      03:14:00  03:15:00

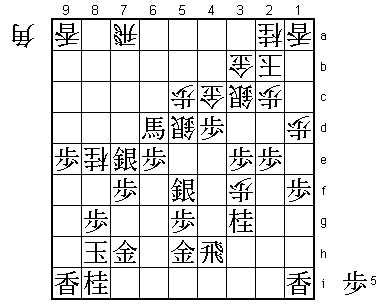
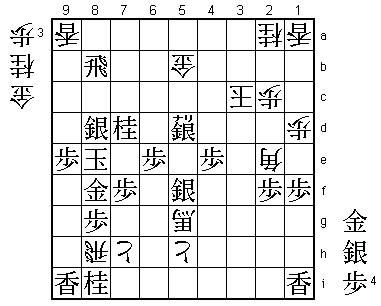
No choice. After 73.G*3a Rx3a +Bx5d G*4c black has no way to continue the
attack and will lose quickly with the weak king position. However, having
to drop the gold on 5b is a big loss for black. Most players in the press
room therefore gave the nod to Sato here.

74.R5ax5b    03:14:00  03:24:00

Here Sato saw the problem, earlier than anyone else. When playing Px3g+, he
thought that he could play 74.P*7g here. Then 75.Nx7g Rx5b +Bx5b N*9f or
75.+Bx5b K2b wins. The problem is that after the simple 75.Gx5a Px7h+ Kx7h
+Px5h there is no way to defend the black king, but R*8b is mate because
white has no pawns in hand. A pawn is worth a thousand golds... 74.Rx5b is
a change of plan. The situation is still very complicated, but Habu makes
no mistake.

75.+B5cx5b   03:14:00  03:24:00
76.P*7g      03:14:00  03:24:00
77.+B5bx8e   03:15:00  03:24:00
78.P7gx7h+   03:15:00  03:24:00
79.K8h-9g    03:15:00  03:24:00

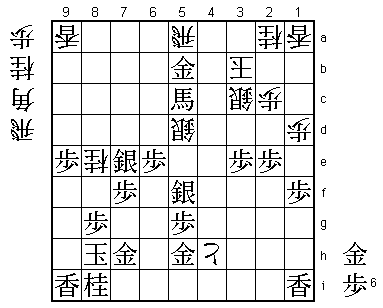
The black king escapes up the board. However, this is not the end of the game.
The black king is still far from safe, so the position is still very much
unclear.

80.N*9c      03:15:00  03:42:00
81.R*8b      03:16:00  03:42:00
82.G*4b      03:16:00  03:42:00
83.+B8e-7d   03:16:00  03:42:00
84.G*8e      03:16:00  03:44:00
85.+B7dx8e   03:27:00  03:44:00
86.N9cx8e    03:27:00  03:44:00
87.K9g-8f    03:27:00  03:44:00
88.+P4hx5h   03:27:00  03:51:00
89.G*5c      03:32:00  03:51:00
90.G*4c?!    03:32:00  03:59:00

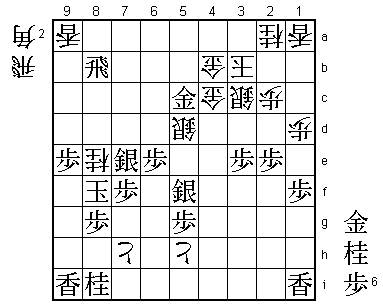
Sato regretted this move and after the game said that he wished he had played
90.+Px8i instead. If then 91.Gx5d B*7g Kx8e B*5b G*6c and the position is still
difficult to judge. Many variations were looked at in the post-mortem analysis,
but no conclusion could be reached.

91.G5cx5d    03:35:00  03:59:00
92.G4cx5d    03:35:00  03:59:00
93.P*4c      03:35:00  03:59:00
94.B*6h      03:35:00  03:59:00
95.K8fx8e    03:38:00  03:59:00
96.B*5b      03:38:00  03:59:00
97.N*7d      03:42:00  03:59:00
98.B5bx4c    03:42:00  03:59:00
99.P*4d      03:42:00  03:59:00
100.G5dx4d   03:42:00  03:59:00
101.P*4e     03:42:00  03:59:00
102.G4d-5d   03:42:00  03:59:00
103.N*4d     03:45:00  03:59:00
104.K3b-2b   03:45:00  03:59:00
105.P3e-3d   03:55:00  03:59:00
106.P*8d     03:55:00  03:59:00
107.S7ex8d   03:55:00  03:59:00
108.R*8h     03:55:00  03:59:00
109.G*8f     03:56:00  03:59:00
110.P*5b     03:56:00  03:59:00
111.P3dx3c+  03:56:00  03:59:00
112.K2bx3c   03:56:00  03:59:00
113.S*6c     03:56:00  03:59:00

114.B6hx5g+? 03:56:00  03:59:00

After this, the white position collapses. The last chance was 114.Gx6e. This
threatens Bx8f+ Px8f Rx8f+, so black has to play 115.Sx6e Bx6e and then P*3e
to avoid the white escape up the board. However, then G*6d is again a mating
threat and the position is still unclear.

115.N4dx5b+  03:56:00  03:59:00
116.G4bx5b   03:56:00  03:59:00
117.S6cx5d+  03:56:00  03:59:00
118.B4cx2e   03:56:00  03:59:00
119.P*2f     03:56:00  03:59:00
Resigns      03:56:00  03:59:00

If black can take the bishop on 2e, there is an easy mate after +S4d K2b Rx5b+.
The bishop can not move, so white needs mating threats but there aren't any good
ones, so Sato resigned. A very high level, exciting game that Sato seemed to
control from the start. Habu showed again that it is almost impossible to beat
him in a complicated endgame. The pressure is now on Sato, who needs to win game
2 with black to avoid a nearly fatal 2-0 deficit.
