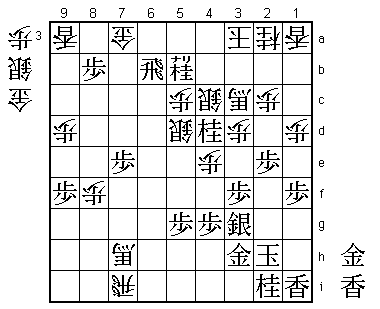
75th Kisei Match Game 2 (Replay)
[Black "Moriuchi Toshiyuki, Challenger"]

[White "Sato Yasumitsu, Kisei"]

[Event "75th Kisei-sen, Replay Game 2"]

[Date "June 29th 2004"]

1.P2g-2f     02:24:00  00:00:00

2.P8c-8d     02:24:00  02:21:00

3.P7g-7f     02:24:00  02:21:00

4.G4a-3b     02:24:00  02:22:00

5.G6i-7h     02:24:00  02:22:00

6.P3c-3d     02:24:00  02:23:00

7.P2f-2e     02:24:00  02:23:00

8.B2bx8h+    02:24:00  02:23:00

9.S7ix8h     02:24:00  02:23:00

10.S3a-2b    02:24:00  02:23:00

11.S3i-3h    02:25:00  02:23:00

12.S2b-3c    02:25:00  02:23:00

13.S3h-2g    02:25:00  02:23:00

14.P1c-1d    02:25:00  02:24:00

15.P1g-1f    02:25:00  02:24:00

16.P4c-4d    02:25:00  02:25:00

17.S2g-2f    02:33:00  02:25:00

18.R8b-4b    02:33:00  02:26:00

19.P3g-3f    02:37:00  02:26:00

20.P4d-4e    02:37:00  02:27:00

21.S2f-3g    02:37:00  02:27:00

22.G6a-7b    02:37:00  02:27:00

23.S8h-7g    02:52:00  02:27:00

24.S7a-6b    02:52:00  02:27:00

25.P7f-7e?!  02:52:00  02:27:00

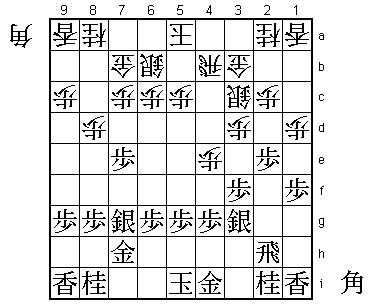
The Kakugawari opening with a tempo loss is a new opening with a

lot of unexplored territory. White gives up a tempo by exchanging

the bishops first. In return, not playing the pawn to 8e can be an

important advantage. For example, the attacking plan with N8e followed

by P6e is now possible. The point seems to be whether white can use the

right knight in the attack and that is the reason Moriuchi played 25.P7e.

However, even though this move is supposed to hamper the development of

the white knight, in reality this knight can come into play strongly anyhow.

Furthermore, the vanguard pawn on 7e becomes a black liability and the

imbalance with the climbing silver attack on the other side of the board

makes the black position hard to play. After the game, Moriuchi said that

he regretted 25.P7e.


26.P6c-6d    02:52:00  02:28:00

27.P6g-6f    02:53:00  02:28:00

28.S6b-6c    02:53:00  02:28:00

29.S7g-7f    02:53:00  02:28:00

30.P7c-7d    02:53:00  02:36:00

31.P7ex7d    02:57:00  02:36:00

32.S6cx7d    02:57:00  02:36:00

33.P*7e      02:57:00  02:36:00

34.S7d-6c    02:57:00  02:36:00

35.G7h-6g    02:58:00  02:36:00

36.K5a-4a    02:58:00  02:37:00

37.P8g-8f    03:10:00  02:37:00

38.P9c-9d    03:10:00  02:54:00

39.N8i-7g    03:14:00  02:54:00

40.N8a-7c    03:14:00  02:58:00

41.P9g-9f    03:23:00  02:58:00

42.K4a-3a    03:23:00  02:58:00

43.R2h-8h    03:23:00  02:58:00

44.K3a-2b    03:23:00  03:06:00

45.G4i-3h    03:25:00  03:06:00

46.P6d-6e!   03:25:00  03:16:00

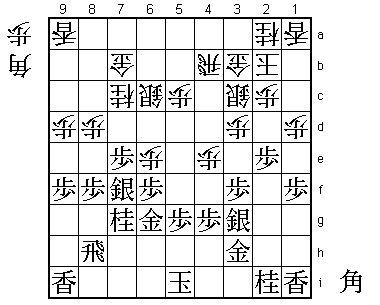
In the press room the general opinion was that white was in trouble here,

because there seems to be no way to develop the knight on 7c and the threat

of P7d immobilizes the formation of gold and silver. With P6e and his next

move, Sato shows that he has seen more than the commentators.


47.P6fx6e    03:28:00  03:16:00

48.S6c-5d!   03:28:00  03:16:00


This seems impossible because of 49.P7d, but Sato has calculated correctly

that the white attack is unstoppable after 50.P*7e 51.Sx7e 52.Nx6e. For example,

53.Nx6e Sx6e P*6f N*5e G7g P*7f G7h B*7g and with the king in the center, black

has no defense.


49.K5i-4h    03:42:00  03:16:00

50.G7b-6c    03:42:00  03:17:00

51.B*8c      03:47:00  03:17:00

52.B*4d      03:47:00  03:26:00

53.R8h-7h    03:50:00  03:26:00

54.P8d-8e    03:50:00  03:28:00

55.B8c-6a+   03:51:00  03:28:00

56.P8ex8f    03:51:00  03:33:00

57.K4h-3i    03:51:00  03:33:00

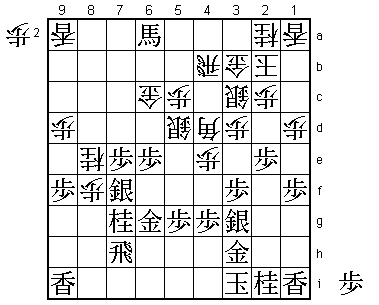
58.N7c-8e!   03:51:00  03:39:00

Sato has succeeded in developing the knight. White has a big, probably

winning, advantage here.


59.N7gx8e    03:54:00  03:39:00

60.B4dx9i+   03:54:00  03:39:00

61.+B6a-5a   03:54:00  03:39:00

62.R4b-8b    03:54:00  03:42:00

63.P6e-6d    03:54:00  03:42:00

64.R8b-8a    03:54:00  03:51:00

65.+B5ax3c   03:54:00  03:51:00

66.+B9ix3c   03:54:00  03:51:00

67.P6dx6c+   03:54:00  03:51:00

68.S5dx6c    03:54:00  03:51:00

69.P*8b      03:54:00  03:51:00

70.R8a-3a    03:54:00  03:53:00

71.N8e-7c+   03:55:00  03:53:00

72.S6c-5d    03:55:00  03:53:00

73.+N7c-6b   03:55:00  03:53:00

74.L*6a!     03:55:00  03:53:00

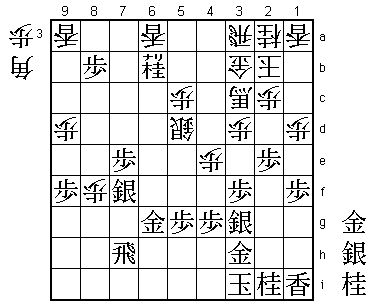
The deciding move. The black attack is based on the promoted knight: +N6b-5b

followed by G*4a is the plan. Without this knight there is no way to win, so

75.+Nx6a Rx6a is out of the question.


75.+N6b-5b   03:56:00  03:53:00

76.L6ax6g+   03:56:00  03:55:00

77.S7fx6g    03:56:00  03:55:00

78.B*8e      03:56:00  03:55:00


Painful fork. Again the knight is under siege. Black can not give it up, so

Moriuchi has to sacrifice more material.


79.G*4a      03:58:00  03:55:00

80.B8ex6g+   03:58:00  03:55:00

81.G4ax3a    03:58:00  03:55:00

82.G3bx3a    03:58:00  03:55:00

83.S*4b      03:58:00  03:55:00

84.+B6gx7h   03:58:00  03:55:00

85.S4bx3a=   03:58:00  03:55:00

86.K2bx3a    03:58:00  03:55:00

87.N*4d      03:58:00  03:55:00

88.S*4c      03:58:00  03:56:00

89.R*6b      03:59:00  03:56:00

90.R*7i      03:59:00  03:59:00

91.K3i-2h    03:59:00  03:59:00


Moriuchi has done everything to try and come back in the game. It seems that

white still has some tough decisions ahead, but Sato decides the game with

one move...


92.G*7a!     03:59:00  03:59:00

Resigns      03:59:00  03:59:00

Kobayashi Kenji (8-dan) was not the only one surprised by this. His comment

upon seeing this move: "Is this really OK? ". After giving it some thought, he changed

his mind: "A good move". 92.G*7a takes away all black's attacking moves. 93.R6d+ fails to the

simple +Bx4d and black has no attack, while white threatens the devastating N*2f next. Furthermore,

after 93.+N4b +Bx4b G*2b K4a black has no more moves. A convincing victory by Sato, again

with the white pieces. With 2-0 down and only three more games to play, it seems suddenly highly

unlikely that Moriuchi will hold the majority of the seven titles after this match.
