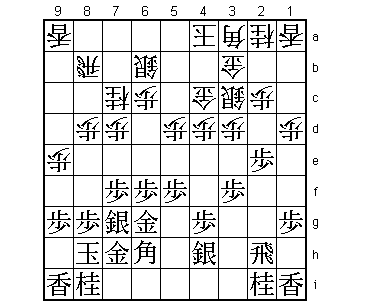
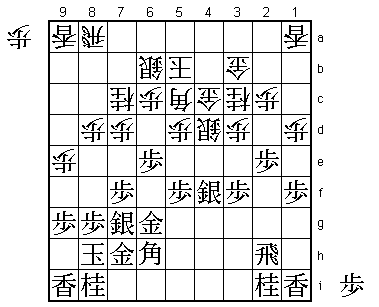
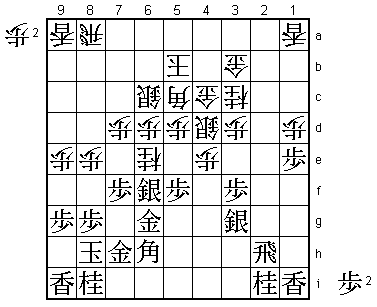
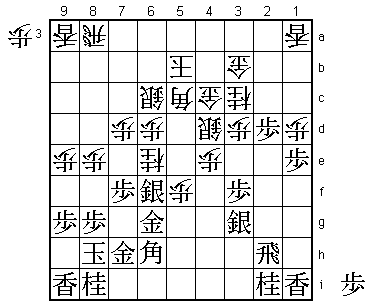
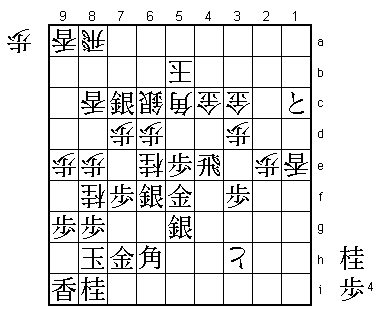
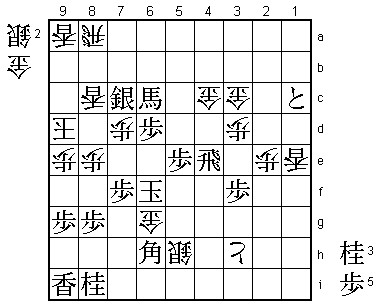
75th Kisei Match Game 1
[Black "Moiruchi Toshiyuki, Challenger"]

[White "Sato Yasumitsu, Kisei"]

[Event "75th Kisei-sen, Game 1"]

[Date "June 17th 2004"]

1.P7g-7f     00:00:00  00:00:00

2.P8c-8d     00:00:00  00:00:00

3.S7i-6h     00:01:00  00:00:00

4.P3c-3d     00:01:00  00:00:00

5.P6g-6f     00:01:00  00:00:00

6.S7a-6b     00:01:00  00:00:00

7.P5g-5f     00:01:00  00:00:00

8.P5c-5d     00:01:00  00:00:00

9.S3i-4h     00:01:00  00:00:00

10.S3a-4b    00:01:00  00:00:00

11.G4i-5h    00:01:00  00:00:00

12.G4a-3b    00:01:00  00:00:00

13.G6i-7h    00:01:00  00:00:00

14.K5a-4a    00:01:00  00:00:00

15.K5i-6i    00:01:00  00:00:00

16.G6a-5b    00:01:00  00:00:00

17.S6h-7g    00:02:00  00:00:00

18.S4b-3c    00:02:00  00:00:00

19.B8h-7i    00:02:00  00:00:00

20.B2b-3a    00:02:00  00:00:00

21.P3g-3f    00:02:00  00:00:00

22.P4c-4d    00:02:00  00:00:00

23.G5h-6g    00:03:00  00:00:00

24.G5b-4c    00:03:00  00:02:00

25.B7i-6h    00:03:00  00:02:00

26.P7c-7d    00:03:00  00:07:00

27.K6i-7i    00:03:00  00:07:00

28.P9c-9d    00:03:00  00:11:00

29.K7i-8h    00:05:00  00:11:00

30.N8a-7c    00:05:00  00:21:00

31.P2g-2f    00:12:00  00:21:00

32.P9d-9e    00:12:00  00:27:00

33.P2f-2e    00:18:00  00:27:00

34.P1c-1d!?  00:18:00  01:16:00

Sato has chosen a variation of the Yagura that was popular more than

10 years ago. However, the move 34.P1d was never popular as it goes

straight against one of the most well-known rules of the Yagura opening:

do not play the edge pawn, because the bogin attack by the opponent is

too strong. Sato has prepared a special counter strategy against the

climbing silver, but this counter plan is probably only effective in one

game with short time limits (four hours in the Kisei match).


35.S4h-3g    00:24:00  01:16:00


Of course, Moriuchi does not shy away from the theoretical answer to

34.P1d. After all, he is the top player in the game at the moment and

almost unbeatable with black.


36.B3a-6d    00:24:00  01:16:00

37.P1g-1f    00:53:00  01:16:00

38.R8b-8a    00:53:00  01:17:00

39.B6h-4f    00:56:00  01:17:00

40.B6d-5c    00:56:00  01:18:00

41.S3g-2f    00:57:00  01:18:00

42.P4d-4e    00:57:00  01:20:00

43.B4f-6h    00:57:00  01:20:00

44.S3c-4d    00:57:00  01:21:00

45.S2f-3g    00:58:00  01:21:00

46.K4a-5b    00:58:00  01:30:00


This is the plan that Sato had prepared. Having the king on 5b combined

with a strong central position behind the vanguard pawn on 4e gives the

white position good balance. Furthermore, the attack on the edge by black

is quite far away, giving white plenty of time to go for his own attack.

The downside of the white strategy is that the king is not very well

defended. If black manages to force a breakthrough, the game will be over

almost immediately.


47.P4g-4f    01:01:00  01:30:00

48.P4ex4f    01:01:00  01:41:00

49.S3gx4f    01:01:00  01:41:00

50.N2a-3c    01:01:00  01:47:00

51.P6f-6e!?  01:17:00  01:47:00

Inviting the knight to 6e, from which it wants to attack anyhow. Therefore,

this is a very hard move to play. The reason behind it is that black wants

to activate the silver on the right without being bothered by B6d all the time.

If white keeps the pawn on 6e, the bishop can not go to 6d. If white takes

the pawn with the knight, after S6f P6d (the game sequence), the bishop is

also blocked.


52.P*4e      01:17:00  01:55:00

53.S4f-3g    01:17:00  01:55:00

54.N7cx6e    01:17:00  01:55:00

55.S7g-6f    01:18:00  01:55:00

56.P6c-6d    01:18:00  01:55:00

57.P2e-2d    01:50:00  01:55:00

58.P2cx2d    01:50:00  01:55:00

59.R2hx2d    01:50:00  01:55:00

60.S6b-6c    01:50:00  02:42:00

61.R2d-2h    01:57:00  02:42:00

62.P8d-8e    01:57:00  02:43:00

63.P1f-1e    02:14:00  02:43:00

The simple plan is to win the lance after 63.Px1e P*1b Lx1b P*1c.


64.P5d-5e!   02:14:00  02:51:00


Sato just allows the capture at 1d. One of the advantages of having the

king on 5b is that even a tokin on 1c is still far away.


65.P*2d      02:41:00  02:51:00


Hoping to force 66.P*2b, which would give black a huge advantage.


66.P5ex5f!   02:41:00  03:22:00

Of course. 67.P2c+ is answered by 68.P*2g Rx2g P*2f Rx2f P*2e R2h Gx2c.


67.G6gx5f    03:00:00  03:22:00


A tough decision. The black king was well-defended, but moving out this gold

makes the difference between the black and white king suddenly very small.


68.P*2g      03:00:00  03:22:00

69.R2hx2g    03:02:00  03:22:00

70.P*2f      03:02:00  03:22:00

71.R2gx2f    03:09:00  03:22:00

72.P*2e      03:09:00  03:23:00

73.R2f-2g    03:17:00  03:23:00

74.P1dx1e    03:17:00  03:23:00

75.S3g-4h    03:17:00  03:23:00

76.P1e-1f    03:17:00  03:25:00

77.P*5e      03:20:00  03:25:00

78.P7d-7e    03:20:00  03:36:00

79.P*1d      03:32:00  03:36:00


No choice. 79.Px7e leaves a hole on 7f for a future knight drop and Sx7e

allows P*7g.


80.L1ax1d    03:32:00  03:40:00

81.P*1e      03:32:00  03:40:00

82.L1dx1e    03:32:00  03:40:00

83.P*1d      03:32:00  03:40:00

84.P1f-1g+   03:32:00  03:53:00

85.L1ix1g    03:33:00  03:53:00

86.P*5g      03:33:00  03:53:00

87.S4hx5g    03:46:00  03:53:00

88.P*1f      03:46:00  03:53:00

89.P1d-1c+   03:46:00  03:53:00

90.P1fx1g+   03:46:00  03:53:00

91.R2g-4g    03:46:00  03:53:00

92.L*8c      03:46:00  03:56:00

93.P2d-2c+   03:46:00  03:56:00

94.G3b-4b    03:46:00  03:56:00

95.S6fx7e    03:52:00  03:56:00

96.P*7d      03:52:00  03:57:00

97.S7e-6f    03:52:00  03:57:00

98.+P1g-2h   03:52:00  03:57:00

99.+P2cx3c   03:52:00  03:57:00

100.G4bx3c   03:52:00  03:57:00

101.N2i-3g   03:52:00  03:57:00

102.+P2h-3h  03:52:00  03:58:00

103.N3gx4e   03:52:00  03:58:00

104.S4dx4e   03:52:00  03:58:00

105.R4gx4e   03:52:00  03:58:00

106.N*8f     03:52:00  03:58:00

107.S*7c?    03:57:00  03:58:00

An important mistake under time pressure. Much better was the simple 107.G7i,

riding the white attacking wave. For example, 108.P9f Px9f P*9h Lx9h Nx9h+ Kx9h

P8f Px8f Lx8f Bx8f Rx8f S*8g R8a P*8f L*8c N*7h and the white attack seems to be

over, while black is threatening L*5d strongly.


108.B5c-6b!  03:57:00  03:59:00


Even though Sato said after the game that he still thought the position was

difficult after this move, the general opinion was that white is winning from

here. By moving the king closer to the lance and rook, black suddenly has no

good way of attacking anymore. On the other hand, white has an unstoppable attack

on the 8th and 9th files.


109.S7cx6b+  03:59:00  03:59:00

110.K5bx6b   03:59:00  03:59:00

111.S6fx6e   03:59:00  03:59:00

112.P6dx6e   03:59:00  03:59:00

113.G5fx6e   03:59:00  03:59:00

114.P*6d     03:59:00  03:59:00

115.N*7e     03:59:00  03:59:00

116.P6dx6e   03:59:00  03:59:00

117.N7ex6c+  03:59:00  03:59:00

118.K6bx6c   03:59:00  03:59:00

119.P*6d     03:59:00  03:59:00

120.K6c-7c   03:59:00  03:59:00

121.B*5b     03:59:00  03:59:00

122.N8fx7h+  03:59:00  03:59:00

123.K8hx7h   03:59:00  03:59:00

124.S*5h     03:59:00  03:59:00

125.K7h-8h   03:59:00  03:59:00

126.S5h-6g+  03:59:00  03:59:00

127.S*7h     03:59:00  03:59:00

128.+S6gx7h  03:59:00  03:59:00

129.K8hx7h   03:59:00  03:59:00

130.S*5h     03:59:00  03:59:00

131.B5b-6c+  03:59:00  03:59:00

132.K7c-8d   03:59:00  03:59:00

133.S*6g     03:59:00  03:59:00

134.N*6f     03:59:00  03:59:00

135.S5gx6f   03:59:00  03:59:00

136.S*6i     03:59:00  03:59:00

137.K7h-7g   03:59:00  03:59:00

138.P6ex6f   03:59:00  03:59:00

139.S6gx5h   03:59:00  03:59:00

140.S6ix5h=  03:59:00  03:59:00

141.S*7c     03:59:00  03:59:00

142.K8d-9d   03:59:00  03:59:00

143.K7gx6f   03:59:00  03:59:00

144.G*6g     03:59:00  03:59:00

Resigns      03:59:00  03:59:00

Mate after 145.K6e S*5f Kx7d S*6e K7e G*7d +Bx7d S6f or 145.K5f G*6f K4f S*3g.

Both are quite unusual mating patterns. Sato wins an important game with white

to take the lead in this match. In a short match like this, it is important

to win the games with the black pieces. If Sato can do this in game 2, he will

already be two up with three to play. After the game Moriuchi hinted at failing

to make the transition from two-day title match games he played recently to the

one-day format of the Kisei match. He better adapt soon or his four crown dream

will end prematurely.
