74th Kisei Match Game 3
[Black "Sato Yasumitsu, Kisei"]
[White "Maruyama Tadahisa, Challenger"]
[Event "74th Kisei-sen, Game 3"]
[Date "July 1st 2003"]
1.P7g-7f 00:00:00 00:00:00
2.P3c-3d 00:00:00 00:00:00
3.P2g-2f 00:00:00 00:00:00
4.P8c-8d 00:00:00 00:01:00
5.P2f-2e 00:00:00 00:01:00
6.P8d-8e 00:00:00 00:01:00
7.G6i-7h 00:00:00 00:01:00
8.G4a-3b 00:00:00 00:01:00
9.P2e-2d 00:00:00 00:01:00
10.P2cx2d 00:00:00 00:01:00
11.R2hx2d 00:00:00 00:01:00
12.P8e-8f 00:00:00 00:01:00
13.P8gx8f 00:00:00 00:01:00
14.R8bx8f 00:00:00 00:01:00
15.R2dx3d 00:00:00 00:01:00
16.B2b-3c 00:00:00 00:01:00
17.R3d-3f 00:02:00 00:01:00
18.S3a-2b 00:02:00 00:01:00
19.P*8g 00:05:00 00:01:00
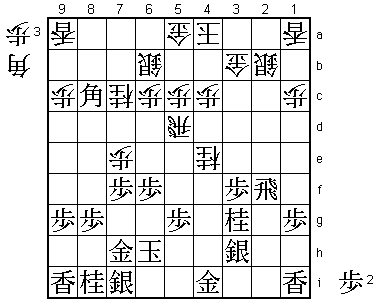
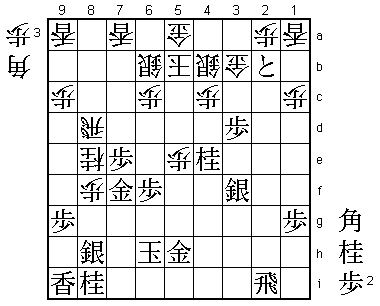
20.R8f-8e 00:05:00 00:02:00
Another R8e Yokofudori game. One of the biggest strengths of Maruyama
is that it is almost impossible to get him off his game. Whether he
is 2-0 down or 2-0 up, he will not change the openings he likes or
change his playing style. In contrast, Sato is quite the opposite.
He is an emotional player who started this match rather nervously,
but with a 2-0 lead is brimming with confidence.
21.R3f-2f 00:05:00 00:02:00
22.K5a-4a 00:05:00 00:02:00
23.K5i-6h 00:12:00 00:02:00
24.S7a-6b 00:12:00 00:03:00
25.S3i-3h 00:15:00 00:03:00
26.P7c-7d 00:15:00 00:06:00
27.P3g-3f 00:16:00 00:06:00
28.N8a-7c 00:16:00 00:07:00
29.N2i-3g 00:17:00 00:07:00
30.G6a-5a 00:17:00 00:08:00
31.P4g-4f 00:17:00 00:08:00
32.R8e-5e 00:17:00 00:34:00
33.P4f-4e 00:30:00 00:34:00
34.R5e-5d 00:30:00 00:37:00
35.B8hx3c+ 00:30:00 00:37:00
36.N2ax3c 00:30:00 00:37:00
37.P6g-6f 00:30:00 00:37:00
38.P7d-7e 00:30:00 00:44:00
39.B*8c 00:49:00 00:44:00
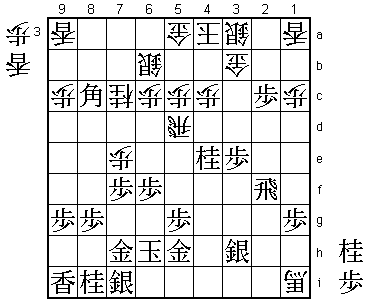
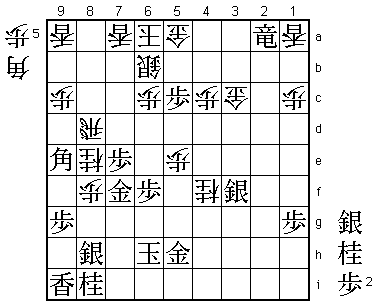
40.N3cx4e 00:49:00 00:54:00
This position was recognized immediately by many as it is the same
position that Maruyama played in one of the big games of his career:
the decisive game of the 59th Meijin match against Tanigawa. Maruyama
has fond memories of this move, as he won that game and defended
his Meijin title as a result of it. Of course, Sato comes well prepared.
41.N3gx4e 00:51:00 00:54:00
42.B*4f 00:51:00 00:54:00
43.G4i-5h 00:59:00 00:54:00
44.B4fx1i+ 00:59:00 00:54:00
45.P*2c 02:41:00 00:54:00
46.S2b-3a 02:41:00 00:56:00
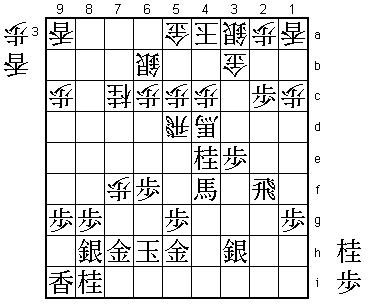
47.P3f-3e!? 02:41:00 00:56:00
There is one other game with 40.Nx4e: a game in the Ryu-O tournament
between Nakata Hiroki and Nozuki. In the meijin match game, Tanigawa
played 47.N*3c here, which seems to rush the attack a little too
much. On the other hand, Nakata played 45.P3e instead of 45.P*2c,
which seems a bit slow. Sato has prepared a combination of these
two, but it is very hard to judge if it is a real improvement. The
120 minutes thought he spent on 45.P*2c show that he is far from
confident about the validness of his new idea.
48.+B1i-5e 02:41:00 01:48:00
49.B8c-5f+ 02:42:00 01:48:00
50.+B5e-4d 02:42:00 01:51:00
51.+B5f-4f 02:44:00 01:51:00
52.P7ex7f 02:44:00 02:05:00
53.S7i-8h 03:02:00 02:05:00
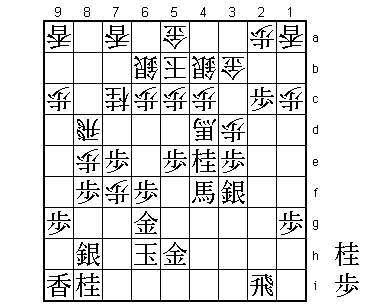
54.P*2a? 03:02:00 02:11:00
A typical Maruyama move. The "Gekikara-ryu", as his style is often
referred to, is about slowly removing any attacking options the opponent
has and then slowly strangling him afterwards. However, in this
case his style is working against him. With 54.P*2a he not only
takes away the attacking possibilities of his opponent, but more
importantly those of himself. Sato's king is pretty vulnerable and
Sato is more than happy that the game is now slowing down and that
he has some time to strengthen his king position. A player like
Tanigawa would definitely picked 54.R5e to put pressure on the
knight on 4e. The variation 55.P7d +Bx4e Px7c+ +Bx4f +Px6b +Bx3e
+Px5a Kx5a N*4g +Bx2f Nx5e N*4f is wild, but gives white plenty
of attacking chances.

55.S3h-4g    03:06:00  02:11:00
56.K4a-5b    03:06:00  02:58:00
57.G7h-6g    03:14:00  02:58:00
58.P*3d      03:14:00  03:07:00
59.S4g-3f    03:38:00  03:07:00
60.S3a-4b    03:38:00  03:24:00
61.P5g-5f    03:39:00  03:24:00
62.L*7a      03:39:00  03:47:00
63.P*7e      03:44:00  03:47:00
64.R5d-8d    03:44:00  03:52:00
65.R2f-2i    03:48:00  03:52:00
66.P*8f      03:48:00  03:57:00
67.P8gx8f    03:48:00  03:57:00
68.P*8e      03:48:00  03:57:00
69.P5f-5e!   03:53:00  03:57:00
Sato has importantly improved his king position and now is ready to
start attacking again. This pawn push is very good. It not only
defends against +B5d, but also threatens N*5f.

70.P8ex8f    03:53:00  03:57:00
71.G6gx7f    03:53:00  03:57:00
72.P5c-5d    03:53:00  03:57:00

72.P8g+ looks good for white, but after 73.P*8e Nx8e Sx8g Nx9g+ P*8e
black has no problems.

73.P*8e      03:53:00  03:57:00
74.N7cx8e    03:53:00  03:57:00
75.P3ex3d    03:53:00  03:57:00
76.+B4dx5e   03:53:00  03:57:00
77.+B4fx5e   03:53:00  03:57:00
78.P5dx5e    03:53:00  03:57:00
79.P2c-2b+!  03:53:00  03:57:00
The deciding move. This pawn sacrifice is times perfectly. It is
important that black sacrifices this pawn first. If he does it later
in the move sequence that follows, white will just ignore the pawn.

80.G3bx2b    03:53:00  03:57:00

After 80.Px2b P3c+ Sx3c Nx3c+ Gx3c black has Rx2b+.

81.P3d-3c+   03:53:00  03:57:00
82.S4bx3c    03:53:00  03:57:00
83.P*5c      03:55:00  03:57:00
84.K5b-6a    03:55:00  03:57:00
85.N4ex3c+   03:55:00  03:57:00
86.G2bx3c    03:55:00  03:57:00
87.R2ix2a+   03:55:00  03:57:00
88.N*4f      03:55:00  03:58:00
89.B*9e      03:57:00  03:58:00
Resigns      03:57:00  03:59:00
If the rook moves sideways, black has mate after +Rx5a Sx5a Bx5a+
K7b G*7c. If the rook moves backwards, it will never help the attack.
Also 89.Nx5h+ Kx5h leaves white without any moves. With a surprising
3-0 score, Sato has defended his Kisei title. Defending the Kisei
title in itself is no small feat, as this title has changed hands
for seven years in a row. Also, Maruyama was the favorite coming into
this match, just taking the Kio title from Habu. On the other hand,
Sato had just lost the Osho title and the right to challenge for the
Meijin after losses in the final round of the Junisen and the play-off
with Habu. Sato himself also seemed a little surprised at the relative
easiness of this match.