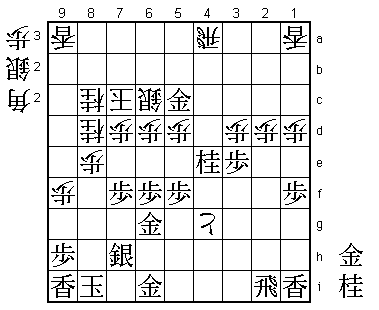
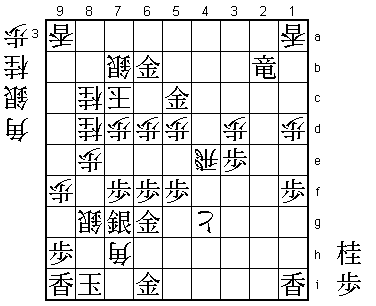
74th Kisei Match Game 2
[Black "Maruyama Tadahisa, Challenger"]
[White "Sato Yasumitsu, Kisei"]
[Event "74th Kisei-sen, Game 2"]
[Date "June 19th 2003"]
1.P7g-7f     00:00:00  00:00:00
2.P3c-3d     00:00:00  00:00:00
3.P2g-2f     00:00:00  00:00:00
4.P5c-5d     00:00:00  00:00:00
5.P2f-2e     00:00:00  00:00:00
6.R8b-5b     00:00:00  00:00:00

Played immediately, so this was Sato's intention. It must have hurt
his pride a little as the Nakabisha opening is more or less saying
that Sato doesn't think he can beat Maruyama in the Kakugawari opening.
Still, this is not the first time he has played this against Maruyama.

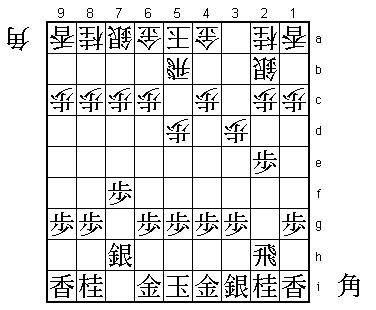
7.B8hx2b+    00:01:00  00:00:00

A Maruyama special. He has good results with this early bishop exchange.

8.S3ax2b     00:01:00  00:00:00
9.S7i-7h!    00:01:00  00:00:00

A very early new idea. In this position 9.K6h or 9.S8h are played
most often. 9.S7h is better as it aims at playing a left Mino, which
is a very strong castle against the Furibisha, especially with the
silver in an awkward position.

10.S2b-3c    00:01:00  00:00:00
11.S3i-4h    00:01:00  00:00:00
12.K5a-6b    00:01:00  00:01:00
13.P4g-4f    00:01:00  00:01:00
14.R5b-2b    00:01:00  00:05:00
15.S4h-4g    00:02:00  00:05:00
16.K6b-7b    00:02:00  00:13:00
17.K5i-6h    00:03:00  00:13:00
18.S7a-6b    00:03:00  00:44:00
19.K6h-7i    00:11:00  00:44:00
20.P7c-7d    00:11:00  00:45:00
21.G4i-5h    00:26:00  00:45:00
22.P6c-6d    00:26:00  00:45:00
23.P6g-6f    00:29:00  00:45:00
24.S6b-6c    00:29:00  00:46:00
25.P3g-3f    00:34:00  00:46:00
26.N8a-7c    00:34:00  00:49:00
27.G5h-6g    00:38:00  00:49:00
28.G6a-6b    00:38:00  00:57:00
29.K7i-8h    00:49:00  00:57:00
30.S3c-4d    00:49:00  01:20:00
31.P5g-5f    01:12:00  01:20:00
32.N2a-3c    01:12:00  01:43:00
33.P9g-9f    01:19:00  01:43:00
34.P9c-9d    01:19:00  01:47:00
35.P8g-8f    02:23:00  01:47:00
36.P8c-8d    02:23:00  02:12:00
37.P1g-1f    02:24:00  02:12:00
38.P1c-1d    02:24:00  02:13:00
39.N8i-7g    02:24:00  02:13:00
40.R2b-2a    02:24:00  02:25:00
41.N2i-3g    02:26:00  02:25:00
42.G4a-4b    02:26:00  02:28:00
43.R2h-2i    02:28:00  02:28:00

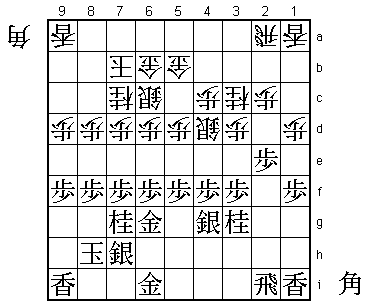
Black has won the opening. His position is much more natural than
white's. Black's castle is stronger and the silver on 4d combined
with the knight on 3c is awkward. Still, it will be hard for black
to find a way to attack, so some were already concerned about
sennichite.

44.G4b-5b!?  02:28:00  03:06:00

"A blunder?", "Impossible to understand", were the comments here.
The general opinion was that Sato has nothing but to invite the
sennichite with G4b-3b-4b. Playing for sennichite is not Sato's
style, but he may have done it in this position. However, he was
worried that while he was switching his gold back and forth, black
would first make a silver crown and then play L9h followed by R9i,
attacking the weak edge of the king. 44.G5b is in general not a
good move, as it leaves a gaping hole on 3b for the black bishop.
However, psychologically this may have been the best way to play.
When your position is suspect, make it a little more suspect and
invite the opponent to attack. Riding the wave of the opponent
attack will open new possibilities for you as well. Of course,
attacking should not be too easy and this condition is also met
here. Black has several options: 45.B*3b, 45.S8g or 45.P4e.

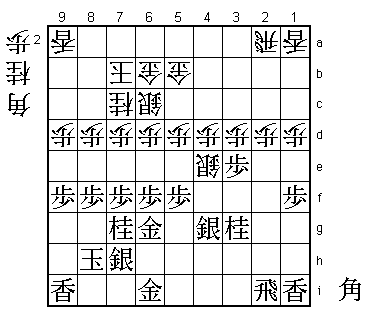
45.P4f-4e?   03:03:00  03:06:00

After 35 minutes, Maruyama chooses the worst of the three. Both
45.B*3b R8a P2d and 45.S8g (aiming at G7h-L9h-R9i followed by the
edge attack) P5e G7h Px5f Sx5f B*3h are better than 45.P4e.

46.N3cx4e    03:03:00  03:10:00

Maruyama might have counted on 46.S5c, after which 47.B*3b is better
than without the pawn push to 4e (the knight on 3c is now hanging).
However, Sato decides to sacrifice material and start a counter attack.

47.N3gx4e    03:03:00  03:10:00
48.S4dx4e    03:03:00  03:10:00
49.N*3g      03:12:00  03:10:00
50.P4c-4d    03:12:00  03:10:00
51.P2e-2d    03:16:00  03:10:00
52.P2cx2d    03:16:00  03:27:00
53.P3f-3e?   03:18:00  03:27:00

Completely underestimates the attacking possibilities of the white
position. Maruyama still thinks he has time for a slow move like P3e
and push white off the board. Maruyama probably had seen that 53.Nx4e
Px4e B*3b looks much more promising than it actually is after R8a
Rx2d P9e Px9e P*9h Lx9h P8e and even though this looks like an
unclear position, white has the nasty B*1c and the bishop on 3b
is hopelessly out of place.

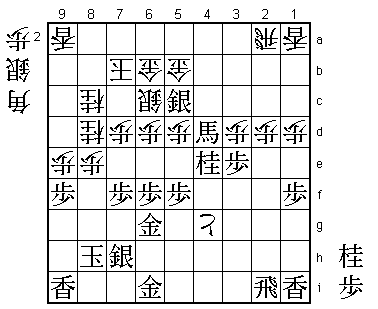
54.N*8c!     03:18:00  03:34:00

This must have been a cold shower for Maruyama. This knight opens
up all kinds of attacking possibilities for white.

55.P8f-8e?   03:31:00  03:34:00

This second mistake in a row ruins black's position. Maruyama is
hoping to use a knight on 8d to attack, but 55.P8e only weakens his
own king.

56.N7cx8e    03:31:00  03:35:00
57.N7gx8e    03:31:00  03:35:00
58.P8dx8e    03:31:00  03:35:00
59.B*3c      03:31:00  03:35:00
60.N*8d      03:31:00  03:39:00

The irony is that white is using 8d as a drop square for the knight.
This double knight attack is very strong.

61.B3cx4d+   03:33:00  03:39:00
62.P*4f      03:33:00  03:39:00
63.N3gx4e    03:33:00  03:39:00
64.P4fx4g+   03:33:00  03:39:00
65.S*5c      03:33:00  03:39:00
66.P9d-9e    03:33:00  03:44:00

This position is all white's, naturally attacking from both sides.
There is no way the black king can survive this onslaught. Black will
always be one move late.

67.K8h-8i    03:37:00  03:44:00
68.P9ex9f    03:37:00  03:45:00
69.P*9h      03:37:00  03:45:00
70.R2a-4a    03:37:00  03:51:00

The decider. This forces black to sacrifice a lot of material or forget
about attacking.

71.S5cx6b+   03:38:00  03:51:00
72.G5bx6b    03:38:00  03:51:00
73.+B4dx6b   03:44:00  03:51:00
74.K7bx6b    03:44:00  03:51:00
75.G*5c      03:44:00  03:51:00
76.K6b-7c    03:44:00  03:51:00

77.S7h-7g    03:46:00  03:51:00

Despite the white lead, in the end it all comes down to a nice mate.
Black has to defend here, because 77.Rx2d leads to mate after 78.S*8h
Kx8h B*9g Px9g Px9g+ K7i B*8h K6h Nx7f Gx7f S*5g K6g N7e Gx7e Bx6f+.
A beautiful mate that shows how strong the two white knights are.

78.R4ax4e    03:46:00  03:54:00
79.G*6b      03:48:00  03:54:00
80.S6c-7b    03:48:00  03:54:00
81.R2ix2d    03:48:00  03:54:00
82.S*8g      03:48:00  03:55:00
83.R2d-2b+   03:48:00  03:55:00
84.B*7h      03:48:00  03:56:00
Resigns      03:48:00  03:56:00

Mate after 85.Gx7h Sx7h+ Kx7h S*8g Kx8g B*6i S*7h N9e K8h G*8g K7i
Bx7h+. A disappointing loss for Maruyama, who saw a good position
evaporate in just a few moves. Winning with white in a best-of-five
match is huge. Now Sato only needs one more game from the next three
to defend his Kisei title. On the other end, coming back from 2-0
behind is no exception. Sato did it himself against Goda last year
and Maruyama also came back from 0-2 in his Kio match against Habu.
Sato can't afford to take things easy.
