74th Kisei Match Game 1
[Black "Sato Yasumitsu, Kisei"]
[White "Maruyama Tadahisa, Challenger"]
[Event "74th Kisei-sen, Game 1"]
[Date "June 7th 2003"]
1.P2g-2f     00:01:00  00:00:00

The furigoma already puts Sato under a little bit of pressure. Maruyama
is very easy to prepare against, as he plays all the important games
with the Kakugawari when he is black and with the R8e-Yokofudori with
white. Especially beating him with white in the Kakugawari is considered
almost impossible. Considering the possibility of a loss in the second
game, Sato already needs this first game with black very badly in the
short Kisei match.

2.P3c-3d     00:01:00  00:00:00
3.P7g-7f     00:01:00  00:00:00
4.P8c-8d     00:01:00  00:00:00
5.P2f-2e     00:01:00  00:00:00
6.P8d-8e     00:01:00  00:00:00
7.G6i-7h     00:01:00  00:00:00
8.G4a-3b     00:01:00  00:00:00
9.P2e-2d     00:01:00  00:00:00
10.P2cx2d    00:01:00  00:00:00
11.R2hx2d    00:01:00  00:00:00
12.P8e-8f    00:01:00  00:00:00
13.P8gx8f    00:01:00  00:00:00
14.R8bx8f    00:01:00  00:00:00
15.R2dx3d    00:01:00  00:00:00
16.B2b-3c    00:01:00  00:00:00
17.R3d-3f    00:01:00  00:00:00
18.K5a-4a    00:01:00  00:00:00
19.P*8g      00:02:00  00:00:00
20.R8f-8e    00:02:00  00:02:00
21.R3f-2f    00:02:00  00:02:00
22.S3a-2b    00:02:00  00:02:00
23.K5i-5h    00:03:00  00:02:00
24.S7a-6b    00:03:00  00:23:00
25.P3g-3f    00:08:00  00:23:00
26.G6a-5a    00:08:00  00:28:00
27.S3i-3h    00:11:00  00:28:00
28.P7c-7d    00:11:00  00:32:00
29.P3f-3e    00:23:00  00:32:00
30.R8ex3e    00:23:00  00:37:00
31.B8hx3c+   00:23:00  00:37:00
32.N2ax3c    00:23:00  00:38:00
33.B*4f      00:23:00  00:38:00
34.P*2e      00:23:00  00:46:00
35.R2f-1f    00:26:00  00:46:00
36.R3e-3d    00:26:00  00:46:00
37.P*3e      00:29:00  00:46:00
38.R3d-4d    00:29:00  00:47:00
39.B4fx9a+   00:29:00  00:47:00
40.N8a-7c    00:29:00  00:47:00
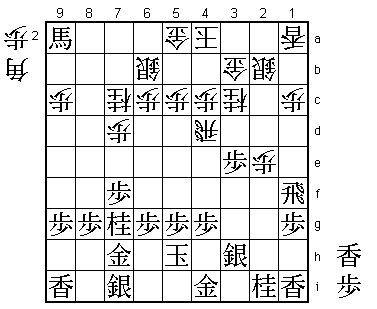
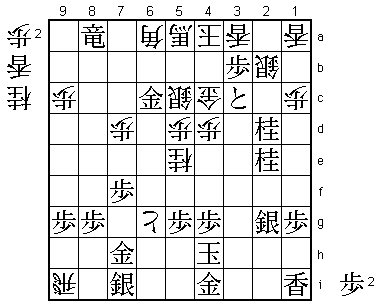
41.N8i-7g!?  00:54:00  00:47:00

A new move. In the past, two alternatives have been played: 41.R3f and
41.P7e. Sato has experience with 41.R3f, as this is what he played in
January last year in the first game of the Osho match against Habu.
The idea of 41.N7g is to defend against a bishop drop on 5e, but it
also gives white the opportunity to attack the head of this knight.
Good or bad is impossible to judge. Even Sato himself admitted that
he played this move more to surprise Maruyama than because he thought
it was a sound way to play this position.

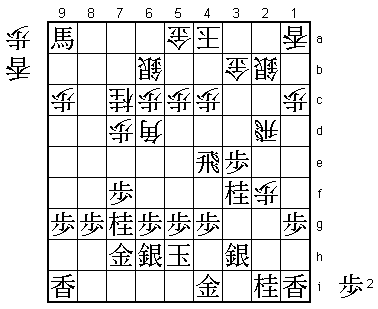
42.R4d-2d    00:54:00  01:57:00

Maruyama takes 70 minutes for his reply and that is already a big
plus for Sato in a match where each player only has 4 hours for the
game. Maruyama had a hard time deciding between 42.R2d and 42.N4e.
The latter move also looks playable after 42.N4e S6h P*3g S2g B*2h
P4f Bx1i+ Px4e. Further analysis is needed to find out which move
is better.

43.S7i-6h    01:11:00  01:57:00
44.N3c-4e    01:11:00  02:13:00
45.R1f-4f    02:13:00  02:13:00
46.P2e-2f    02:13:00  02:34:00
47.L*2h      02:20:00  02:34:00
48.B*6d      02:20:00  02:44:00
49.L2hx2f    02:24:00  02:44:00
50.P*2e      02:24:00  02:44:00
51.R4fx4e    02:24:00  02:44:00
52.P2ex2f    02:24:00  02:44:00
53.N*3f      02:25:00  02:44:00

54.R2d-5d    02:25:00  03:38:00

The alternative was 54.R1d. For example, 54.R1d N8e N6e N7c+ Bx7c +Bx7c
Sx7c Rx6e B*5d R6f S6d N*2d and black threatens to go for the white
rook with P1f. Still, this position is very much unclear.

55.N7g-8e    02:28:00  03:38:00
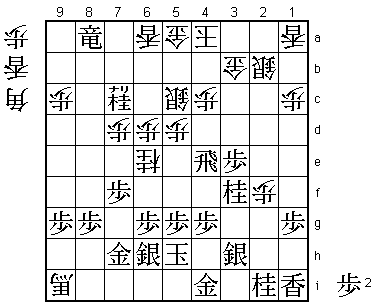
56.N7c-6e?!  02:28:00  03:50:00

This might not have been the best move. Better is perhaps 56.L*4d and
after 57.Rx4d Px4d Nx7c+ Bx7c +Bx7c Sx7c it seems that black can
strongly play L*5f R6d Lx5c+, but then B*4e is again difficult.

57.+B9ax6d   02:29:00  03:50:00
58.P6cx6d    02:29:00  03:50:00
59.B*8a      02:30:00  03:50:00
60.B*3c      02:30:00  03:50:00
61.B8ax5d+   02:46:00  03:50:00
62.P5cx5d    02:46:00  03:50:00
63.R*8c      02:47:00  03:50:00
64.B3cx9i+   02:47:00  03:50:00
65.N8e-7c+   02:59:00  03:50:00
66.S6b-5c    02:59:00  03:50:00
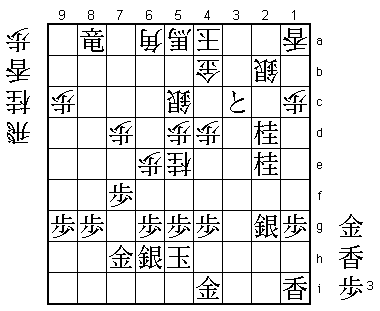
67.R8c-8a+?! 03:13:00  03:50:00

Sato criticized his own move here and suggested 67.+N6c as better.
Still, the black advantage does not change much, although Sato needs
to find some difficult moves to keep Maruyama under control.

68.L*6a      03:13:00  03:51:00

69.R4ex6e!   03:21:00  03:51:00

The only way to keep the advantage.

70.P6dx6e    03:21:00  03:51:00
71.N*6c      03:21:00  03:51:00
72.+B9i-3c   03:21:00  03:51:00
73.P3e-3d    03:21:00  03:51:00
74.+B3c-4b   03:21:00  03:51:00
75.N6cx5a+   03:21:00  03:51:00
76.+B4bx5a   03:21:00  03:51:00
77.+N7c-7b   03:21:00  03:51:00
78.B*9d      03:21:00  03:52:00
79.N2i-3g    03:24:00  03:52:00

Again Sato condemned his own move, claiming he had made things
difficult here. Still, he did not give an alternative that would
have been better.

80.P2f-2g+   03:24:00  03:53:00
81.S3hx2g    03:25:00  03:53:00
82.P4c-4d    03:25:00  03:53:00
83.N3g-2e    03:29:00  03:53:00
84.N*5e      03:29:00  03:54:00
85.+N7bx6a   03:40:00  03:54:00
86.B9dx6a    03:40:00  03:54:00
87.N3f-2d    03:41:00  03:54:00
88.G3b-4b    03:41:00  03:57:00
89.P3d-3c+   03:49:00  03:57:00

90.R*9i?     03:49:00  03:59:00

Maruyama has run out of time and shoots an air ball here. However, the
obvious 90.Bx2e fails to 91.+Px4b Kx4b L*3f! and after P*3e black has
the time to give his attack decisive strength.

91.S6h-7i    03:50:00  03:59:00

This simple defense puts the rook out of play.

92.P6e-6f    03:50:00  03:59:00
93.L*4c      03:53:00  03:59:00
94.G4bx4c    03:53:00  03:59:00
95.G*6c      03:53:00  03:59:00
96.P6fx6g+   03:53:00  03:59:00
97.K5h-4h    03:53:00  03:59:00
98.L*3a      03:53:00  03:59:00
99.P*3b      03:56:00  03:59:00

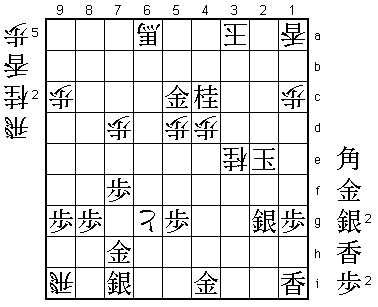
Here Sato was a little afraid that Maruyama might have something as
this is no mating threat. If he would have had the time, he might
have completely read out 99.+Px4c and concluded that he would win
after 100.N*5f Px5f Nx4g+ Kx4g L*4e P*4f Lx4f Kx4f +Bx2d P*3e +Bx3e
K3g +Bx2e P*3d.

100.N5ex4g+  03:56:00  03:59:00

Sato does not need to worry. The white attack just comes up short.

101.K4hx4g   03:56:00  03:59:00
102.N*3e     03:56:00  03:59:00
103.K4g-3f   03:56:00  03:59:00
104.S2bx3c   03:56:00  03:59:00
105.N2ex3c+  03:57:00  03:59:00
106.G4cx3c   03:57:00  03:59:00
107.G6cx5c   03:57:00  03:59:00
108.G3cx2d   03:57:00  03:59:00
109.P3bx3a+  03:57:00  03:59:00
110.K4ax3a   03:57:00  03:59:00
111.+R8ax6a  03:57:00  03:59:00
112.G2d-2e   03:57:00  03:59:00
113.K3fx2e   03:57:00  03:59:00
114.+B5ax6a  03:57:00  03:59:00
115.N*4c     03:57:00  03:59:00
Resigns      03:57:00  03:59:00

Answering check with check ends this game. Every move with the white
king leads to mate, while 115.+Bx4c Gx4c leaves white without attack
and without defense. A difficult game in which it is not completely
clear where Maruyama made a mistake. The pressure is now on him to
equalize in the second game with black in the Kakugawari opening.
