73rd Kisei Match Game 5
Black: Sato Yasumitsu, Challenger
White: Goda Masataka, Kisei
73rd Kisei-sen, Game 5, August 1st 2002
1.P7g-7f     00:00:00  00:00:00

The final game of the Kisei match started with a surprisingly confident
looking Goda. He was thought to have quite a big psychological
disadvantage as he allowed Sato to come back from 2-0 down. Maybe
the venue of the game was in Goda's favour, as this game was played
at the same location where Goda took the Kisei title from Habu last year.

2.P8c-8d     00:00:00  00:00:00
3.P2g-2f     00:01:00  00:00:00
4.P8d-8e     00:01:00  00:00:00
5.B8h-7g     00:01:00  00:00:00
6.P3c-3d     00:01:00  00:00:00
7.S7i-8h     00:01:00  00:00:00
8.G4a-3b     00:01:00  00:01:00
9.G6i-7h     00:01:00  00:01:00
10.B2bx7g+   00:01:00  00:02:00
11.S8hx7g    00:01:00  00:02:00
12.S3a-4b    00:01:00  00:02:00
13.S3i-3h    00:01:00  00:02:00
14.S7a-7b    00:01:00  00:02:00
15.P9g-9f    00:01:00  00:02:00
16.P9c-9d    00:01:00  00:02:00
17.P1g-1f    00:02:00  00:02:00
18.P1c-1d    00:02:00  00:02:00
19.P4g-4f    00:02:00  00:02:00
20.P6c-6d    00:02:00  00:02:00
21.S3h-4g    00:02:00  00:02:00
22.S7b-6c    00:02:00  00:04:00
23.K5i-6h    00:02:00  00:04:00
24.G6a-5b    00:02:00  00:07:00
25.K6h-7i    00:04:00  00:07:00
26.K5a-4a    00:04:00  00:10:00
27.S4g-5f    00:08:00  00:10:00
28.S6c-5d    00:08:00  00:10:00
29.P3g-3f    00:11:00  00:10:00
30.K4a-3a    00:11:00  00:14:00
31.N2i-3g    00:16:00  00:14:00
32.P7c-7d    00:16:00  00:14:00
33.G4i-5h    00:23:00  00:14:00
34.P4c-4d    00:23:00  00:22:00
35.P6g-6f    00:29:00  00:22:00
36.S4b-3c    00:29:00  00:26:00

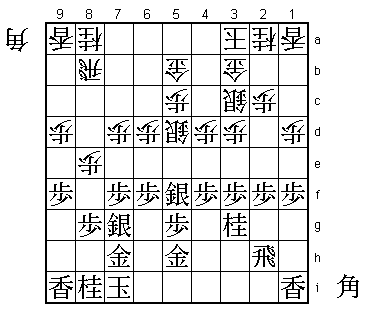
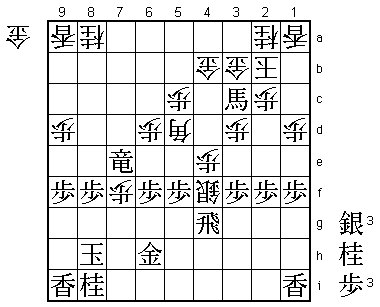
The furigoma has given Kisei challenger Sato Yasumitsu black and he
chooses the reclining silver variation of the Kakugawari. He is a
high winning percentage with this opening, so this will not have
surprised Goda. He prepared something very interesting that starts
with moving up this silver early. Usually, white delays this move
until black plays P2e, because it is generally thought that the
attack with N2e followed by P4e is good if white has the silver on 3c.
This game might change that opinion.

37.R2h-4h    00:35:00  00:26:00
38.G5b-4b    00:35:00  00:28:00
39.K7i-8h    00:36:00  00:28:00
40.K3a-2b    00:36:00  00:29:00
41.N3g-2e    01:31:00  00:29:00
42.S3c-2d    01:31:00  00:54:00
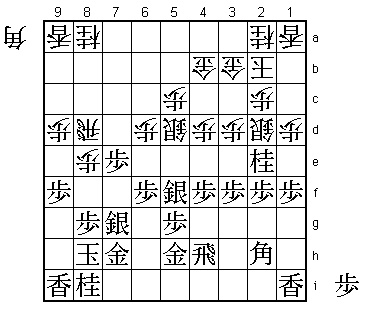
43.B*2h      01:31:00  00:54:00

And white is in trouble as there seems to be no good way to defend
against the attack P4e, or so everyone thought.

44.P7d-7e!   01:31:00  00:58:00
45.P7fx7e    01:38:00  00:58:00
46.R8b-8d!   01:38:00  01:26:00

A very good new idea by Goda. Moving the rook out of harm's way and
defending the pawn on 6d at the same time defends against all the good
attacking options black has. This includes the attack P4e, which has
some serious problems with the open diagonal 5d to 8g as we will soon
see.

47.P4f-4e    02:46:00  01:26:00

Sato sees the problems, but needs 68 minutes of agony to make the
decision that it is the only way to avoid a passive position. Rather
than waiting for the axe to fall, he chooses to fight.

48.P4dx4e    02:46:00  01:32:00
49.S5fx4e    02:48:00  01:32:00
50.S5dx4e    02:48:00  01:32:00
51.R4hx4e    02:48:00  01:32:00
52.P*7f      02:48:00  02:22:00

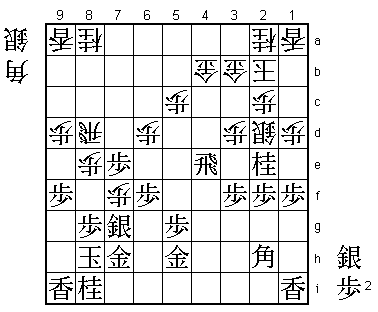
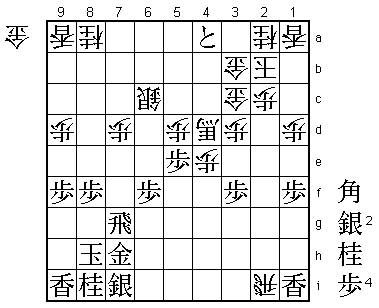
The problem. It is hard to take this pawn: 52.Sx7f B*5d R4h Bx7f
G5h-6g B5d S*5a P8f Px8f Rx8f P*8g R8b and white seems better. If
black retreats with S6h, the attacking base on 7g is very good for white.

53.B2h-5e    03:01:00  02:22:00
54.S*3c      03:01:00  02:40:00
55.N2ex3c+?  03:05:00  02:40:00

Looks like the only move, but better is 55.S*5a and after 56.Px7g+
Gx7g S*3a Sx4b+ S3ax4b Nx3c+ the defence around the white king is
also weakened.

56.S2dx3c    03:05:00  02:40:00
57.S7g-6h    03:05:00  02:40:00
58.B*5d      03:05:00  02:51:00
59.R4e-4f    03:19:00  02:51:00
60.N*6c      03:19:00  03:16:00
61.P5g-5f!   03:21:00  03:16:00

Good fighting move. Sato tries to confuse Goda by giving him several
moves that look good.

62.N6cx7e    03:21:00  03:27:00

62.Nx5e Px5e B6c also looks good, but Goda can't be blamed for wanting
to use this knight on the head of the opponent king.

63.S*9g      03:27:00  03:27:00
64.P8e-8f?   03:27:00  03:31:00

Goda misses his best chance to keep his Kisei title here. 64.P9e!
first would have made black's task extremely difficult after 65.Px9e
P8f Sx8f Rx8f Px8f S*6i R*7a P*8g K9g Lx9e P*9f P*4e (shutting out the
rook) R4h Sx7h= Px9e P8h+ K9f P7g+ and the white attack is unstoppable.
64.P9e is a typical move that a professional would play to open up
lines with some pawn sacrifices before the actual attack, so it is
strange that Goda didn't play it.

65.S9gx8f    03:29:00  03:31:00
66.R8dx8f    03:29:00  03:32:00
67.P8gx8f    03:29:00  03:32:00
68.S*6i      03:29:00  03:40:00
69.R*7a      03:31:00  03:40:00
70.S6ix5h+   03:31:00  03:41:00

The difference is that 70.P*8g fails to 71.K9g. White no longer has
any pawns in hand to shut out the rook on 4e, so the threat Rx4b+ Gx4b
S*3a is very hard to defend against. If white tries to get into the
variation above with 72.P9e, black has time to play 73.P8e and escape
up the board after 74.Px9f K8f.

71.R7ax7e+   03:33:00  03:41:00

With this knight out of the way, the position has become quite
complicated. Black probably already has the upper hand here.

72.P*4e      03:33:00  03:45:00
73.R4f-4g    03:33:00  03:45:00
74.+S5hx6h   03:33:00  03:45:00
75.G7hx6h    03:33:00  03:45:00
76.S*4f      03:33:00  03:45:00
77.B5ex3c+?! 03:36:00  03:45:00

According to Tomioka (7-dan), simply 77.R1g would have won more quickly.
For example 78.Sx5e Px5e B4c G7h B*4h P1e and the black attack is very
strong.

78.G4bx3c    03:36:00  03:46:00
79.R4g-8g    03:36:00  03:46:00
80.B*5i      03:36:00  03:48:00
81.S*7i      03:37:00  03:48:00
82.B5ix2f+   03:37:00  03:50:00
83.P*4b      03:38:00  03:50:00
84.+B2f-4d   03:38:00  03:53:00
85.S*5e      03:44:00  03:53:00
86.S4fx5e    03:44:00  03:53:00
87.P5fx5e    03:44:00  03:53:00
88.P7f-7g+   03:44:00  03:53:00
89.R8gx7g    03:44:00  03:53:00
90.P*7d      03:44:00  03:53:00
91.+R7ex6d   03:44:00  03:53:00
92.S*6c      03:44:00  03:54:00
93.+R6dx5d   03:44:00  03:54:00
94.P5cx5d    03:44:00  03:54:00
95.P4b-4a+   03:44:00  03:54:00
96.R*2i      03:44:00  03:57:00
97.G6h-7h    03:49:00  03:57:00

98.+B4d-5c?  03:49:00  03:57:00

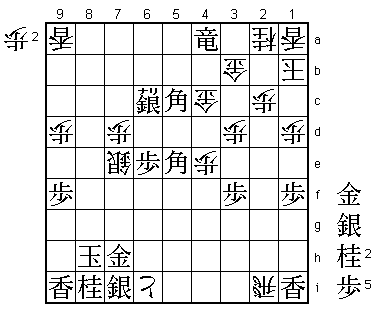
The losing move. After 98.+Bx5e S*4b +Bx6f Sx3c+ +Bx3c S*4b +Bx7g the
outcome of the game is still unclear.

99.S*4b      03:52:00  03:57:00

This is now also an attack on the white promoted bishop, so 98.+B5c only
helped black to speed up the attack.

100.+B5cx8f  03:52:00  03:58:00
101.P*8g     03:52:00  03:58:00
102.+B8fx4b  03:52:00  03:59:00
103.+P4ax4b  03:52:00  03:59:00
104.G3bx4b   03:52:00  03:59:00
105.P5ex5d   03:52:00  03:59:00
106.S*6d     03:52:00  03:59:00
107.P6f-6e   03:53:00  03:59:00
108.S6d-7e   03:53:00  03:59:00
109.P5d-5c+  03:53:00  03:59:00
110.G4bx5c   03:53:00  03:59:00
111.S*4b     03:53:00  03:59:00
112.G*3b     03:53:00  03:59:00
113.S4bx5c+  03:53:00  03:59:00
114.P*8f     03:53:00  03:59:00
115.+S5cx6c  03:53:00  03:59:00
116.P8fx8g+  03:53:00  03:59:00
117.R7gx8g   03:53:00  03:59:00
118.P*6h     03:53:00  03:59:00
119.R8gx8a+  03:54:00  03:59:00
120.P6h-6i+  03:54:00  03:59:00
121.B*5c     03:58:00  03:59:00
122.G3c-4c   03:58:00  03:59:00
123.B*5e     03:58:00  03:59:00
124.K2b-1b   03:58:00  03:59:00
125.+R8a-4a  03:58:00  03:59:00
Resigns      03:58:00  03:59:00

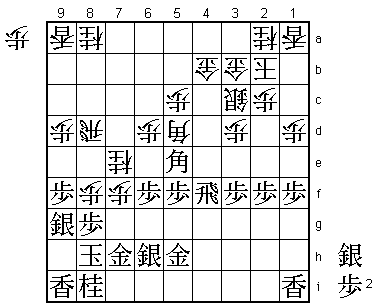
White has only pawns in hand so no real defence against +Rx3b, so there is
nothing else but to resign. Sato takes the Kisei title from Goda and
for the first time in his career holds two major titles at the same
time. Rather than being happy, he said his main feelings after the game
were that he just couldn't believe it. Not surprisingly, as this seemed
to be a match that would go Goda's way on several occasions. First, he
took a 2-0 lead that slipped away and then he sees a good position in
this final game go bad as well. This will be a tough match to recover
from for Goda.
