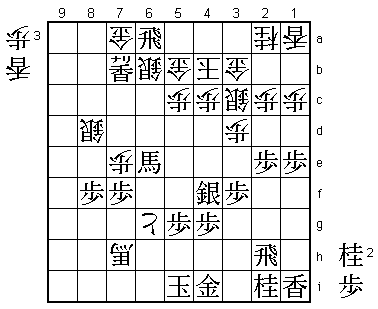
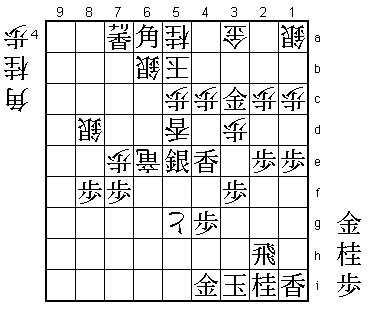
73rd Kisei Match Game 4
Black: Sato Yasumitsu, Challenger
White: Goda Masataka, Kisei
73rd Kisei-sen, Game 4, July 18th 2002
1.P7g-7f     00:01:00  00:00:00
2.P8c-8d     00:01:00  00:00:00
3.P2g-2f     00:02:00  00:00:00
4.P8d-8e     00:02:00  00:00:00
5.B8h-7g     00:02:00  00:00:00
6.P3c-3d     00:02:00  00:00:00
7.S7i-8h     00:02:00  00:00:00
8.G4a-3b     00:02:00  00:00:00
9.P2f-2e!?   00:06:00  00:00:00

In the Kakugawari, black usually postpones this move to keep the
option of a quick attack with N2e later. However, Sato has a
different opening plan.

10.B2bx7g+   00:06:00  00:00:00
11.S8hx7g    00:06:00  00:00:00
12.S3a-2b    00:06:00  00:00:00
13.S3i-3h    00:06:00  00:00:00
14.S7a-7b    00:06:00  00:00:00
15.P1g-1f    00:06:00  00:00:00

Point number one. If white answers this edge pawn with 16.P1d, his
position will become vulnerable against a climbing silver attack.

16.S2b-3c    00:06:00  00:15:00
17.P3g-3f    00:07:00  00:15:00
18.P6c-6d    00:07:00  00:16:00
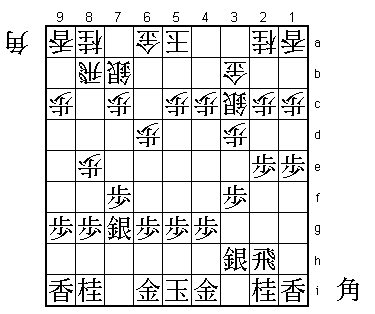
19.P1f-1e!   00:09:00  00:16:00

Point number two. White is more or less committed to a reclining
silver after 18.P6d. Sato now extends the pawn on the edge, which
can be important in attack when the game ends up in a normal double
reclining silver position.

20.K5a-4b    00:09:00  00:19:00
21.G6i-7h    00:09:00  00:19:00
22.G6a-5b    00:09:00  00:19:00
23.P9g-9f    00:15:00  00:19:00
24.P7c-7d    00:15:00  00:52:00
25.K5i-6h    00:54:00  00:52:00
26.S7b-7c?!  00:54:00  01:33:00

Goda judges that a double reclining silver position with the pawn on
1e is favourable for black, so instead he plays a climbing silver
attack. However, this is not a well-balanced strategy with the pawn
on 6d. Sato's subtle opening play has paid off: black has the better
position.

27.S3h-3g    00:55:00  01:33:00
28.S7c-8d    00:55:00  01:33:00
29.S7g-6f    00:58:00  01:33:00
30.P9c-9d    00:58:00  01:33:00

Goda sticks with his climbing silver. An alternative was 30.S7c, but
Goda didn't like 31.S4f P8f Px8f Rx8f P*8g R8b P3e which gives black
a good looking attack which is further strengthened by the pawn on 1e.

31.S3g-4f    01:01:00  01:33:00
32.P9d-9e    01:01:00  01:39:00
33.P9fx9e    01:07:00  01:39:00
34.L9ax9e    01:07:00  01:39:00

The joseki books state that one should capture with the silver, but in
this position this is a problem after 34.Sx9e Lx9e Lx9e B*6a.

35.P*9g      01:09:00  01:39:00
36.P7d-7e    01:09:00  01:41:00
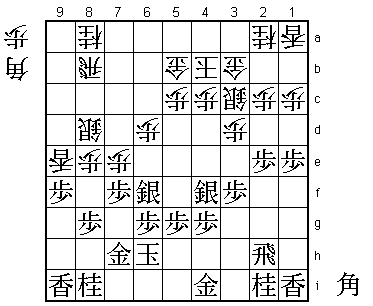
37.P9g-9f!   02:05:00  01:41:00

Top class play. Sato pushes the pawn he just dropped one move earlier.
The move expected in the press room was P3e as black can't play
37.Px7e P8f Px8f P6e Sx6e Sx7e and white has a strong attack. Sato's
pawn push shows what an exceptionally good player he is. There is a
world of difference between the position with the white pawn on 7d
or 7e as will become clear soon.

38.P8e-8f?   02:05:00  02:02:00

After the game Goda said this was the losing move. He should have tried
38.Lx9f Lx9f P*9e P3e Px9f Px3d S4d L*3i P9g+ here. Black will probably
attack with P3c+ and still looks to have the upper hand, but this seemed
to have been white's best fighting chance.

39.P8gx8f    02:06:00  02:02:00
40.L9ex9f    02:06:00  02:02:00
41.L9ix9f    02:06:00  02:02:00
42.B*9h      02:06:00  02:21:00
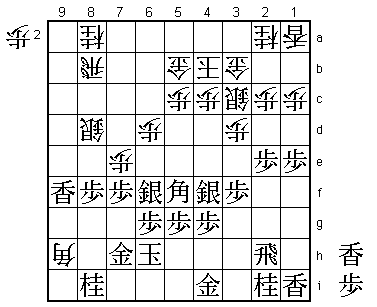
43.B*5f!     02:43:00  02:21:00

The point of pushing the edge pawn only after white played P7e. This
bishop is going to create havoc in the white position.

44.B9hx8i+   02:43:00  02:28:00

Everything would have been alright if 44.P6e would have worked.
Unfortunately for Goda, after 45.G8h Bx7f+ S7g the white bishop dies.

45.L9f-9b+   02:43:00  02:28:00
46.R8b-6b    02:43:00  02:31:00
47.B5f-8c+   02:43:00  02:31:00

Not only promotion of the bishop, also the silver on 8d is now just a
worthless piece of wood.

48.N*5d      02:43:00  03:12:00
49.+L9bx8a   02:45:00  03:12:00
50.N5dx6f    02:45:00  03:12:00
51.P6gx6f    02:45:00  03:12:00
52.P6d-6e    02:45:00  03:12:00
53.K6h-5i!   03:08:00  03:12:00

"An early escape is worth 8 moves". White has tried hard to set up an
attack, but this pretty much kills the effort. Dangerous would have
been 53.+Bx8d Px6f +Bx6b Gx6b and white threatens +Bx7h next.

54.P6ex6f    03:08:00  03:13:00
55.L*6e      03:11:00  03:13:00

Wins the rook. Here a quick end of the game was expected, but from
here one Goda shows a lot of fighting spirit to hang in there,
hoping for a miracle.

56.R6bx6e    03:11:00  03:13:00
57.+B8cx6e   03:11:00  03:13:00
58.P6f-6g+   03:11:00  03:13:00
59.R*6a      03:22:00  03:13:00
60.S*6b      03:22:00  03:19:00
61.+L8a-8b   03:23:00  03:19:00
62.+B8ix7h   03:23:00  03:21:00
63.+L8b-7b   03:26:00  03:21:00
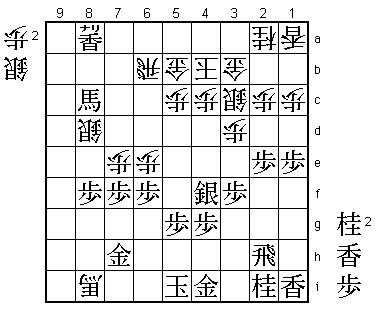
64.G*7a!     03:26:00  03:22:00

Nice defence. 65.+Lx7a fails to 66.G5a, which wins the rook and gives
white hope to turn things around.

65.R6ax2a+!  03:27:00  03:22:00

Sato was taken by surprise by 64.G*7a, but takes only one minute to
find the correct reply. Giving up the rook is inevitable, but taking
this knight gives black a strong attack with N*6d.

66.G3b-3a    03:27:00  03:22:00
67.+R2ax1a   03:28:00  03:22:00
68.S3c-2b    03:28:00  03:22:00
69.N*6d      03:30:00  03:22:00
70.+B7h-7g   03:30:00  03:29:00

Or 70.Sx1a Nx5b+ Kx5b Rx7h +Px7h N*4d and mate.

71.K5i-4h    03:30:00  03:29:00

With the black king in safe territory, the outcome of the game is clear.

72.S2bx1a    03:30:00  03:29:00
73.N6dx5b+   03:31:00  03:29:00
74.K4bx5b    03:31:00  03:29:00
75.N*5e      03:31:00  03:29:00
76.+P6gx5g   03:31:00  03:29:00
77.K4h-3i    03:36:00  03:29:00
78.L*5d      03:36:00  03:30:00
79.L*4e      03:38:00  03:30:00
80.N*5a      03:38:00  03:30:00
81.+L7bx7a   03:53:00  03:30:00
82.R*6i      03:53:00  03:43:00
83.G*3c      03:56:00  03:43:00
84.+B7gx5e   03:56:00  03:45:00
85.S4fx5e    03:56:00  03:45:00
86.R6ix6e+   03:56:00  03:45:00
87.B*6a      03:56:00  03:45:00
Resigns      03:56:00  03:45:00

White loses the rook after 88.K6c B7b+ K7d N*6f, which leaves him
without attack and defence. A great game by Sato, who took his opening
lead into the endgame and didn't give Goda a single chance to get back
into the game. Goda misses his second opportunity to defend his Kisei
title as Sato ties the match at 2-2 after being 2-0 down. This must be
a real psychological boost for Sato, who should be slightly favoured
to win the decisive fifth game.
