73rd Kisei Match Game 3
Black: Goda Masataka, Kisei
White: Sato Yasumitsu, Challenger
73rd Kisei-sen, Game 3, July 4th 2002
1.P7g-7f     00:00:00  00:00:00
2.P8c-8d     00:00:00  00:01:00
3.G6i-7h     00:02:00  00:01:00
4.P3c-3d     00:02:00  00:05:00
5.P2g-2f     00:02:00  00:05:00
6.P4c-4d     00:02:00  00:05:00
7.P2f-2e     00:10:00  00:05:00
8.B2b-3c     00:10:00  00:05:00
9.S3i-4h     00:10:00  00:05:00
10.G6a-5b    00:10:00  00:10:00
11.P4g-4f    00:10:00  00:10:00

Goda again plays this move early. In the first game he was successful,
but that may in part have been because he surprised Sato. As this
element of surprise is no longer there, it is likely that Sato
prepared something this time.

12.G5b-4c    00:10:00  00:12:00
13.S4h-4g    00:10:00  00:12:00
14.S7a-6b    00:10:00  00:14:00
15.K5i-6i    00:10:00  00:14:00
16.P5c-5d    00:10:00  00:24:00
17.G4i-5h    00:17:00  00:24:00
18.S6b-5c    00:17:00  00:32:00
19.P3g-3f    00:23:00  00:32:00
20.P8d-8e    00:23:00  01:12:00
21.B8h-7g    00:47:00  01:12:00
22.K5a-4b    00:47:00  01:12:00
23.S7i-8h    00:47:00  01:12:00
24.K4b-3b    00:47:00  01:14:00
25.B7g-5i    00:47:00  01:14:00
26.P7c-7d    00:47:00  01:15:00
27.S8h-7g    00:49:00  01:15:00
28.K3b-2b    00:49:00  01:15:00
29.K6i-7i    00:50:00  01:15:00
30.G4a-3b    00:50:00  01:16:00
31.P6g-6f    00:57:00  01:16:00
32.B3c-5a    00:57:00  01:25:00
33.B5i-2f    01:36:00  01:25:00
34.L1a-1b    01:36:00  01:49:00
35.S4g-5f    01:37:00  01:49:00
36.R8b-7b    01:37:00  02:08:00
37.N2i-3g    01:50:00  02:08:00
38.P7d-7e    01:50:00  02:10:00
39.P7fx7e    01:50:00  02:10:00
40.R7bx7e    01:50:00  02:10:00
41.S5f-6g    01:50:00  02:10:00
42.R7e-7b    01:50:00  02:24:00
43.K7i-8h    01:50:00  02:24:00
44.K2b-1a    01:50:00  02:24:00

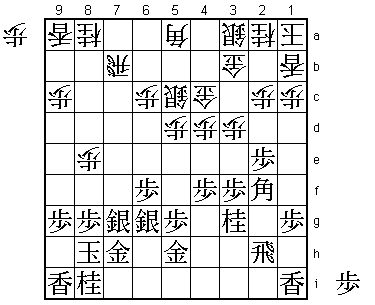
Well, whatever Sato prepared didn't work as both players agreed
that black had won the opening here. Sato said he switched to the
anaguma because he had run out of positive moves.

45.P1g-1f    02:02:00  02:24:00
46.S3a-2b    02:02:00  02:24:00
47.R2h-4h    02:02:00  02:24:00
48.B5a-6b    02:02:00  02:58:00
49.P1f-1e    02:09:00  02:58:00
50.P5d-5e    02:09:00  02:58:00
51.P*7f      02:44:00  02:58:00
52.P9c-9d    02:44:00  03:00:00
53.P4f-4e    02:58:00  03:00:00
54.P4dx4e    02:58:00  03:00:00
55.R4hx4e    02:58:00  03:00:00
56.S5c-4d    02:58:00  03:00:00
57.R4e-4i    02:58:00  03:00:00
58.P*4e      02:58:00  03:02:00
59.P5g-5f    03:07:00  03:02:00
60.P5ex5f    03:07:00  03:11:00
61.S6gx5f    03:07:00  03:11:00
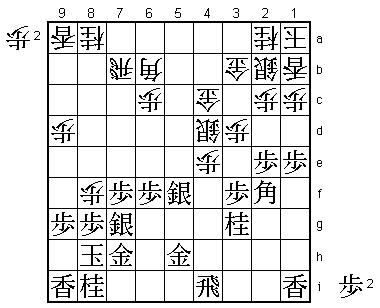
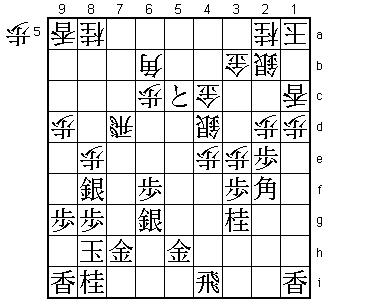
62.P8e-8f!   03:07:00  03:11:00

Sato does everything to create future counter attacks. It is hard
to decide how to take this pawn. As it is likely that the knight
on 3g will be in white's hands later in the game, Sx8f creates the
future threat of N*6d and Px8f creates the potential attack of
P*8g Gx8g N*9e.

63.S7gx8f    03:09:00  03:11:00
64.P3d-3e    03:09:00  03:13:00
65.P1e-1d    03:16:00  03:13:00
66.P1cx1d    03:16:00  03:13:00
67.P2e-2d    03:25:00  03:13:00
68.P2cx2d    03:25:00  03:13:00
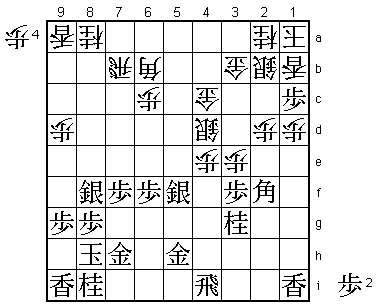
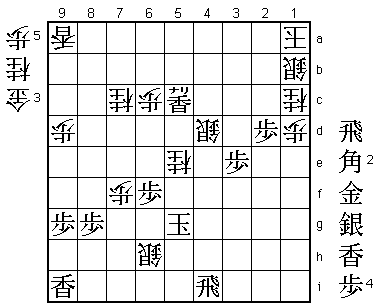
69.P*1c?     03:25:00  03:13:00

Goda regretted this pawn drop very much. He should have played his
attack without handing over pawns. Black is voluntarily giving up
all his pawns and this gives white the opportunity to get his own
attack going.

70.L1bx1c    03:25:00  03:16:00
71.P*5d      03:33:00  03:16:00
72.R7bx7f    03:33:00  03:19:00
73.P*2e      03:35:00  03:19:00
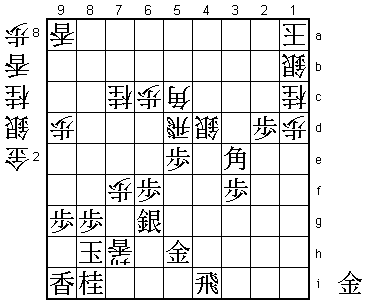
74.P*8e!     03:35:00  03:26:00

Great fighting move. According to Katsumata, a fighting move must at
least fulfil one of the following criteria: 1) surprise the opponent;
2) confuse the opponent because there are many possible replies;
3) make the opponent regret an earlier move. Sato's move deserves
an exclamation mark because it fulfils all three of the criteria.
First, it is a surprising move as both Sx8e and S7g are moves that
attack the white rook, so P*8e doesn't look so powerful. Because
white is in trouble, it must have been a big surprise to Goda that
white can afford to play a passive move like pulling back the rook.
Secondly, it is hard to make a choice between Sx8e, S7g and S6g.
Thirdly, it makes Goda regret 69.P*1c. After 75.S7g R7b Px2d P*7f
S6h P*2c black is in trouble as giving up a knight will give white
the strong attack P8f Px8f P*8g Gx8g N*9e. If Goda would have had
one pawn (the one he dropped on 1c earlier), he could have simply
played 75.S7g R7b P*7f here and everything would have been alright.

75.S5f-6g?   03:46:00  03:26:00

The worst of the three. Both 75.Sx8e R7e P8f and 75.S7g R7b S6g were
better, leading to unclear positions. Not only is 75.S6g the worst
of the three options black had, on top of it, it invites the next
mistake, which loses the game.

76.R7f-7d    03:46:00  03:30:00
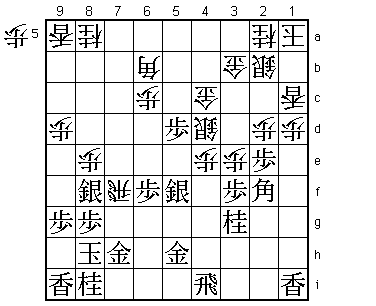
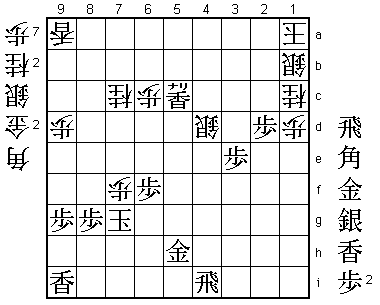
77.P5d-5c+?  03:47:00  03:30:00

Loses a silver. As painful as allowing Rx5d is, Goda should have
allowed it. The white bishop is better positioned on 5c than on 6b.

78.B6bx5c    03:47:00  03:30:00
79.S8fx8e    03:47:00  03:30:00
80.R7d-5d    03:47:00  03:30:00
81.P*1e      03:49:00  03:30:00
82.P1dx1e    03:49:00  03:30:00
83.P2ex2d    03:49:00  03:30:00
84.N8a-7c    03:49:00  03:30:00
85.S8e-7f    03:50:00  03:30:00
86.P*7e      03:50:00  03:30:00

And the silver dies. White has turned the tables.

87.P*1d      03:51:00  03:30:00
88.L1cx1d    03:51:00  03:30:00
89.L1ix1e    03:51:00  03:30:00
90.P7ex7f    03:51:00  03:44:00
91.L1ex1d    03:52:00  03:44:00
92.P*1c      03:52:00  03:44:00
93.L*2e      03:53:00  03:44:00
94.P1cx1d    03:53:00  03:45:00
95.N3gx4e    03:56:00  03:45:00
96.B5c-4b    03:56:00  03:48:00
97.P*1c      03:56:00  03:48:00
98.N2ax1c    03:56:00  03:50:00
99.P2d-2c+   03:56:00  03:50:00
100.G3bx2c   03:56:00  03:50:00
101.L2ex2c+  03:56:00  03:50:00
102.S2bx2c   03:56:00  03:50:00
103.G*5c     03:57:00  03:50:00
104.G4cx5c   03:57:00  03:51:00
105.N4ex5c+  03:57:00  03:51:00
106.B4bx5c   03:57:00  03:51:00
107.P*2d     03:57:00  03:51:00
108.S2c-1b?  03:57:00  03:59:00

This question mark is not for the move itself (which is correct), but
for the time Sato used to play it. He spent his final 8 minutes on
this move, trying to find a mate. He should have saved a little more
time here which he could use later.

109.B2fx3e   03:58:00  03:59:00
110.L*7g     03:58:00  03:59:00
111.P*5e     03:59:00  03:59:00

Both players in byoyomi now. White is winning, but Sato almost throws
it away.

112.L7gx7h+? 03:59:00  03:59:00

A big mistake that could have ended this match. Correct was 112.Rx5e
right away. Giving up the lance is a bad idea as Sato soon realized.
If he had had a little more time, he would undoubtedly have played
112.Rx5e and white wins after 113.Rx4d Lx7h+ Kx7h Rx3e R4a+ G*3a.

113.S6gx7h   03:59:00  03:59:00
114.R5dx5e   03:59:00  03:59:00
115.L*5g!    03:59:00  03:59:00

The difference. This slows down white's attack and the endgame now
gets extremely close. Very uncharacteristically, Sato was visibly
upset with himself here.

116.R5ex3e   03:59:00  03:59:00
117.P3fx3e   03:59:00  03:59:00
118.L*7d     03:59:00  03:59:00
119.L5gx5c+  03:59:00  03:59:00
120.S*7g     03:59:00  03:59:00
121.N8ix7g   03:59:00  03:59:00
122.P7fx7g+  03:59:00  03:59:00
123.S7hx7g   03:59:00  03:59:00
124.L7dx7g+  03:59:00  03:59:00
125.K8hx7g   03:59:00  03:59:00
126.P*7f     03:59:00  03:59:00
127.K7g-6h   03:59:00  03:59:00
128.P7f-7g+  03:59:00  03:59:00
129.K6hx7g   03:59:00  03:59:00
130.P*7f     03:59:00  03:59:00

Sato is desperately trying to find a mate, sacrificing pawns to gain
time. He has a lot of those and every pawn sacrifice gains him two
minutes (one minute per move), so if there is a mate he is likely to
find it eventually. If there is no mate, he will lose this game.

131.K7g-6h   03:59:00  03:59:00
132.P7f-7g+  03:59:00  03:59:00
133.K6hx7g   03:59:00  03:59:00
134.P*7f     03:59:00  03:59:00
135.K7g-6h   03:59:00  03:59:00
136.P7f-7g+  03:59:00  03:59:00
137.K6hx7g   03:59:00  03:59:00
138.P*7f     03:59:00  03:59:00
139.K7g-6h   03:59:00  03:59:00
140.S*7g     03:59:00  03:59:00

A great relief for Sato. He has found the mate.

141.K6h-6g   03:59:00  03:59:00
142.N*5e     03:59:00  03:59:00
143.K6g-5g   03:59:00  03:59:00
144.B*6h     03:59:00  03:59:00
145.G5hx6h   03:59:00  03:59:00
146.S7gx6h=  03:59:00  03:59:00
Resigns      03:59:00  03:59:00

A tough fighting game which finally went Sato's way. With shogi like
this, the objective shogi fan can only hope that Sato also wins the
next game so this Kisei match will go the full distance.
