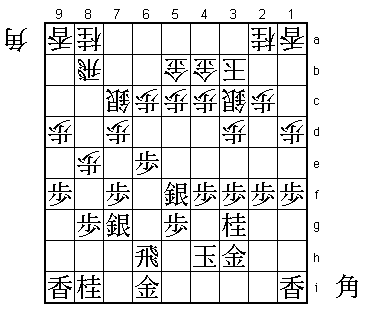
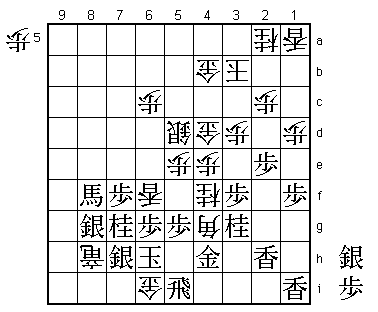
73rd Kisei Match Game 2
Black: Sato Yasumitsu, Challenger
White: Goda Masataka, Kisei
73rd Kisei-sen, Game 2, June 25th 2002
1.P7g-7f 00:00:00 00:00:00
2.P8c-8d 00:00:00 00:01:00
3.P2g-2f 00:01:00 00:01:00
4.P8d-8e 00:01:00 00:01:00
5.B8h-7g 00:01:00 00:01:00
6.P3c-3d 00:01:00 00:01:00
7.S7i-8h 00:01:00 00:01:00
8.B2bx7g+ 00:01:00 00:02:00
9.S8hx7g 00:01:00 00:02:00
10.S3a-2b 00:01:00 00:02:00
11.S3i-3h 00:01:00 00:02:00
12.S7a-7b 00:01:00 00:02:00
13.P4g-4f 00:05:00 00:02:00
14.S2b-3c 00:05:00 00:02:00
15.S3h-4g 00:05:00 00:02:00
16.K5a-4b 00:05:00 00:03:00
17.P3g-3f 00:32:00 00:03:00
18.G6a-5b 00:32:00 00:45:00
19.P6g-6f 00:53:00 00:45:00
20.S7b-8c 00:53:00 01:14:00
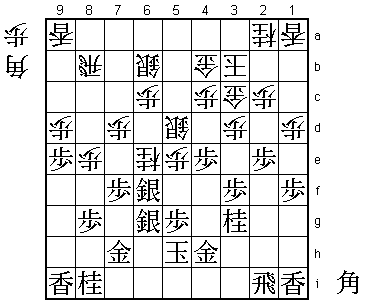
No real surprises in the early opening stage of this game. Sato was
expected to use the Kakugawari (Bishop Exchange) as he has a high
winning percentage with it, while Goda likes to fight the Kakugawari
with the Bogin (Climbing Silver).
21.P9g-9f 00:58:00 01:14:00
22.P9c-9d 00:58:00 01:15:00
23.R2h-6h 01:00:00 01:15:00
24.S8c-8d 01:00:00 01:15:00
25.G4i-3h 01:01:00 01:15:00
26.K4b-3b 01:01:00 01:24:00
27.N2i-3g 01:04:00 01:24:00
28.G4a-4b 01:04:00 01:25:00
29.K5i-4h 01:23:00 01:25:00
Against the Bogin attack, moving the king to the right side of the
board is an often played plan. The Bogin aims at a breakthrough on
the edge, sacrificing the silver for a lance. By moving the king to
the right, this attack will not lead to immediate king danger and
will give black the time to use the material advantage to counter.
30.P7c-7d 01:23:00 01:30:00
31.P6f-6e 01:31:00 01:30:00
32.S8d-7c 01:31:00 01:31:00
When the black king moves to the right, white often abandons his
Bogin plans pulls the silver back to use it in a central position.
This gives up a couple of moves, but black has no quick attack, so
this is not so important in this position.
33.P1g-1f 01:31:00 01:31:00
34.P1c-1d 01:31:00 01:31:00
35.S4g-5f?! 01:56:00 01:31:00
The first important point of the game. By moving up this silver, Sato
gives up the idea of castling on the right. Instead, he intends to
move the king back to left with G7h-K5h-K6i-K7i, as white no longer
has a strong attack with the climbing silver. This seems to take a
lot of moves, but as white also has lost some moves with his silver
manoeuvre, this more or less cancels out.
36.S7c-6b 01:56:00 02:08:00
37.G6i-7h 02:00:00 02:08:00
38.P5c-5d 02:00:00 02:13:00
39.K4h-5h 02:06:00 02:13:00
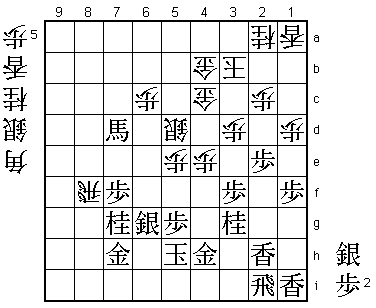
40.S3c-4d! 02:06:00 02:30:00
Aggressive play, but very important. White could just strengthen his
castle with P4d-S5c-G4c(5b), but that would give black the time to
complete the king walk to the left. White will then be stuck for
moves, so Goda decides to play for an early opening of the position,
while the black king is still on 5h.
41.P4f-4e 02:22:00 02:30:00
42.P5d-5e 02:22:00 02:30:00
43.S5f-6g 02:24:00 02:30:00
44.S4d-5c 02:24:00 02:32:00
45.R6h-6i 02:39:00 02:32:00
46.N8a-7c 02:39:00 03:02:00
47.R6i-2i 02:41:00 03:02:00
48.N7cx6e 02:41:00 03:09:00
49.S7g-6f 02:41:00 03:09:00
50.S5c-5d 02:41:00 03:09:00
51.P2f-2e 02:43:00 03:09:00
52.G4b-3c 02:43:00 03:09:00
This is the disadvantage of white's 40th move. Because the silver is
no longer on 3c, white has to defend the pawn exchange on 2d by
moving this gold to a bad square. Goda's judgment at the 40th move
was that this couldn't be helped and that white still would have the
better chances. He was probably right, but things are still far
from easy.
53.G3h-4h 02:51:00 03:09:00
54.G5b-4b 02:51:00 03:13:00
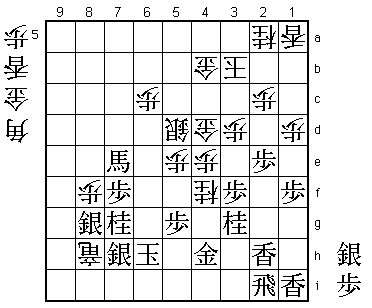
55.P9f-9e! 03:31:00 03:13:00
Very resourceful attack. If black allows white to secure the position
with 56.P6d, he will have no reasonable moves left. It was hard to
find anything good for black in this position, but Sato's 55.P9e is
the only way to put pressure on the white position.

56.P9dx9e    03:31:00  03:19:00
57.S6fx6e    03:31:00  03:19:00
58.S5dx6e    03:31:00  03:19:00
59.N8i-7g    03:31:00  03:19:00
60.S6e-5d    03:31:00  03:19:00
61.N*4f      03:31:00  03:19:00
62.S6b-5c    03:31:00  03:19:00
63.B*7c      03:31:00  03:19:00
64.R8b-8a    03:31:00  03:19:00
65.L9ix9e    03:31:00  03:19:00
66.L9ax9e    03:31:00  03:19:00
67.B7cx9e+   03:31:00  03:19:00

The point of the edge attack. Black has made a promoted bishop
and white needs to attack quickly to make sure that this promoted
bishop is not creating all sorts of trouble in the white camp.

68.P4c-4d    03:31:00  03:21:00
69.+B9e-7c   03:33:00  03:21:00

Black now strongly threatens R9i followed by R9b+.

70.P8e-8f    03:33:00  03:33:00

Goda said that he had overlooked the rook switch, but that he still
felt he was OK because of the P8f attack. In reality, the position
is quite complicated.

71.P8gx8f    03:43:00  03:33:00
72.P4dx4e    03:43:00  03:33:00
73.N4fx5d    03:43:00  03:33:00
74.S5cx5d    03:43:00  03:33:00
75.P*4c?     03:45:00  03:33:00

Sato picks the wrong plan. He should have played 75.R9i P*9h Rx9h
Rx8f P*8g P*9g Rx9g L*9f Px8f Lx9g+ and now black has reasonably
good chances to survive after R*9b N*4f K6h S*8g Rx9g+ R*8i P*6i.
It seemed that Goda thought that he could stop the rook with P*9f
followed by Px9g+ instead of having to use the lance. After the
game Sato regretted playing 75.P*4c, but black still has another
chance to make it interesting.

76.G3cx4c    03:45:00  03:33:00
77.L*2h      03:47:00  03:33:00
78.R8ax8f    03:47:00  03:37:00
79.+B7cx7d?  03:54:00  03:37:00
Here Sato misses his final chance. The simple 79.P*8g would have
still made things quite difficult for white. For example, 80.R9f P2d
Px2d Lx2d P*2h Rx2h R9i+ P*6i S*3i and white seems to be attacking
strongly, but after L2b+ K4a S*6b! (overlooked by Goda) K5b N6e Sx6e
Nx4e black wins. Therefore, after L2b+ white has to play K3c Nx4e
K4d +B6d L*5c and even though it seems that white might survive, it
is not easy to play such a position under time pressure. Note that
instead of L2b+, the variation L2c+ K4a S*6b fails to Sx2h+. After
79.+Bx7d the endgame becomes a display of Goda's attacking skills.
Black never gets another chance to play P2d, so the lance on 2h
becomes just a useless piece of wood.

80.S*8g      03:54:00  03:41:00
81.P*4d      03:58:00  03:41:00
82.G4cx4d    03:58:00  03:41:00
83.+B7d-7e   03:58:00  03:41:00
84.N*4f      03:58:00  03:45:00
85.K5h-6h    03:58:00  03:45:00
86.S8gx7h+   03:58:00  03:45:00
87.S6gx7h    03:58:00  03:45:00
88.R8f-8h+   03:58:00  03:45:00
89.S*8g      03:59:00  03:45:00
90.P*8f!     03:59:00  03:47:00
Good move. This forces the promoted bishop away from the square 6f,
opening up this square for a lance drop.

91.+B7ex8f   03:59:00  03:47:00
92.B*4g      03:59:00  03:49:00
93.R2i-5i    03:59:00  03:49:00
94.L*6f      03:59:00  03:49:00
95.P*6g      03:59:00  03:49:00
96.G*6i      03:59:00  03:49:00
Resigns      03:59:00  03:49:00
Mate after 97.Rx6i Bx6i+ Kx6i Lx6g= K5i (Sx6g or a piece drop on 6h
is answered by R*7i) R*6i Sx6i+ Lx6i+ etc. An important win for Goda
with the white pieces as he is now two up with three to play. This game
may not have been as exciting as the first one, but Goda showed that
positive play pays off, as he was the one dictating the pace of game
from early on. Sato will need to find something quick or this match
will be over.