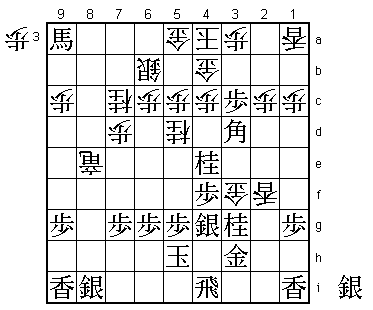
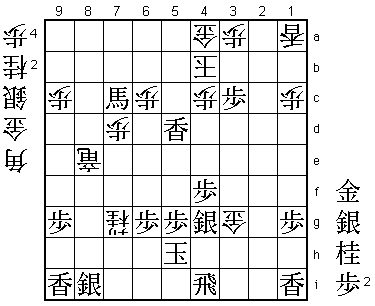
72nd Kisei Match Game 4
Black: Goda Masataka, Challenger
White: Habu Yoshiharu, Kisei
72nd Kisei-sen, Game 4, July 23rd 2001
1.P2g-2f     00:00:00  00:00:00
2.P3c-3d     00:00:00  00:01:00
3.P7g-7f     00:00:00  00:01:00
4.P8c-8d     00:00:00  00:01:00
5.P2f-2e     00:00:00  00:01:00
6.P8d-8e     00:00:00  00:03:00
7.G6i-7h     00:00:00  00:03:00
8.G4a-3b     00:00:00  00:04:00
9.P2e-2d     00:00:00  00:04:00
10.P2cx2d    00:00:00  00:04:00
11.R2hx2d    00:00:00  00:04:00
12.P8e-8f    00:00:00  00:05:00
13.P8gx8f    00:00:00  00:05:00
14.R8bx8f    00:00:00  00:05:00
15.R2dx3d    00:13:00  00:05:00
16.B2b-3c    00:13:00  00:09:00
17.R3d-3f    00:14:00  00:09:00
18.S3a-2b    00:14:00  00:10:00
19.P*8g      00:16:00  00:10:00
20.R8f-8e    00:16:00  00:12:00

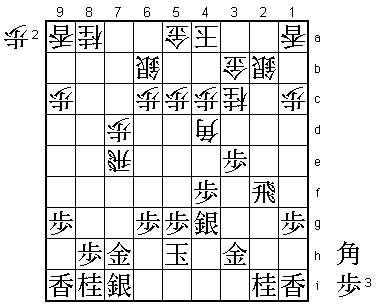
It's not often that Habu is with his back against the wall, but this
is a game he must win to avoid losing his Kisei title to Goda.
Especially since he is playing white and after his dramatic loss
in the third game there must have been a lot of pressure. In this
all-important game it is not a real surprise that he plays the
immensely popular Chuza Yokofudori. Statistically it's white's best
chance to win.

21.G4i-3h    00:21:00  00:12:00
22.K5a-4a    00:21:00  00:15:00
23.K5i-5h    00:22:00  00:15:00
24.S7a-6b    00:22:00  00:18:00
25.R3f-2f    00:27:00  00:18:00
26.G6a-5a    00:27:00  00:23:00
27.S3i-4h    00:28:00  00:23:00
28.P7c-7d    00:28:00  00:34:00
29.P3g-3f    00:28:00  00:34:00
30.P*2e      00:28:00  00:58:00
31.R2f-2h    00:28:00  00:58:00
32.P*8f      00:28:00  00:58:00
33.P8gx8f    00:45:00  00:58:00
34.R8ex8f    00:45:00  00:58:00
35.P4g-4f    00:45:00  00:58:00
36.R8fx7f    00:45:00  01:00:00
37.B8hx3c+   00:46:00  01:00:00
38.N2ax3c    00:46:00  01:00:00
39.S4h-4g    00:46:00  01:00:00
40.P2e-2f    00:46:00  01:10:00
41.P*8h      01:00:00  01:10:00
42.R7f-7e    01:00:00  01:19:00
43.R2hx2f    01:32:00  01:19:00
44.B*4d      01:32:00  01:34:00
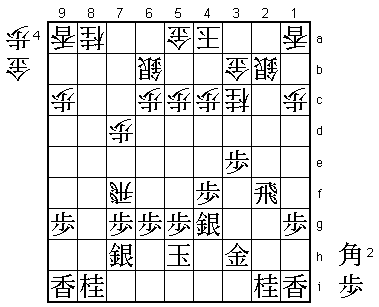
45.P3f-3e!?  02:34:00  01:34:00

The first point of the game. As Takahashi (9-dan) explains in
Shukan Shogi, he thinks that the only way to beat Habu is to
surprise him (and he immediately jokingly admits that he himself
almost never manages to do that). Normal would have been 45.R2h
Bx8h+ and even though it is impossible to say if this is good
for black or white, this would be playing according to Habu's
plans, which in Takahashi's opinion is a psychological mistake.
45.P3e gives white two different options and therefore a chance
to get confused.

46.B4dx8h+?!  02:34:00  01:47:00

Habu sticks with his original plan. The other alternative was
46.Rx3e S3f R2e! which looks a bit scary for black as well.
However, flirting with disaster like this is Goda's style. Now
Habu has decided to play Bx8h+ anyway, Goda's 45.P3e is much
better than the normal 45.R2h.

47.P*7f      02:34:00  01:47:00
48.R7ex7f    02:34:00  01:47:00
49.P*7g      02:34:00  01:47:00
50.+B8hx7h   02:34:00  01:47:00
51.S7ix7h    02:37:00  01:47:00

Habu was not at all convinced that this exchange of bishop for
gold was good. This game is too difficult to draw any conclusions
at this point.

52.R7f-8f    02:37:00  01:47:00
53.P*8g      02:37:00  01:47:00
54.R8f-8e    02:37:00  01:47:00
55.S4g-3f    02:37:00  01:47:00
56.P*8h      02:37:00  02:52:00
57.P3e-3d    02:37:00  02:52:00
58.P*2c!     02:37:00  02:52:00

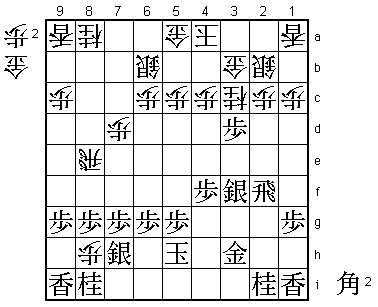
Habu shows his great feeling for the balance of the position.
Much more positive looks 58.P*2e, but after 59.R2h Px8i+ Px3c+
Sx3c N3g this pawn becomes a target for attack. White wants to
keep black without pawns in hand as long as possible. This is
more important than leaving the initiative to black in this position.

59.N2i-3g    03:28:00  02:52:00

Another difficult decision. 59.Px3c+ Sx3c N*3e is a strong looking
alternative.

60.P8hx8i+   03:28:00  02:55:00
61.S7hx8i    03:32:00  02:55:00
62.R8ex8g+   03:32:00  03:11:00
63.R2f-2i!   03:35:00  03:11:00

This rook is vulnerable to a knight drop on 3d and on 2i it is doing
important work in defense.

64.N*5d!     03:35:00  03:38:00

Attack and defense. 64.P*8h is not good after 65.B*9h +Rx7g Px3c+
Sx3c B*5e and black has a very strong attack with the two bishops.
The knight on 5d both threatens to take on 4f and defends the square
4c, which is the Achilles' heel of white's position in this opening.
The position is impossible to judge here; judgement of who's better
changes with every move.

65.B*5e      03:46:00  03:38:00
66.+R8g-8e   03:46:00  03:40:00
67.B5ex9a+   03:46:00  03:40:00
68.N8a-7c    03:46:00  03:40:00
69.S3f-4g    03:47:00  03:40:00
70.G*3e      03:47:00  03:40:00
71.P3dx3c+   03:47:00  03:40:00
72.S2bx3c    03:47:00  03:40:00
73.N*4e      03:49:00  03:40:00
74.S3c-3d    03:49:00  03:44:00
75.P*3c      03:52:00  03:44:00
76.G3b-4b    03:52:00  03:45:00
77.B*1f      03:54:00  03:45:00
78.P*3a      03:54:00  03:46:00
79.L*3f      03:58:00  03:46:00
80.G3ex3f    03:58:00  03:51:00
81.B1fx3d    03:58:00  03:51:00
82.L*2f      03:58:00  03:51:00
83.R2i-4i?   03:58:00  03:51:00

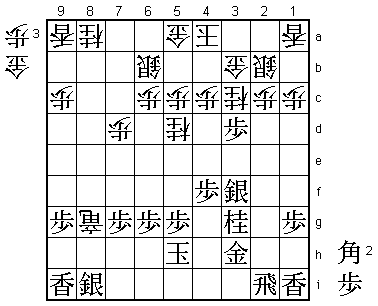
When a game is as close as this one, it's really a subtle difference
that decides the outcome. Bad luck for Goda that he makes the wrong
choice here about where to put his rook. 83.R4i looks very natural,
as it defends the pawn on 4f, giving the silver a little more freedom
to move. However, correct was 83.R3i. Then if white plays the same as
in the game, then after 84.L2g+ Gx2g Gx2g the knight attack N4e brings
the rook into the attack, which is a vital difference. The post-mortem
analysis didn't show that black would actually win after that, but this
was the way to keep the game too close to call.

84.L2f-2g+   03:58:00  03:51:00
85.G3hx2g    03:58:00  03:51:00
86.G3fx2g    03:58:00  03:51:00
87.N4ex5c+   03:58:00  03:51:00
88.S6bx5c    03:58:00  03:55:00
89.N3g-4e    03:58:00  03:55:00
90.N7c-6e!   03:58:00  03:57:00

This classic knight attack, threatening Nx5g+ Kx5g N*6e decides the
game in white's favor.

91.L*5f      03:58:00  03:57:00
92.G2g-3g    03:58:00  03:59:00
93.+B9a-7c   03:59:00  03:59:00
94.N6ex7g+   03:59:00  03:59:00
95.B3dx2c+   03:59:00  03:59:00
96.K4a-5b    03:59:00  03:59:00
97.S*4a      03:59:00  03:59:00
98.G5ax4a    03:59:00  03:59:00
99.+B2cx4a   03:59:00  03:59:00
100.G4bx4a   03:59:00  03:59:00
101.N4ex5c+  03:59:00  03:59:00
102.K5bx5c   03:59:00  03:59:00
103.L5fx5d   03:59:00  03:59:00
104.K5c-4b   03:59:00  03:59:00
Resigns      03:59:00  03:59:00

104.Kx5d also doesn't look like mate, but Habu plays the safest move.
A very good and extremely difficult game of which both players can be
proud. Still, it must have been a big disappointment to Goda that he
didn't win the Kisei title here. On the other hand, Habu must have
been very happy that he managed to pull out this tough game under
immense pressure, taking the Kisei match to the final game. Considering
his vast experience in these situations, he should be favorite to keep
his title, but in this match Goda has shown some great fighting spirit,
so this is not over yet.
