72nd Kisei Match Game 3
Black: Habu Yoshiharu, Kisei
White: Goda Masataka, Challenger
72nd Kisei-sen, Game 3, July 6th 2001
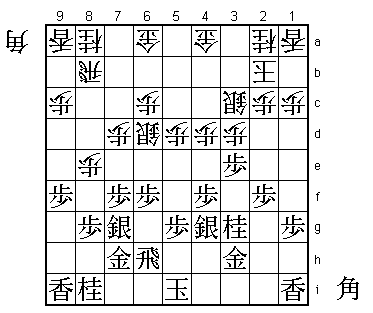
1.P7g-7f 00:00:00 00:00:00
2.P8c-8d 00:00:00 00:01:00
3.P2g-2f 00:00:00 00:01:00
4.P8d-8e 00:00:00 00:02:00
5.B8h-7g 00:00:00 00:02:00
6.P3c-3d 00:00:00 00:02:00
7.S7i-8h 00:00:00 00:02:00
8.B2bx7g+ 00:00:00 00:03:00
9.S8hx7g 00:00:00 00:03:00
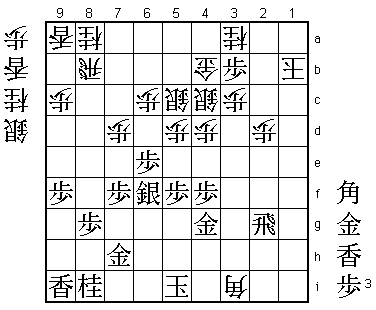
The R8e Yokofudori was expected, but Goda plays it differently.
He is one of the few players who still believes that the Kakugawari
is playable for white.
10.S3a-2b 00:00:00 00:03:00
11.S3i-3h 00:03:00 00:03:00
12.S7a-7b 00:03:00 00:06:00
13.G6i-7h 00:06:00 00:06:00
14.S2b-3c 00:06:00 00:06:00
15.P9g-9f 00:06:00 00:06:00
16.K5a-4b 00:06:00 00:09:00
17.P4g-4f 00:09:00 00:09:00
18.P7c-7d 00:09:00 00:15:00
19.S3h-4g 00:10:00 00:15:00
20.S7b-7c 00:10:00 00:15:00
21.P6g-6f 00:13:00 00:15:00
22.S7c-6d 00:13:00 00:39:00
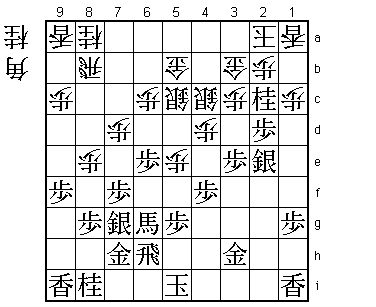
23.R2h-6h! 00:57:00 00:39:00
An important move. White is aiming for an early attack with P7e,
but this is now answered by P6e. Keeping the king and rook apart
is an well-known shogi proverb, but this is an exception. White
suddenly has no positive moves anymore and must settle for a
waiting game.
24.P5c-5d 00:57:00 00:56:00
25.P3g-3f 01:04:00 00:56:00
26.K4b-3b 01:04:00 00:59:00
27.N2i-3g 01:05:00 00:59:00
28.P4c-4d 01:05:00 00:59:00
29.G4i-3h 01:20:00 00:59:00
30.K3b-2b 01:20:00 01:03:00
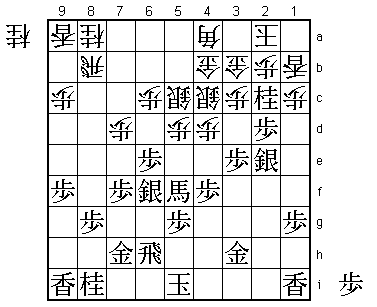
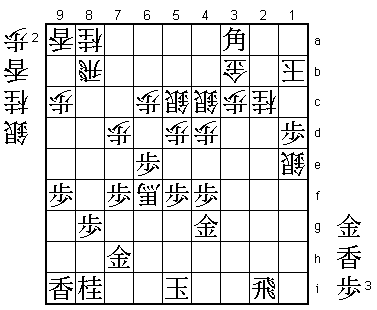
White doesn't have a natural way to get into the castle as there
is a hole on 4c. However, if white takes a slower approach, this
gives black the opportunity to put his king in a safe place and
attack strongly. Goda has seen that 31.B*4c G4a-5b Bx5d+ G5c wins
the bishop, but he thought that Habu's following move was not
possible.
31.P3f-3e! 01:41:00 01:03:00
Well judged by Habu. Goda thought it was difficult for black to
start the attack with a sitting king. However, the black position
has no holes for white piece to drop, so it is quite hard for
white to get a good attack going.
32.G4a-3b 01:41:00 01:58:00
33.N3g-2e 01:44:00 01:58:00
34.S3c-4b 01:44:00 02:02:00
35.P3ex3d 01:45:00 02:02:00
36.P2c-2d 01:45:00 02:08:00
37.P6f-6e 02:07:00 02:08:00
38.S6d-5c 02:07:00 02:09:00
39.N2e-3c+ 02:08:00 02:09:00
40.N2ax3c 02:08:00 02:09:00
41.S4g-3f 02:08:00 02:09:00
42.G6a-5b 02:08:00 02:34:00
43.P3dx3c+ 02:39:00 02:34:00
44.S4bx3c 02:39:00 02:34:00
45.P2f-2e 02:39:00 02:34:00
46.P*3d 02:39:00 03:10:00
47.P*3e 02:51:00 03:10:00
48.P2dx2e 02:51:00 03:10:00
49.P3ex3d 02:58:00 03:10:00
50.S3cx3d 02:58:00 03:10:00
51.P*3e 02:58:00 03:10:00
52.S3d-4c 02:58:00 03:12:00
53.S3fx2e 03:02:00 03:12:00
54.P*3c 03:02:00 03:27:00
55.P*2d 03:03:00 03:27:00
56.K2b-2a 03:03:00 03:27:00
57.B*2c 03:06:00 03:27:00
58.P5d-5e 03:06:00 03:27:00
59.B2c-6g+ 03:21:00 03:27:00
60.P*2b 03:21:00 03:27:00
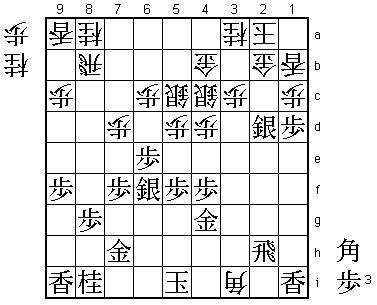
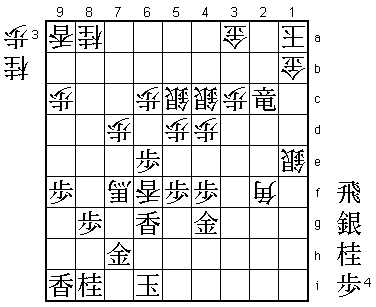
61.N*2c? 03:28:00 03:27:00
Black has played the attack perfectly, making a strong promoted
bishop in the process. However, 61.N*2c is an overplay that gives
Goda chances to counter. Improving the position of the black king
was better here.

62.L1a-1b    03:28:00  03:31:00
63.S7g-6f    03:32:00  03:31:00
64.P8e-8f    03:32:00  03:42:00
65.P8gx8f    03:32:00  03:42:00
66.R8bx8f    03:32:00  03:42:00
67.P*8g      03:32:00  03:42:00
68.R8f-8b    03:32:00  03:42:00
69.S6fx5e    03:32:00  03:42:00
70.G5b-4b    03:32:00  03:42:00
71.+B6g-5f   03:38:00  03:42:00
72.P*5d      03:38:00  03:47:00
73.S5e-6f    03:38:00  03:47:00
74.B*4a!     03:38:00  03:47:00
Goda isn't ready to give this one up yet. He wants to resolve
the situation at the head of his king and exchange this bishop
against black's promoted one.
75.G3h-4g 03:42:00 03:47:00
76.P2bx2c 03:42:00 03:47:00
77.R6h-2h 03:42:00 03:47:00
78.N*3a 03:42:00 03:49:00
79.P2dx2c+ 03:46:00 03:49:00
80.G3bx2c 03:46:00 03:49:00
81.P1g-1f 03:49:00 03:49:00
82.G2c-2b 03:49:00 03:49:00
83.P1f-1e 03:49:00 03:49:00
84.B4a-2c 03:49:00 03:49:00
85.P3e-3d 03:49:00 03:49:00
86.P*2d 03:49:00 03:50:00
87.S2ex2d 03:51:00 03:50:00
88.B2cx3d 03:51:00 03:50:00
89.P1e-1d 03:51:00 03:50:00
90.B3dx5f 03:51:00 03:57:00
91.P5gx5f 03:51:00 03:57:00
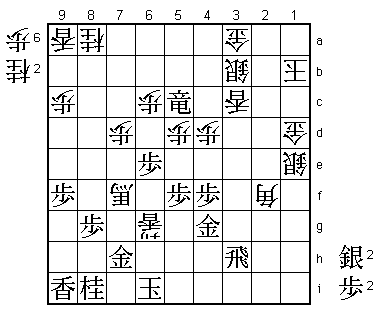
92.B*3i! 03:51:00 03:57:00
White's counter plan has succeeded. It's no longer clear who's
winning here. Some professionals in the press room believed that
white had turned the tables, but Habu shows with some of his magic
that this isn't the case.

93.R2h-2g    03:53:00  03:57:00
94.P*2c      03:53:00  03:57:00
95.P1dx1c+   03:54:00  03:57:00
96.P2cx2d    03:54:00  03:57:00
97.+P1cx1b   03:56:00  03:57:00
98.G2bx1b    03:56:00  03:57:00
99.L1ix1b+   03:56:00  03:57:00
100.K2ax1b   03:56:00  03:57:00
101.P*3b!    03:56:00  03:57:00
There it is. This move looks bad because of 101.N*3e, but after
102.Px3a+ Nx2g+ N*3e white has no defense.

102.G4bx3b   03:56:00  03:58:00
103.P*1d     03:57:00  03:58:00
104.N3a-2c   03:57:00  03:58:00

No choice. 104.G2c fails to B*4a.

105.R2gx2d   03:57:00  03:58:00
106.S*1e     03:57:00  03:58:00
107.R2d-2i   03:57:00  03:58:00
108.B3ix6f+  03:57:00  03:58:00
109.B*3a!    03:57:00  03:58:00
A nice sacrifice that should have wrapped things up.

110.G3bx3a   03:57:00  03:59:00
111.G*1c     03:57:00  03:59:00
112.K1b-1a   03:57:00  03:59:00
113.R2ix2c+  03:57:00  03:59:00
114.P*1b     03:57:00  03:59:00
115.G1cx1b   03:58:00  03:59:00
116.R8bx1b   03:58:00  03:59:00
117.P1d-1c+  03:58:00  03:59:00
118.B*2f     03:58:00  03:59:00

This is close to "katachizukuri", but Goda still seemed to have
some hope here. 118.P*3g Bx3g+ Gx3g L*5g is dangerous for black.

119.K5i-6i   03:59:00  03:59:00
120.S*5h     03:59:00  03:59:00
121.K6ix5h   03:59:00  03:59:00
122.+B6fx7f  03:59:00  03:59:00
123.K5h-6i   03:59:00  03:59:00
124.L*6f!    03:59:00  03:59:00

A good attempt by Goda. Forcing black to drop a lance is important
as will become clear soon.

125.L*6g     03:59:00  03:59:00
126.G*2b     03:59:00  03:59:00

Now the importance of 124.L*6f becomes clear. If black would
still have a lance in hand, then 127.L*1d would have been an
easy win here.

127.+P1cx1b  03:59:00  03:59:00
128.G2bx1b   03:59:00  03:59:00

Ishida (9-dan) was already telling the press that Habu would win in
a couple of moves. White might even resign if Habu would play a move
suggested by Kubo.
129.+R2cx3c?? 03:59:00  03:59:00

A terrible blunder by Habu, which might have been a combination
of time pressure and the confidence with which Goda played his
previous move. Kubo had suggested 129.R*1d here and white has no
defense. Both Habu and Goda had read 129.R*1d P*1c Rx1c+ Gx1c
+Rx1c K2a +R2c G*2b and after G*1b K3a black takes a lot of
material, but there is no mate so white wins. However, both
players overlooked the simple S*3b! (instead of G*1b) Sx3b
G*1b K3a Gx2b and mate. After 129.+Rx3c the black attack runs
out of steam and white wins easily.

130.S4c-3b   03:59:00  03:59:00
131.N*2c     03:59:00  03:59:00
132.G1bx2c   03:59:00  03:59:00
133.P*1b     03:59:00  03:59:00
134.K1ax1b   03:59:00  03:59:00
135.P*1c     03:59:00  03:59:00
136.G2cx1c   03:59:00  03:59:00
137.+R3cx5c  03:59:00  03:59:00
138.L6fx6g+  03:59:00  03:59:00
139.R*3h     03:59:00  03:59:00
140.L*3c     03:59:00  03:59:00
141.P*1d     03:59:00  03:59:00
142.G1cx1d   03:59:00  03:59:00
Resigns      03:59:00  03:59:00
It's only very rarely that we see Habu blunder in the endgame.
Coming from behind to win is his trademark and to see this happen
against him is a big surprise. Furthermore, it happened at a
particularly bad moment. Losing with black and going 2-1 down
in a best-of-five series suddenly makes Goda a strong favorite
to win the Kisei title. He needs only one win from two games to
regain the title he lost two years ago.