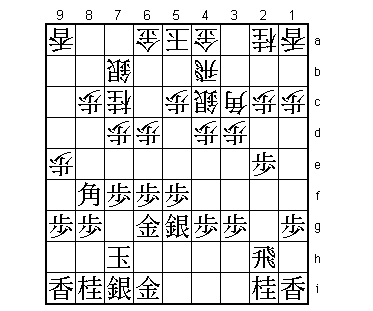
72nd Kisei Match Game 2
Black: Goda Masataka, Challenger
White: Habu Yoshiharu, Kisei
72nd Kisei-sen, Game 2, June 26th 2001
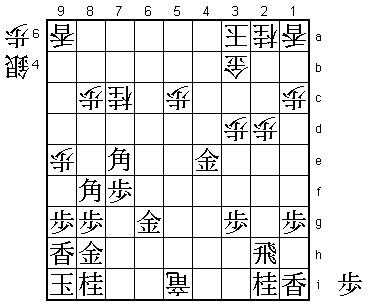
1.P7g-7f 00:00:00 00:00:00
2.P3c-3d 00:00:00 00:02:00
3.P2g-2f 00:00:00 00:02:00
4.P4c-4d 00:00:00 00:03:00
5.P2f-2e 00:00:00 00:03:00
6.B2b-3c 00:00:00 00:03:00
7.S3i-4h 00:00:00 00:03:00
8.S3a-3b 00:00:00 00:05:00
9.P5g-5f 00:00:00 00:05:00
10.R8b-4b 00:00:00 00:08:00
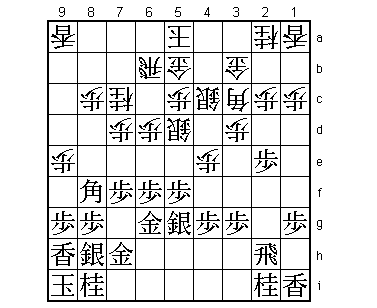
"Habu won't play the same opening twice in a row. It will probably be a
furibisha game" was the prediction of Kano (1-dan). She was right, but
this may be the last time Habu plays this against Goda.
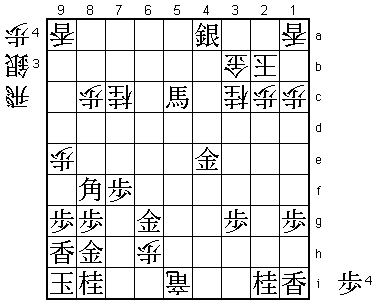
11.K5i-6h 00:01:00 00:08:00
12.S7a-7b 00:01:00 00:09:00
13.K6h-7h 00:01:00 00:09:00
14.P9c-9d 00:01:00 00:10:00
15.G4i-5h 00:06:00 00:10:00
16.S3b-4c 00:06:00 00:13:00
17.S4h-5g 00:07:00 00:13:00
18.P9d-9e 00:07:00 00:18:00
19.B8h-7g 00:08:00 00:18:00
20.P7c-7d 00:08:00 00:27:00
21.P6g-6f 00:08:00 00:27:00
22.P6c-6d 00:08:00 00:29:00
23.G5h-6g 00:08:00 00:29:00
24.N8a-7c 00:08:00 00:34:00
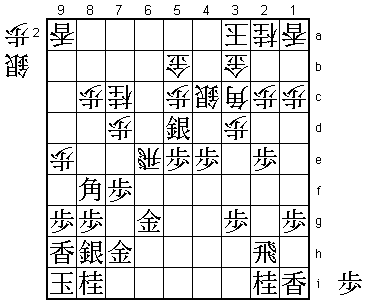
25.B7g-8f! 00:11:00 00:34:00
Well timed new move that Goda had prepared at home. If 25.K8h here,
white can set up a good attack after 26.R6b B8f G6a-5b.
26.S7b-6c 00:11:00 01:00:00
Habu didn't like 26.R6b P5e after which it will be much hard for
white to attack on the 6th file. However, moving up this silver is
also not what white wants. As building a mino castle is no longer
possible, white has to spend time to build a safe haven for the
king on the other side of the board. This time can be used by black
to move into the anaguma.
27.K7h-8h 00:11:00 01:00:00
28.R4b-6b 00:11:00 01:07:00
29.L9i-9h 00:55:00 01:07:00
30.P4d-4e 00:55:00 01:17:00
31.K8h-9i 00:57:00 01:17:00
32.G6a-5b 00:57:00 01:18:00
33.S7i-8h 00:57:00 01:18:00
34.S6c-5d 00:57:00 01:20:00
35.G6i-7h 00:57:00 01:20:00
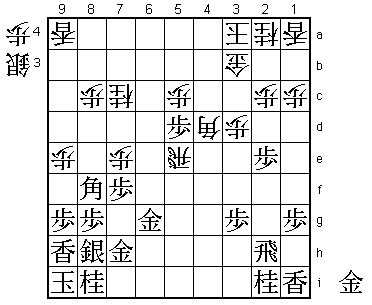
36.G4a-3b? 00:57:00 01:22:00
Probably already the decisive mistake. After the game, Habu said he
should have played 36.K4b instead. Now 37.P4f Px4f Sx4f P6e looks
good for white. Better is 37.P3f G3b N3g N8e P4f Px4f Sx4f P6e with
chances for both sides.

37.P4g-4f!   01:04:00  01:22:00

With the king still on 5a this move is very strong. The difference
becomes clear after the violent 38.Px4f Sx4f P6e P5e Px6f Px5d Px6g+
Px5c+ +Px7h +Px6b Gx6b Rx7h. Black's king is still relatively safe
while the white king is completely exposed. For example, G*6g R2h
G*7h P*5e leads to nothing and black has moves like P*6c or S*5c
to choose from.

38.P6d-6e    01:04:00  01:47:00
39.P4fx4e    02:05:00  01:47:00
40.K5a-4a    02:05:00  02:07:00

Good for black is 40.Px6f Sx6f Bx6f Gx6f Rx6f P4d Sx4d B*7g R6i+
Bx4d and the double threat Bx5c+ (by either bishop) and Bx1a+ is
good for black.

41.P6fx6e    02:16:00  02:07:00
42.K4a-3a    02:16:00  02:07:00

Habu sacrificed two pawns to put his king safe and is now waiting
for a black mistake.

43.P5f-5e!   02:35:00  02:07:00

The start of a series of fine tesuji moves by Goda. Here 44.Sx5e
P*5f loses the silver, so white has no choice...

44.B3cx5e    02:35:00  02:22:00
45.S5g-6f    02:40:00  02:22:00
46.B5e-3c    02:40:00  02:38:00
47.P*5e      02:40:00  02:38:00
48.S5dx6e    02:40:00  02:43:00
49.S6fx6e    02:40:00  02:43:00
50.R6bx6e    02:40:00  02:43:00
51.S*5d!     02:41:00  02:43:00
Black has forced the exchange of silvers and immediately uses this
silver for another fine combination. The power of the bishop on 8f
is more than white's position can handle.

52.R6ex5e    02:41:00  02:46:00
53.S5dx4c+   02:41:00  02:46:00
54.G5bx4c    02:41:00  02:46:00
55.S*4d!     02:44:00  02:46:00

And another one of white's defensive pieces is exchanged. The white
castle gets thinner and thinner.

56.G4cx4d    02:44:00  02:50:00

Even giving up the bishop doesn't help: 56.Rx4e Sx3c+ Nx3c B*6d and
if white moves the knight on 7c, then P*4d is terrible (Rx4d Bx5c+).

57.P4ex4d    02:48:00  02:50:00
58.B3cx4d    02:48:00  02:50:00
59.P*5d!     03:05:00  02:50:00

Goda is really rubbing it in: having the bishop and the king on the
same diagonal is dangerous.

60.P7d-7e    03:05:00  03:04:00
Closes the deadly diagonal, but only temporarily.

61.P2e-2d    03:15:00  03:04:00
62.P2cx2d    03:15:00  03:05:00
63.B8fx7e    03:19:00  03:05:00

The bishop is back.

64.R5ex5d    03:19:00  03:08:00

No choice, but this loses a major piece.

65.G*4e      03:24:00  03:08:00
66.B4dx8h+   03:24:00  03:08:00
67.G7hx8h    03:25:00  03:08:00
68.R5d-5i+   03:25:00  03:08:00
69.B*8f!     03:25:00  03:08:00
Ends all hope for a white counterattack. Dropping the second
bishop on this diagonal with attack on the promoted rook decides
the game quickly in black's favor.

70.P*6h      03:25:00  03:16:00
71.B7ex5c+   03:29:00  03:16:00
72.K3a-2b    03:29:00  03:16:00
73.R2hx2d    03:36:00  03:16:00
74.P*2c      03:36:00  03:29:00
75.R2dx3d    03:37:00  03:29:00
76.S*3c      03:37:00  03:30:00

Or 76.P*3c R5d +Rx2i (+Rx5d +Bx5d is just putting the promoted
bishop on a better square) +B3a Gx3a Bx3a+ Kx3a R5b+ and no defense.

77.R3dx3c+   03:38:00  03:30:00
78.N2ax3c    03:38:00  03:30:00
79.S*4a      03:38:00  03:30:00
Resigns      03:38:00  03:30:00
A mating threat and there is no effective defense. A complete
victory for Goda, overwhelming Habu straight from the opening.
However, Habu is known for having these types of "accidents"
once in while. It says nothing about his form and I am sure
that Goda will not take the third game any easier. Still,
he will feel much more confident now that he can beat Habu
in this pivotal third game