71st Meijin Match Game 5
[Black "Habu Yoshiharu, Challenger"]
[White "Moriuchi Toshiyuki, Meijin"]
[Event "71th Meijin-sen, Game 5"]
[Date "May 30th and 31st 2013"]
1.P7g-7f 00:00:00 00:00:00
2.P8c-8d 00:00:00 00:00:00
3.S7i-6h 00:02:00 00:00:00
4.P3c-3d 00:02:00 00:07:00
5.P6g-6f 00:03:00 00:07:00
6.S7a-6b 00:03:00 00:07:00
7.P5g-5f 00:05:00 00:07:00
8.P5c-5d 00:05:00 00:07:00
9.S3i-4h 00:07:00 00:07:00
10.S3a-4b 00:07:00 00:08:00
11.G4i-5h 00:12:00 00:08:00
12.G4a-3b 00:12:00 00:08:00
13.G6i-7h 00:14:00 00:08:00
14.K5a-4a 00:14:00 00:10:00
15.K5i-6i 00:17:00 00:10:00
16.G6a-5b 00:17:00 00:11:00
17.S6h-7g 00:25:00 00:11:00
18.S4b-3c 00:25:00 00:11:00
19.B8h-7i 00:27:00 00:11:00
20.B2b-3a 00:27:00 00:11:00
21.P3g-3f 00:28:00 00:11:00
22.P4c-4d 00:28:00 00:11:00
23.S4h-3g 00:41:00 00:11:00
24.B3a-6d 00:41:00 00:11:00
25.G5h-6g 00:42:00 00:11:00
26.P7c-7d 00:42:00 00:12:00
27.B7i-6h 00:43:00 00:12:00
28.G5b-4c 00:43:00 00:17:00
29.K6i-7i 00:46:00 00:17:00
30.K4a-3a 00:46:00 00:17:00
31.K7i-8h 00:47:00 00:17:00
32.P9c-9d 00:47:00 00:17:00
33.S3g-4f 01:06:00 00:17:00
34.S6b-5c 01:06:00 00:25:00
35.N2i-3g 01:07:00 00:25:00
36.B6d-7c 01:07:00 00:25:00
37.P2g-2f 01:08:00 00:25:00
38.P9d-9e 01:08:00 00:30:00
39.P1g-1f 01:11:00 00:30:00
40.P1c-1d 01:11:00 00:30:00
41.R2h-3h 01:13:00 00:30:00
42.S3c-2d 01:13:00 00:37:00
43.L1i-1h 01:14:00 00:37:00
44.K3a-2b 01:14:00 00:40:00
45.P6f-6e 01:17:00 00:40:00
46.P8d-8e 01:17:00 00:41:00
47.N3g-2e 01:30:00 00:41:00
48.S5c-4b 01:30:00 00:41:00
49.P3f-3e 01:31:00 00:41:00
50.S2dx3e 01:31:00 01:01:00
51.S4fx3e 01:32:00 01:01:00
52.P3dx3e 01:32:00 01:01:00
53.P1f-1e 01:33:00 01:01:00
54.P1dx1e 01:33:00 01:02:00
55.P6e-6d 01:34:00 01:02:00
56.P6cx6d 01:34:00 01:02:00
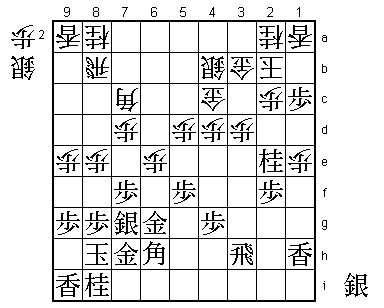
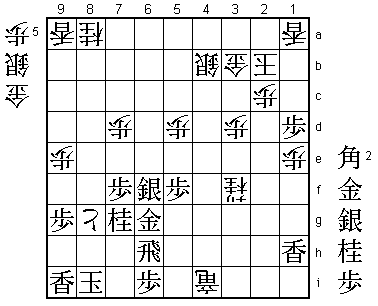
This fifth game has become a theoretical Yagura fight. No less than 54 official
games have been played with this position, and this is an important fork in
the road. Both 56.Bx6d and 56.Px6d have been played here, both 27 times.
Obviously, 56.Bx6d looks like the better move, because it keeps the bishop
diagonal open. However, recently 56.Px6d has been played more often. Because
the bishop is blocked it seems to give black a free attack which is a bit
scary, but we will see in this game that this is not decisive and that white
gets time to open the bishop diagonal again with P6e, creating a attacking
base on 6f at the same time.
57.B6hx3e 01:34:00 01:02:00
58.P*3d 01:34:00 01:09:00
59.B3e-6h 01:48:00 01:09:00
60.P6d-6e 01:48:00 01:18:00
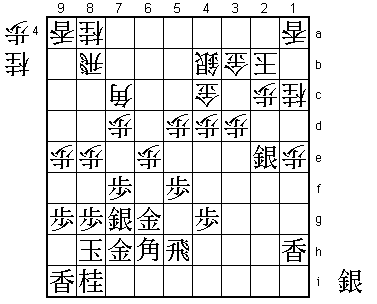
Here 60.P2d P*1b Lx1b Bx2d S2c has been played more often, but Moriuchi has
prepared something new here.
61.P*1c 01:56:00 01:18:00
62.S*3g! 01:56:00 01:19:00
A new move by Moriuchi. The black attack on the edge looks very strong, so
in the past moves like S*2d or S*1d had been tried. Ignoring the edge attack
with S*3g is not something that comes to mind easily.
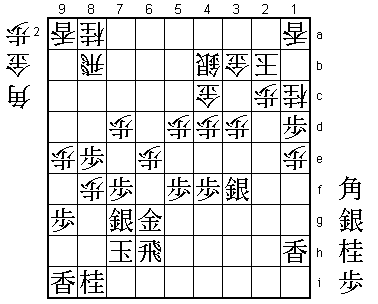
63.R3h-5h 03:40:00 01:19:00
Played after almost two hours of thought and definitely not Habu's first choice
of move. The way to challenge Moriuchi's idea is to play 63.R3i 64.S2h+ 65.Lx1e
66.Sx3i+ which sacrifices the rook, but the promoted silver is more or less
useless and the black attack has gained steam. This position was analyzed
thoroughly in the post-mortem analysis, but surprisingly it doesn't seem to
work for black. For example, 67.P1b+ Lx1b P*1c Lx1c Lx1c+ K3a S*1b Nx1c Bx1c+
K4a Sx2c+ Gx2c +Bx2c K5b P*3c it seems like black is attacking strongly, but
Habu said he didn't like the black position at all because the white king has
a lot of space to run away. On the other hand, white has a very fast attack
with R*3h P3b+ L*6f. As an alternative, leaving the rook on 3h after S*3g and
playing 63.Lx1e directly was analyzed, which doesn't give white a rook drop
on 3h, but even after 63.Lx1e Sx3h= no good variations for black were found.
64.S3gx2f+ 03:40:00 01:30:00
65.S*1d 03:40:00 01:30:00
66.+S2fx2e 03:40:00 02:58:00
67.S1dx2e 03:41:00 02:58:00
68.N2ax1c! 03:41:00 03:37:00
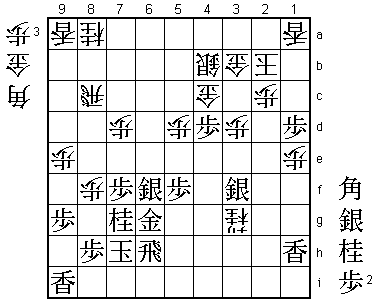
Tempting is to go for the attack with 68.N*6f, but after 69.R3h black threatens
Sx3d next. Also, 68.B3g+ can be answered with 69.B4f +Bx4g (+Bx4f Px4f B*4g R2h
is good for black) Bx8b+ +Bx5h R*2h and black has the upper hand.

69.S2e-3f    04:23:00  03:37:00

The point of 68.Nx1c is that black has no choice but to move back this attacking
silver. After 69.S1d white plays 70.Bx3g+ and this cannot be answered by B4f
this time because of the fork +Bx4f Px4f B*4g. If white then plays Sx1c+ Lx1c,
the edge attack has run out of steam and black is left with a bad position. The
best way to play for black may have been to try and grind it out with 71.S*3h
+Bx7c Lx1e P*1b R5i and Habu admitted after the game that this might have been
better than what was played in the game.

70.B7c-3g+   04:23:00  04:14:00
71.B6h-4f    04:42:00  04:14:00
72.+B3gx4f   04:42:00  04:14:00
73.P4gx4f    04:42:00  04:14:00
74.N*6f      04:42:00  04:14:00

Obvious but strong. White has a very strong attack now.

75.R5h-6h    04:42:00  04:14:00
76.N6fx7h+   04:42:00  04:57:00
77.K8hx7h    04:49:00  04:57:00
78.P8e-8f    04:49:00  04:59:00
79.P8gx8f    04:53:00  04:59:00
80.P*8e      04:53:00  05:04:00
81.P8fx8e    05:00:00  05:04:00
82.P*8f      05:00:00  05:08:00
83.P*1d      05:24:00  05:08:00
Here 83.Sx8f is answered by B*5i followed by P6f, so Habu goes for the desperate
attack. Moriuchi has seen it all and has prepared a perfect counter. In the
post-mortem analysis 83.P4e was looked at to keep the square 1d open for a knight
drop. After 84.Rx8e P*8h B*4f Px4d G4c-3c Moriuchi said that this was not an easy
position to play, but Habu didn't like it at all because black has to sacrifice
material to get an attack going and this material can be used very effectively
by white with the 8th file unavailable as an escape route.

84.N1c-2e!   05:24:00  05:34:00

This knight cannot be taken because of 85.Sx2e Rx8e P*8h P6f followed by Rx2e.

85.P4f-4e    05:58:00  05:34:00
86.R8bx8e    05:58:00  06:33:00
87.P*8h      06:20:00  06:33:00
88.P6e-6f    06:20:00  06:52:00
89.S7gx6f    06:30:00  06:52:00
90.N2e-3g+   06:30:00  06:56:00

This knight has been perfect for white, stopping the black attack and now helping
in the white attack.

91.N8i-7g    06:37:00  06:56:00
92.R8e-8c    06:37:00  07:01:00
93.P4ex4d    06:39:00  07:01:00
94.+N3gx3f!  06:39:00  07:29:00

A perfect way to round off a perfect game. Moriuchi uses the momentum of the black
attack to get the rook into the attack from the weak side of the king.

95.P4dx4c+   06:44:00  07:29:00
96.B*8g      06:44:00  07:38:00
97.K7h-8i    06:53:00  07:38:00
98.R8cx4c    06:53:00  07:38:00
99.P8hx8g    06:53:00  07:38:00

Or 99.P*4h S*5i and white wins.

100.R4c-4i+  06:53:00  07:39:00
101.P*6i     06:53:00  07:39:00
102.P8fx8g+  06:53:00  07:39:00
Resigns      06:53:00  07:39:00
With the sun still high at a little before 5 o'clock in the afternoon, Habu decides
he has had enough. White threatens mate with +Rx6i and even if black defends with
103.G*8h then 104.P*8f is a simple reply. Also, black has no chance to get to the
white king, so resignation is the only choice. A game without any obvious mistake
by Habu. Moriuchi prepared something new which was very effective and pushed home
his advantage with flawless play. A surprisingly one-sided match between childhood
rivals Moriuchi and Habu ends in a 4-1 title defense for Moriuchi who will be
extremely pleased with the level of his play in this match.