71st Meijin Match Game 2
[Black "Moriuchi Toshiyuki, Meijin"]
[White "Habu Yoshiharu, Challenger"]
[Event "71st Meijin-sen, Game 2"]
[Date "April 23rd and 24th 2013"]
1.P2g-2f     00:00:00  00:00:00
2.P8c-8d     00:00:00  00:00:00
3.P2f-2e     00:02:00  00:00:00
4.P8d-8e     00:02:00  00:03:00
5.G6i-7h     00:02:00  00:03:00
6.G4a-3b     00:02:00  00:04:00
7.P2e-2d     00:03:00  00:04:00
8.P2cx2d     00:03:00  00:05:00
9.R2hx2d     00:03:00  00:05:00
10.P*2c      00:03:00  00:06:00
11.R2d-2h    00:03:00  00:06:00

Like in the first game, an Aigakari game. Moriuchi won the first game with
the white pieces quite convincingly, so it is a clear sign of his confidence
that he plays the same opening with the black pieces this time.

12.P3c-3d    00:03:00  00:42:00
13.S3i-3h    00:05:00  00:42:00
14.S7a-7b    00:05:00  00:43:00
15.S3h-2g    00:12:00  00:43:00
16.P9c-9d    00:12:00  00:45:00
17.P9g-9f    00:16:00  00:45:00
18.P8e-8f    00:16:00  00:56:00
19.P8gx8f    00:16:00  00:56:00
20.R8bx8f    00:16:00  00:56:00
21.P*8g      00:16:00  00:56:00
22.R8f-8d    00:16:00  00:56:00
23.S2g-3f    00:25:00  00:56:00
24.P7c-7d    00:25:00  01:04:00
25.P7g-7f    00:26:00  01:04:00
26.B2bx8h+   00:26:00  01:05:00
27.S7ix8h    00:26:00  01:05:00
28.N2a-3c    00:26:00  01:05:00
29.P1g-1f    01:03:00  01:05:00
30.K5a-4b    01:03:00  01:15:00
31.P4g-4f    01:04:00  01:15:00
32.S3a-2b    01:04:00  01:22:00
33.S8h-7g    01:06:00  01:22:00
34.P6c-6d    01:06:00  02:12:00
35.S3f-4g    01:56:00  02:12:00
36.P2c-2d    01:56:00  02:15:00
37.S4g-5f    02:01:00  02:15:00
38.S2b-2c    02:01:00  02:19:00
39.P4f-4e    02:02:00  02:19:00
40.S7b-6c    02:02:00  02:26:00
41.K5i-6h    02:18:00  02:26:00
42.N8a-7c    02:18:00  02:50:00
43.G4i-5h    02:35:00  02:50:00
44.R8d-8a    02:35:00  02:59:00
45.P6g-6f    02:44:00  02:59:00
46.G6a-6b    02:44:00  03:04:00
47.P1f-1e    03:10:00  03:04:00

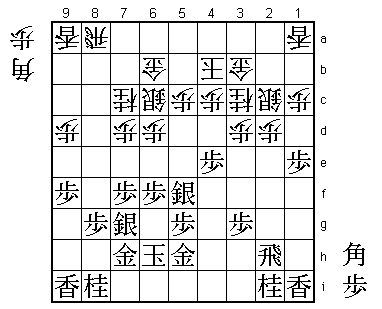
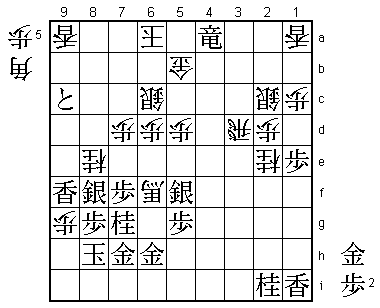
The position is quite different from the first game, and Habu has an important
decision to make here. Defend with 48.P5d or take a more attacking stance
with 48.S5d.

48.P5c-5d    03:10:00  03:34:00

Habu decides to take a defensive position, but this is not going to work out
well for him. However, the more attacking option 48.S5d is also not very
satisfactory after 49.R4h K3a P3f P6e Px6e P7e P*2e and it is hard for white
to defend against the attack with black having different moves to strengthen
the attack, threatening B*4f followed by Px2d. It seems that the white position
is already inferior here.

49.K6h-7i    03:18:00  03:34:00
50.K4b-5b    03:18:00  03:40:00
51.K7i-8h    03:25:00  03:40:00
52.G6b-5c    03:25:00  03:55:00
53.G5h-6h    03:42:00  03:55:00
54.K5b-6b    03:42:00  04:19:00
55.P3g-3f    03:55:00  04:19:00
56.G3b-4b    03:55:00  04:33:00
57.R2h-4h    04:16:00  04:33:00
58.G4b-5b    04:16:00  04:47:00
59.S7g-8f    04:27:00  04:47:00
60.G5b-4b    04:27:00  04:49:00
61.L9i-9h    04:36:00  04:49:00
62.K6b-5b    04:36:00  05:01:00

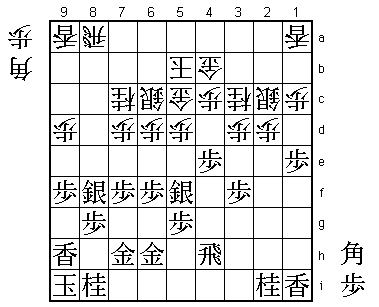
It is clear that the white strategy has failed. While black continues to
strengthen his position, white can only play waiting moves.

63.K8h-9i    04:39:00  05:01:00

64.P3d-3e?!  04:39:00  05:41:00

Habu decides that he cannot wait any longer and even though he had no
confidence in his own attack, he decides to force the issue. He can try
to wait one more move with 64.K6b, which gives black the option to further
strengthen his castle with 65.G8h, but has the drawback that the two golds
are no longer connected. If white tries to attack with 66.P3e Px3e N2e like
in the game, Habu was worried that black could play G6i followed by G7i next.
However, Moriuchi said that he hadn't considered that and that he planned
to play R3h next. Then B*4i R3i B2g+ P3d and Habu again had to admit that
he had no confidence in his own position. Finally, Habu could have waited
even longer, but after 64.K6b G8h K5b G6h-7h K6b black can attack with B*4f
G4b-5b P7e Px7e P6e and because of the difference in king position, black
has the better chances.

65.P3fx3e    04:42:00  05:41:00
66.N3c-2e    04:42:00  05:41:00
67.P4e-4d!   05:20:00  05:41:00

Moriuchi ignores the knight and goes for the weaknesses on the 4th file
instead. Habu was probably hoping for 67.P*2f N3g+ Nx3g B*5i and white has
some fighting chances.

68.P4cx4d    05:20:00  05:44:00
69.P*4e      05:21:00  05:44:00
70.P9d-9e    05:21:00  06:10:00
71.P9fx9e    05:22:00  06:10:00
72.B*5i      05:22:00  06:11:00
73.R4h-4i    05:54:00  06:11:00
74.B5i-2f+   05:54:00  06:11:00
75.P4ex4d    05:55:00  06:11:00
76.+B2fx3e   05:55:00  06:13:00
77.P9e-9d    05:59:00  06:13:00

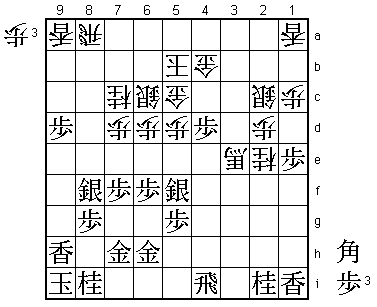
Moriuchi is using the white edge attack to put pressure on the white king.

78.P*9g      05:59:00  06:25:00

Habu doesn't hold back and positively pushes his own edge attack. Ignoring the
attack and pushing through with one's own attack can already be seen in games
Habu and Moriuchi played against each other when they were children.

79.L9hx9g    06:00:00  06:25:00
80.N7c-8e    06:00:00  06:25:00
81.L9g-9f    06:07:00  06:25:00
82.+B3ex4d   06:07:00  06:26:00
83.P9d-9c+   06:20:00  06:26:00
84.P*9g      06:20:00  06:46:00
85.K9i-8h    06:31:00  06:46:00
86.+B4dx6f   06:31:00  06:50:00
87.N8i-7g    06:35:00  06:50:00
88.R8a-3a    06:35:00  06:50:00
89.P*3c      06:59:00  06:50:00
90.R3ax3c    06:59:00  06:53:00
91.P*3d      07:05:00  06:53:00

92.R3cx3d    07:05:00  06:54:00

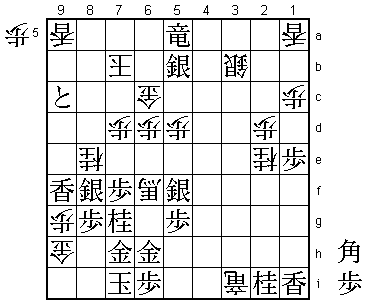
The only way to keep the rook into play, but this invites the following attack.

93.B*6a!     07:06:00  06:54:00
94.K5bx6a    07:06:00  06:54:00

If the king moves, Bx3d+ gives black two rooks and an easy attack.

95.R4ix4b+   07:06:00  06:54:00
96.G5c-5b    07:06:00  06:54:00
97.+R4b-4a   07:18:00  06:54:00

98.B*5a      07:18:00  07:04:00

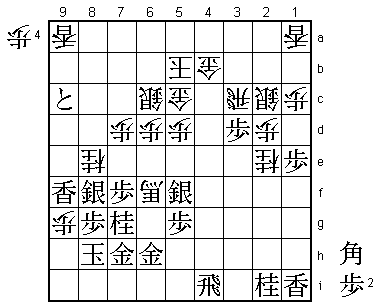
Or 98.G5a P*6b Kx6b G*7c Kx7c +Rx5a G*9b K7i R3i+ P*6i stops the attack
because Lx9c Nx8e K8d +R8a P*8c G*9e leads to mate.

99.G*7c      07:30:00  07:04:00

Here Moriuchi felt confident that he would win this game.

100.S2c-3b   07:30:00  07:15:00
101.G7cx6c   07:33:00  07:15:00
102.G5bx6c   07:33:00  07:15:00
103.S*5b     07:33:00  07:15:00
104.K6a-7b   07:33:00  07:15:00
105.+R4ax5a  07:33:00  07:15:00
106.G*9h     07:33:00  07:15:00
107.K8h-7i   07:33:00  07:15:00
108.R3d-3i+  07:33:00  07:15:00
109.P*6i     07:33:00  07:15:00
Resigns      07:33:00  07:15:00

And white has only pawns so no attack and no defense. Even 110.Lx9c leads to
mate after 111.+R6a, so Habu resigned here. A perfect start in this match for
Moriuchi, winning the first two games without giving Habu the slightest of
chances. Habu needs to turn things around quickly, or this could become the
shortest match between them.
