71st Kisei Match Game 3
Black: Habu Yoshiharu, Challenger
White: Tanigawa Koji, Kisei
71st Kisei-sen, Game 3, July 6th 2000
1.P7g-7f     0/0       0/0
2.P3c-3d     0/0       1/1
3.P2g-2f     2/2       0/1
4.P8c-8d     0/2       1/2
5.P2f-2e     1/3       0/2
6.P8d-8e     0/3       0/2
7.G6i-7h     2/5       0/2
8.G4a-3b     0/5       0/2
9.P2e-2d     2/7       0/2
10.P2cx2d    0/7       0/2
11.R2hx2d    0/7       0/2
12.P8e-8f    0/7       0/2
13.P8gx8f    0/7       0/2
14.R8bx8f    0/7       0/2
15.R2dx3d    9/16      0/2
16.B2b-3c    0/16      2/4
17.R3d-3f    7/23      0/4
18.S3a-2b    0/23      1/5
19.P*8g      6/29      0/5
20.R8f-8e    0/29      1/6

Before the match, Tanigawa said that he would probably play Kakugawari with
black and Shikenbisha or Yokofudori with white. This is exactly as it is
played, with Tanigawa choosing the difficult R8e Yokofudori this time.

21.R3f-2f    0/29      0/6
22.K5a-4a    0/29      4/10
23.K5i-5h    17/46     0/10
24.S7a-6b    0/46      4/14
25.G4i-3h    2/48      0/14
26.G6a-5a    0/48      2/16
27.S3i-4h    2/50      0/16
28.P7c-7d    0/50      3/19
29.P3g-3f    1/51      0/19
30.N8a-7c    0/51      41/60
31.N2i-3g    7/58      0/60
32.P9c-9d    0/58      1/61

Subtle opening play. Tanigawa is allowing Habu the attack P3e by making this
pass move. He has something prepared...

33.P4g-4f    8/66      0/61
34.P7d-7e    0/66      17/78
35.P3f-3e    18/84     0/78
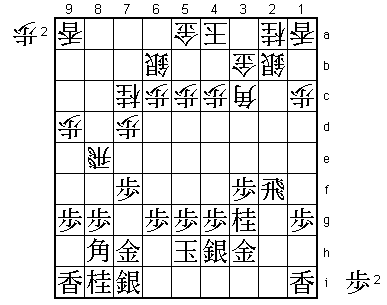
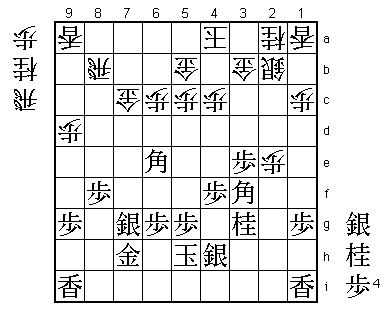
36.P*2e!     0/84      6/84

Preparation for the 40th move. Black of course can not take this pawn with
the rook because of Bx8b+ Sx8h B*1d, but he also can not pull the rook back
as white can then play P3f. Black has no choice but to move his rook to
a square where it can not easily move from.

37.R2f-3f    1/85      0/84
38.B3cx8h+   0/85      29/113
39.S7ix8h    0/85      0/113
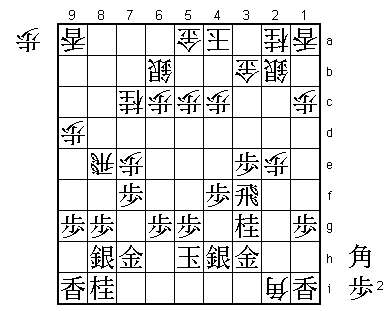
40.B*2i!     0/85      1/114

This seems to be what Tanigawa prepared. After 41.G3i B6e+ he gets a nice
promoted bishop and after 40.S4g or B*4g, white seems to be winning after
Bx3h+ followed by G*2f, or...

41.B*4g!     38/123    0/114

The position is very similar to the game between Nakamura and Inoue in this
year's B1 Junisen. There, Nakamura played 41.N2e, but he was blown away after
42.P*2d B*4g Px2e. Habu did not even consider that line, but goes for active
play with two bishops as compensation for the rook. Of course he is not
really down in material, but giving up the rook for the bishop is quite
painful in these types of position.

42.B2ix3h+   0/123     6/120
43.B4gx3h    1/124     0/120
44.G*2f      0/124     0/120
45.B*1h      1/125     0/120
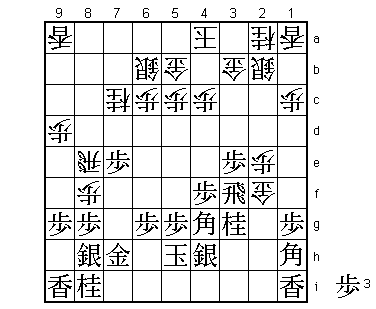
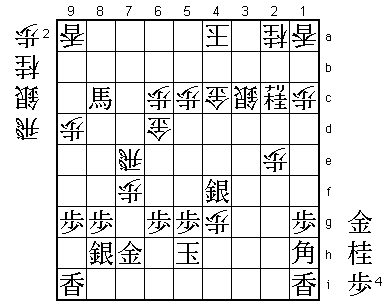
46.G5a-5b!   0/125     34/154

Well played. Tanigawa does not rush the capture of the rook, but takes time
to defend the weak point 6c first, as this is the square where both black
bishops are aiming for.

47.B3h-7d    44/169    0/154
48.R8e-8d    0/169     32/186
49.P7fx7e    1/170     0/186
50.P*8f      0/170     1/187
51.B7d-4g    5/175     0/187
52.R8d-8e!   0/175     10/197

Another good white move. This rook becomes very active now. White has the
advantage.

53.P7e-7d    38/213    0/197
54.R8e-7e    0/213     0/197
55.N8i-7g    1/214     0/197

It is hard to defend the gold on 7h. If black would have played 51.B5f instead
of B4g, he would have had the option of P6f here. However, the bishop on 5f
would be vulnerable to other attacks (N*4d), so 5f is a worse position than 4g.

56.N7c-8e    0/214     5/202
57.P7d-7c+   0/214     0/202
58.G2fx3f    0/214     20/222
59.B1hx3f    5/219     0/222
60.S6bx7c    0/219     1/223
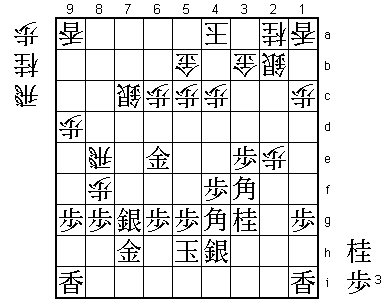
61.G*6e!     15/234    0/223

Habu fights back with everything he has. White's position is extremely
vulnerable to rook drops, so that is where Habu is looking for his counter
chances. White is better, but the margin of error is small.

62.N8ex7g+   0/234     4/227
63.S8hx7g    0/234     0/227
64.R7e-8e?   0/234     1/228

The first Tanigawa mistake which makes matters very complicated. Better
would have been 64.Px8g+ Gx8g (Gx7e +Px7h is even better for white) R8e
and white keeps his advantage. 64.R8e allows the black bishops to come
alive.

65.P8gx8f    1/235     0/228
66.R8e-8b    0/235     0/228
67.G6e-7d    1/236     0/228
68.S7cx7d    0/236     3/231
69.B4gx7d    0/236     0/231
70.G*7c      0/236     0/231
71.B7d-6e?   13/249    0/231

Habu regretted this move. Pulling back the bishop to 4g immediately would
have been better. Now white is given the chance to activate his gold and
move it to a square where it is defended.

72.G7c-6d    0/249     16/247
73.B6e-4g    9/258     0/247
74.N*4d      0/258     2/249
75.B3f-1h    2/260     0/249
76.P*7f      0/260     16/265
77.S7g-8h    4/264     0/265
78.R8bx8f    0/264     1/266
79.P*8g      1/265     0/266
80.R8f-8e    0/265     0/266
81.P4f-4e    0/265     0/266
82.P*3f      0/265     0/266
83.P4ex4d    0/265     0/266
84.P3fx3g+   0/265     0/266
85.S4hx3g    0/265     0/266
86.R8ex3e    0/265     3/269
87.S*4f      3/268     0/269
88.R3e-7e    0/268     0/269
89.N*3e      4/272     0/269
90.N*3d!     0/272     9/278

Typical Tanigawa move. He ignores black's attack on 4c and puts pressure
on his opponent pieces instead. Defending by creating attacking chances.

91.P4dx4c+   3/275     0/278
92.G3bx4c    0/275     0/278
93.N3ex4c+   0/275     0/278
94.G5bx4c    0/275     0/278
95.N*3e      2/277     0/278
96.G4c-4d    0/277     5/283
97.P*4c      3/280     0/283
98.S2b-3c    0/280     3/286
99.N3e-2c+   0/280     0/286
100.G4dx4c   0/280     1/287
101.B4g-8c+  0/280     0/287
102.N3dx4f   0/280     3/290
103.S3gx4f   0/280     0/290
104.P*4g!    0/280     0/290

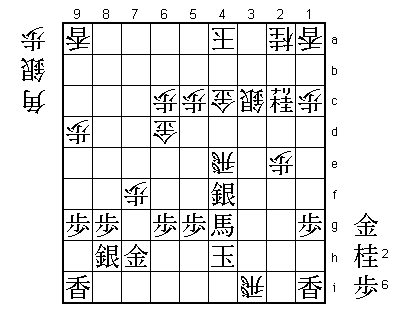
Probably the highlight of the game and an illustration of Tanigawa's special
endgame skills. Even though this is not a mating threat, black will be mated
after the natural attacking move 105.+B6a, since after R*4h K5i S*5h K6h
S4i= K7i Rx7h+ etc. black has the square 6e for a gold drop to mate. The
promoted bishop on 8c must stay there to defend 6e. This just takes enough
sting out of black's attack.

105.+B8cx4g  3/283     0/290
106.P*4e     0/283     0/290
107.B1hx4e   6/289     0/290
108.N*3e     0/289     0/290
109.S4fx3e   0/289     0/290
110.R7ex4e   0/289     0/290
111.S3e-4f   0/289     0/290
112.R*3i     0/289     1/291
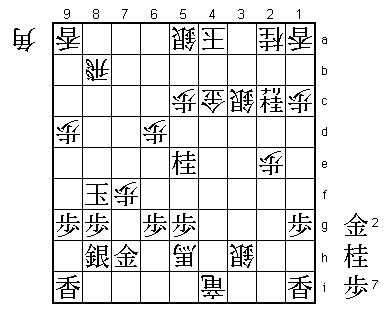
113.K5h-4h?  3/292     0/291

Here Habu misses his chance to keep the position very close. 113.N*5i was
overlooked by both players, but is the right move here. After 114.B*2g or
B*3h black can defend with +B4h. The best move seems 114.R7e and defend
with S3d after N*3e, but being forced to move the rook away seems to be
giving black the initiative and might have changed the outcome of the game.

114.R4ex4f   0/292     2/293
115.+B4gx4f  0/292     0/293
116.S*3h     0/292     0/293
117.R*7a     2/294     0/293
118.S*5a     0/294     0/293
119.K4h-5h   0/294     0/293
120.R3i-4i+  0/294     0/293
121.K5h-6h   0/294     0/293
122.B*6i     0/294     0/293
123.R7ax7f+  1/295     0/293
124.P*7e!    0/295     0/293

A pawn is worth a thousand golds. Without this final pawn to drop, white is
lost.

125.+B4fx6d  0/295     0/293
126.B6i-5h+  0/295     0/293
127.K6h-7g   0/295     0/293
128.P7ex7f   0/295     0/293
129.K7g-8f   0/295     0/293
130.P6cx6d   0/295     0/293
131.N*5e     0/295     0/293
132.R*8b     0/295     0/293
Resigns      0/295     0/293
Time:        04:55:00  04:53:00

A very close game that could have gone either way. However, Tanigawa's play
stood out as he was dictating the pace of the game throughout and played the
best moves. He seems to be in great form and should be able to win at least
one of the two remaining games to keep his Kisei title.
