70th Meijin Match Game 6
[Black "Habu Yoshiharu, Challenger"]
[White "Moriuchi Toshiyuki, Meijin"]
[Event "70th Meijin-sen, Game 6"]
[Date "June 12th and 13th 2012"]
1.P7g-7f     00:00:00  00:00:00
2.P8c-8d     00:00:00  00:00:00
3.P2g-2f     00:05:00  00:00:00
4.G4a-3b     00:05:00  00:03:00
5.G6i-7h     00:07:00  00:03:00
6.P8d-8e     00:07:00  00:07:00
7.B8h-7g     00:10:00  00:07:00
8.P3c-3d     00:10:00  00:07:00
9.S7i-8h     00:12:00  00:07:00
10.B2bx7g+   00:12:00  00:10:00
11.S8hx7g    00:12:00  00:10:00
12.S3a-4b    00:12:00  00:10:00
13.S3i-3h    00:17:00  00:10:00
14.S7a-7b    00:17:00  00:11:00
15.P9g-9f    00:22:00  00:11:00
16.P9c-9d    00:22:00  00:11:00
17.P4g-4f    00:31:00  00:11:00
18.P6c-6d    00:31:00  00:12:00
19.S3h-4g    00:32:00  00:12:00
20.S7b-6c    00:32:00  00:14:00
21.K5i-6h    00:33:00  00:14:00
22.S4b-3c    00:33:00  00:21:00
23.G4i-5h    00:38:00  00:21:00
24.P1c-1d    00:38:00  00:24:00
25.P1g-1f    00:40:00  00:24:00
26.K5a-4b    00:40:00  00:24:00
27.P3g-3f    00:42:00  00:24:00
28.S6c-5d    00:42:00  00:30:00
29.K6h-7i    00:51:00  00:30:00
30.G6a-5b    00:51:00  00:35:00
31.S4g-5f    00:57:00  00:35:00
32.P4c-4d    00:57:00  00:37:00
33.P6g-6f    00:58:00  00:37:00
34.P7c-7d    00:58:00  00:52:00
35.N2i-3g    01:06:00  00:52:00
36.K4b-3a    01:06:00  00:52:00
37.R2h-4h    01:06:00  00:52:00
38.G5b-4b    01:06:00  00:53:00
39.K7i-8h    01:13:00  00:53:00
40.K3a-2b    01:13:00  00:53:00
41.N3g-2e    01:22:00  00:53:00
42.S3c-2d    01:22:00  00:53:00
43.B*2h      01:22:00  00:53:00
44.P7d-7e    01:22:00  00:53:00
45.P4f-4e    01:24:00  00:53:00
46.P7ex7f    01:24:00  01:04:00
47.S7gx7f    01:24:00  01:04:00
48.P4dx4e    01:24:00  01:04:00
49.B2hx6d    01:24:00  01:04:00
50.P*7c      01:24:00  01:08:00
51.P*7d      01:28:00  01:08:00
52.R8b-6b    01:28:00  01:08:00
53.B6d-3g    01:29:00  01:08:00
54.R6bx6f    01:29:00  01:13:00
55.G5h-6g    01:30:00  01:13:00
56.B*4d      01:30:00  01:34:00
57.N8i-7g    01:44:00  01:34:00
58.R6fx6g+   01:44:00  01:36:00
59.S5fx6g    01:44:00  01:36:00
60.P*6f      01:44:00  01:38:00
61.S6g-5h    01:46:00  01:38:00

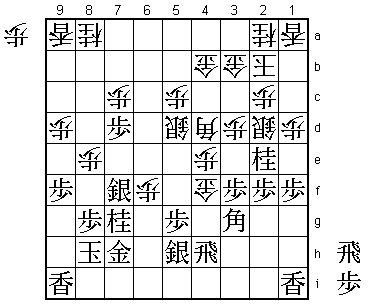
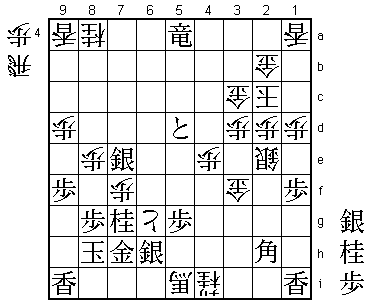
This game has started with a blistering pace, but this should come as no
surprise, because this position is still identical to the position that
appeared in the second game.

62.G*4f      01:46:00  01:38:00

In the second game Moriuchi played 62.G*2g here, but he was not happy with
the way this gold was working here. Here, 62.N9c has also been tried, but
62.G*4f is move that has been played most often.

63.B3g-2h    01:48:00  01:38:00

64.B4dx2f    01:48:00  01:45:00
65.R4h-4i    01:49:00  01:45:00
66.S2dx2e    01:49:00  01:46:00
67.R*6a      02:28:00  01:46:00
68.G4fx3f!   02:28:00  01:59:00

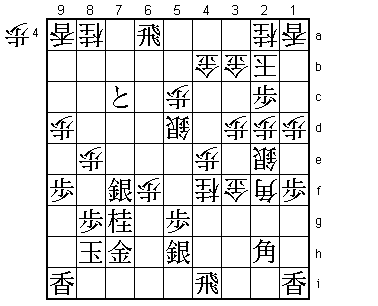
This is Moriuchi's new idea. It is not an easy move to play, because it opens
the bishop diagonal while moving the gold in the wrong direction. Habu admitted
after the game that he never saw this coming. The idea is to drop a knight on
4f next, putting pressure on the rook and bishop. However, as Moriuchi pointed
out, the white pieces are in each other's way, so this is not necessarily bad
for black.

69.P*2d      03:13:00  01:59:00
70.P2cx2d    03:13:00  02:24:00
71.P7dx7c+   03:23:00  02:24:00
72.N*4f      03:23:00  03:00:00
73.P*2c      03:49:00  03:00:00

74.K2bx2c!   03:49:00  03:13:00

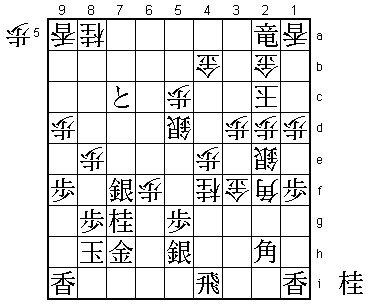
Allows black to take the knight on 2a, which requires some courage, but it is
the right decision. After 74.Gx2c, the drop B*4a after an exchange of the bishops
is much harder to defend for white.

75.R6ax2a+   04:37:00  03:13:00
76.G3b-2b    04:37:00  03:16:00

77.+R2a-5a?  04:37:00  03:16:00

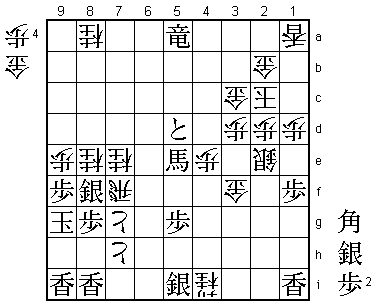
This is a mistake. Correct was 77.+Rx1a and after 78.Nx5h+ black has the
surprising 79.R3i!. This threatens N*1g next, which is hard to defend against.
The point of R3i is that white cannot answer N*1g with Sx1f because the gold
on 3f will be lost. Both players had overlooked 79.R3i and only looked at
79.R2i. When they were shown 79.R3i, they both were surprised, but after looking
at it for a while had to admit that this was the right way to play for black.

78.G4b-3b    04:37:00  04:34:00
79.S5h-6i    05:03:00  04:34:00
80.P*7e!     05:03:00  04:40:00

Strong counter attack.

81.S7fx7e    06:40:00  04:40:00

Played after a long thought that must have been quite painful for Habu. Black
wants to answer with 81.Sx8e, but then 81.Nx7c picks up the promoted pawn while
attacking the silver on 8e. For example, 82.P*3c G3bx3c +Rx1a Nx8e Nx8e B4d and
P6g+ next is very strong.

82.P*7f      06:40:00  05:03:00

Simple, but strong.

83.P*3c      07:09:00  05:03:00

Black cannot play 83.Nx8e because of 84.B4d.

84.G3bx3c    07:09:00  05:57:00
85.+P7c-6c   07:12:00  05:57:00
86.N4f-3h+   07:12:00  07:07:00
87.+P6cx5c   07:37:00  07:07:00
88.+N3hx4i   07:37:00  07:37:00
89.+P5cx5d   07:40:00  07:37:00
90.B2f-5i+   07:40:00  07:39:00
91.S6i-6h    08:04:00  07:39:00
92.P6f-6g+!  08:04:00  07:43:00

Another strong move by Moriuchi. 92.Sx6g is answered by 93.Px7g+ Gx7g R*4h
forking king and bishop. 92.Gx6g is also answered by 93.R*4h and +Bx6h next
is devastating.

93.S6hx5i    08:10:00  07:43:00
94.P7fx7g+   08:10:00  07:55:00
95.K8h-9g    08:11:00  07:55:00

Black has no choice. 95.Gx7g is answered by 96.R*8i Kx8i +Px7g and there is
no defense.

96.P9d-9e    08:11:00  08:06:00

"Against the edge king, push the edge pawn".

97.B2hx9a+   08:17:00  08:06:00
98.R*7f      08:17:00  08:10:00
99.N*8f      08:21:00  08:10:00

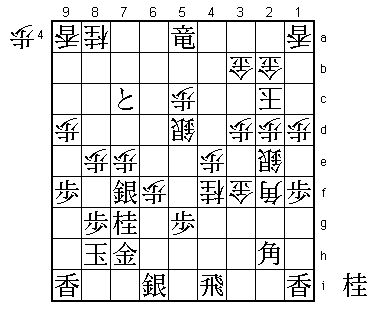
Moriuchi was worried about a bishop drop on 4a at several occasions here, but
it is not strong enough. For example, if black plays it here, then 99.B*4a
N*3b Bx8e+ +P6gx7h +Bx5e Px9f +Bx9f R7f! threatens mate while the white king
cannot be mated.

100.P8ex8f   08:21:00  08:21:00
101.S7ex8f   08:23:00  08:21:00
102.N*7e!    08:23:00  08:24:00

Moriuchi had to be careful, but he makes no mistake. If he rushes in with
102.+P6gx7h then 103.+B5e is a mating threat that defends against the white
mating threat and suddenly the tables are turned. For example, 104.N*8e Sx8e
+Px8g Kx8g G*8f is a similar mating sequence as in the actual game, but after
K9h white has only a knight in hand and therefore there is no mate.

103.L*8i     08:48:00  08:24:00
104.+P6gx7h  08:48:00  08:33:00
105.+B9a-5e  08:51:00  08:33:00
106.N*8e     08:51:00  08:37:00
Resigns      08:51:00  08:37:00

Mate after 107.Sx8e +Px8g Lx8g Nx8g+ Kx8g G*8f K9h L*9g, so white resigned
here, giving white the first win of this match at a decisive moment. Despite
losing 11 games in a row for the first time in his career in the build-up to
this match, Moriuchi defends his Meijin title in great style. This is his 7th
Meijin title, which puts him 4th in the all-time ranking, shared with Habu.
Challenger Habu can't have too many regrets over this match, because he was
soundly beaten four times. Winning all games in the A Junisen for the first
time in his career was no guarantee to take the Meijin title away from Moriuchi,
who seems to have special powers when playing for this particular title.
