70th Meijin Match Game 5
[Black "Moriuchi Toshiyuki, Meijin"]
[White "Habu Yoshiharu, Challenger"]
[Event "70th Meijin-sen, Game 5"]
[Date "May 31st and June 1st 2012"]
1.P7g-7f     00:00:00  00:00:00
2.P3c-3d     00:00:00  00:01:00

Habu has tried to break down Moriuchi's opening play with the black pieces
with the Yagura opening twice, but failed on both occasions. This time he
tries the Yokofudori opening.

3.P2g-2f     00:04:00  00:01:00
4.P8c-8d     00:04:00  00:04:00
5.P2f-2e     00:04:00  00:04:00
6.P8d-8e     00:04:00  00:06:00
7.G6i-7h     00:05:00  00:06:00
8.G4a-3b     00:05:00  00:09:00
9.P2e-2d     00:07:00  00:09:00
10.P2cx2d    00:07:00  00:11:00
11.R2hx2d    00:07:00  00:11:00
12.P8e-8f    00:07:00  00:20:00
13.P8gx8f    00:07:00  00:20:00
14.R8bx8f    00:07:00  00:20:00
15.R2dx3d    00:07:00  00:20:00
16.B2b-3c    00:07:00  00:23:00
17.K5i-5h    00:11:00  00:23:00
18.S3a-2b    00:11:00  00:30:00
19.G4i-3h    00:14:00  00:30:00
20.K5a-4a    00:14:00  00:59:00
21.R3d-3f    00:17:00  00:59:00
22.R8f-8d    00:17:00  01:03:00
23.P*8g      00:38:00  01:03:00
24.R8d-2d    00:38:00  01:11:00
25.S3i-2h    00:39:00  01:11:00
26.G6a-5a    00:39:00  01:12:00
27.P7f-7e    00:46:00  01:12:00
28.R2d-8d    00:46:00  01:15:00
29.R3f-8f    00:52:00  01:15:00
30.P*8e      00:52:00  01:18:00
31.R8f-5f    00:52:00  01:18:00
32.S7a-6b    00:52:00  01:21:00
33.P3g-3f    00:53:00  01:21:00
34.P5c-5d    00:53:00  01:23:00
35.P3f-3e    00:57:00  01:23:00
36.B3c-4b    00:57:00  01:28:00
37.S2h-3g    00:59:00  01:28:00

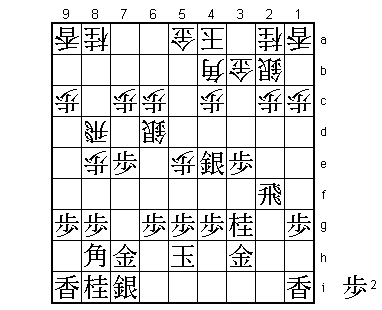
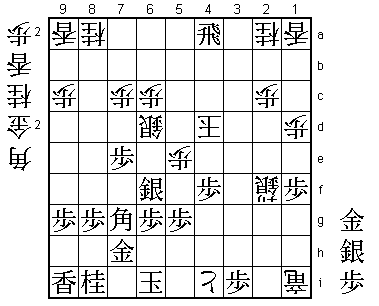
The position after 36.B4b has been played earlier in five games. Both players
also have experience with it, because it also appeared in the 5th game of
last year's Meijin match. There Moriuchi played 37.R2f which was answered
by 38.P*2c R7f S3c N3g and Habu moved the silver on the left far up the board,
exchanging it for the knight on 3g. Exchanging a defensive silver for an
attacking knight is supposed to be good for the attacking side, but this was
an exception. Habu judged the position perfectly and won the game. In this
game, Moriuchi tries the different move 37.S3g, which also has been played before.

38.S6b-5c    00:59:00  02:13:00
39.S3g-4f    01:12:00  02:13:00
40.S5c-6d    01:12:00  02:24:00
41.S4f-4e    02:02:00  02:24:00
42.P5d-5e    02:02:00  02:28:00
43.R5f-2f    02:02:00  02:28:00
44.P*2c      02:02:00  02:28:00
45.N2i-3g    02:57:00  02:28:00

46.G5a-5b    02:57:00  03:18:00

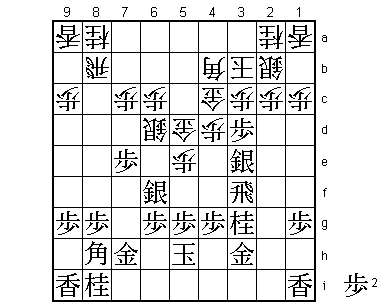
This is a move by Habu. In the 5th game of the 2010 Ryu-O match against
Watanabe, he played 46.K3a, but that wasn't a good idea. The plan of moving
the gold up is to get rid of the pawn on the third file, so that white can
move up the wall silver on 2b.

47.P3e-3d    04:00:00  03:18:00
48.G5b-5c    04:00:00  04:05:00

Taking things slow is important here. The mutual attack 48.Sx7e Bx5e P8f Px8f
Sx8f N7g is good for black because of the wall silver on 2b.

49.S7i-6h    04:40:00  04:05:00
50.P4c-4d    04:40:00  04:51:00
51.S4e-3f    04:40:00  04:51:00
52.P8e-8f    04:40:00  04:52:00
53.P8gx8f    04:40:00  04:52:00
54.R8dx8f    04:40:00  04:52:00
55.P*8g      04:47:00  04:52:00
56.R8f-8b    04:47:00  05:00:00
57.S3f-3e    04:49:00  05:00:00
58.G3b-4c    04:49:00  05:02:00
59.S6h-7g    05:17:00  05:02:00
60.K4a-3b    05:17:00  05:16:00
61.S7g-6f    05:23:00  05:16:00
62.G5c-5d    05:23:00  05:17:00
63.R2f-3f    05:41:00  05:17:00
64.P*3c      05:41:00  06:14:00

65.G3h-4h!   06:25:00  06:14:00

A surprise, but a good move. It seems like black can keep the attacking base
on 3d with 65.Px3c+ Sx3c P*3d S2d Sx2d Px2d and this was the development
that was expected in the press room. However, after P*2e S4e Nx4e Gx4e R2f
Gx3e R2i Px2e the position is not clear. Moriuchi opts for strengthening
his position with G4h followed by K6i.

66.P3cx3d    06:25:00  06:29:00
67.S3ex3d    06:25:00  06:29:00
68.G4cx3d    06:25:00  06:29:00
69.R3fx3d    06:25:00  06:29:00
70.S2b-3c    06:25:00  06:29:00
71.R3d-3f    06:25:00  06:29:00
72.P*3d      06:25:00  06:29:00
73.R3f-2f    06:29:00  06:29:00
74.P4d-4e    06:29:00  06:38:00
75.B8h-7g    06:33:00  06:38:00
76.G5d-4d    06:33:00  06:43:00
77.K5h-6i    07:03:00  06:43:00
78.P1c-1d    07:03:00  06:51:00
79.P1g-1f    07:04:00  06:51:00

80.P3d-3e    07:04:00  07:33:00

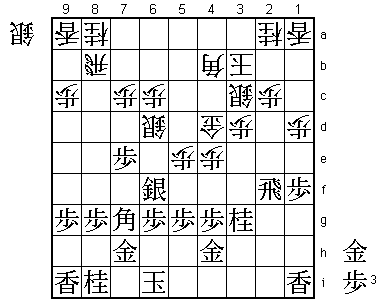
This is leading to a good position for black, but there weren't a lot of
other good moves to play for white. Black has given up the attacking base
on 3d and white has activated the silver on 2b, so all is supposed to be
well with the white position. However, Moriuchi has judged to perfection
that white will run out of moves first, being forced to create weaknesses
in its own position. The only alternative to 80.P3e seems to be 80.S2d,
but after 81.K7i S3e R2i P2d black can counterattack strongly with P*3f
Sx3f P4f Px4f P*4e and it looks like black will break through on the 4th
file.

81.P4g-4f    07:21:00  07:33:00

Moriuchi doesn't hesitate. White threatened P3f Rx3f S*3e so there is no
time to put the king closer to the castle with K7i.

82.P3e-3f    07:21:00  07:37:00

Habu tries to confuse the issue. The normal 82.Px4f is answered by 83.P*4e
G3d Sx5e S*7f S5d and the square 4c is too weak to set up a proper defense.

83.N3gx4e    07:23:00  07:37:00
84.S*3g      07:23:00  07:37:00

Habu tries to set up a position for an entering king here, but this seems
like a pipe dream in this position.

85.N4ex3c+   07:34:00  07:37:00
86.B4bx3c    07:34:00  07:37:00
87.P*3d      07:39:00  07:37:00
88.S3gx2f+   07:39:00  08:04:00
89.P3dx3c+   07:39:00  08:04:00
90.K3bx3c    07:39:00  08:04:00
91.B*7a      08:05:00  08:04:00
92.R*2i      08:05:00  08:07:00
93.P*3i      08:08:00  08:07:00
94.R2ix3i+   08:08:00  08:09:00
95.G*4i      08:13:00  08:09:00
96.+R3ix1i   08:13:00  08:10:00

97.B7ax8b+   08:14:00  08:10:00

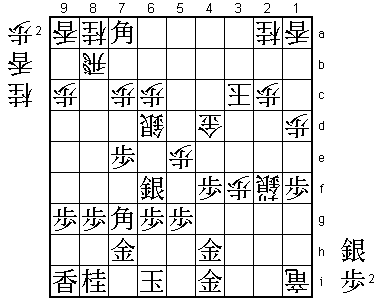
Moriuchi is supposed to win easily from here, but without making an
obvious mistake, the position has become a little more complicated than
expected. Because the endgame was not completely clear, in the post-mortem
analysis a number of alternatives for black were analyzed. The most
promising of these seems 97.Sx5e instead of Bx8b+ here, but even then
98.Sx5e P*3d K2d Bx5e Gx5e S*3e K1c Bx8b+ and after P3g+ no clear way
to win for black was found.

98.P3f-3g+   08:14:00  08:14:00
99.+B8b-7a   08:17:00  08:14:00
100.+P3gx4h  08:17:00  08:18:00
101.P*3i     08:17:00  08:18:00
102.+P4hx4i  08:17:00  08:32:00
103.+B7ax4d  08:30:00  08:32:00
104.K3cx4d   08:30:00  08:32:00
105.R*4a     08:30:00  08:32:00

106.K4d-3e?  08:30:00  08:36:00

Uncharacteristically, Habu seemed to have given up on his position here.
After 106.K3e the game is over in a few moves. More difficult for black
was 106.K3c because after 107.S*3e K2b P*2d Px2d Sx5e +P5i K7i +P6i K8h
L*7g the position also looks very dangerous for black, but after Sx6d
Lx7g+ Kx7g the post-mortem analysis showed that black narrowly escapes.
However, when Moriuchi was shown 106.N*4c instead, he stopped in his
tracks. The difference between dropping a knight and a pawn on 4c is
that after 106.P*4c, black can play 107.G*4e K3c G3e and the white king
is attacked from the top and the bottom. However, with the knight on 4c,
the square 3e is defended so this attack doesn't work. In the post-mortem
analysis, no conclusion could be reached about the position after 106.N*4c.

107.R4a-4e+  08:36:00  08:36:00
108.K3e-2d   08:36:00  08:36:00
109.G*3d     08:36:00  08:36:00
110.K2d-1c   08:36:00  08:36:00
111.P*2d     08:36:00  08:36:00
112.P2cx2d   08:36:00  08:39:00
113.+R4e-4c  08:38:00  08:39:00
114.P*3c     08:38:00  08:39:00
115.+R4c-3b  08:40:00  08:39:00
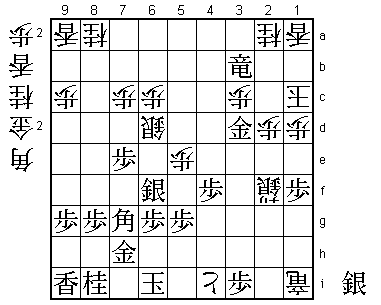
Resigns      08:40:00  08:48:00

Mate after 116.Px3d S*2b K1b S3c+ K1c +R2b and 116.L*2b doesn't defend
because of 117.G2c Lx2c S*2b etc. A bit of an unsatisfactory game for
both players. Habu will rue the fact that he didn't find 106.N*4c to
make a final stand and Moriuchi kept wondering what his mistake was in
a position that seemed to have been easily won for black, but suddenly
became unclear. Of course, Moriuchi will happily take the win that gives
him a 3-2 lead and two chances to defend his Meijin title. Still, all
games in this match have been won by the player with the black pieces,
and Habu will play black in the next game.
