70th Meijin Match Game 4
[Black "Habu Yoshiharu, Challenger"]
[White "Moriuchi Toshiyuki, Meijin"]
[Event "70th Meijin-sen, Game 4"]
[Date "May 22nd and 23rd 2012"]
1.P7g-7f 00:00:00 00:00:00
2.P8c-8d 00:00:00 00:00:00
3.S7i-6h 00:01:00 00:00:00
4.P3c-3d 00:01:00 00:00:00
5.P6g-6f 00:02:00 00:00:00
6.S7a-6b 00:02:00 00:00:00
7.P5g-5f 00:03:00 00:00:00
8.P5c-5d 00:03:00 00:00:00
9.S3i-4h 00:04:00 00:00:00
10.S3a-4b 00:04:00 00:00:00
11.G4i-5h 00:05:00 00:00:00
12.G4a-3b 00:05:00 00:00:00
13.G6i-7h 00:07:00 00:00:00
14.K5a-4a 00:07:00 00:06:00
15.K5i-6i 00:08:00 00:06:00
16.G6a-5b 00:08:00 00:06:00
17.S6h-7g 00:10:00 00:06:00
18.S4b-3c 00:10:00 00:06:00
19.B8h-7i 00:11:00 00:06:00
20.B2b-3a 00:11:00 00:06:00
21.P3g-3f 00:14:00 00:06:00
22.P4c-4d 00:14:00 00:06:00
23.G5h-6g 00:15:00 00:06:00
24.P7c-7d 00:15:00 00:06:00
25.S4h-3g 00:16:00 00:06:00
26.B3a-6d 00:16:00 00:06:00
27.B7i-6h 00:19:00 00:06:00
28.G5b-4c 00:19:00 00:40:00
29.K6i-7i 00:21:00 00:40:00
30.K4a-3a 00:21:00 00:40:00
31.K7i-8h 00:24:00 00:40:00
32.K3a-2b 00:24:00 00:40:00
33.S3g-4f 00:30:00 00:40:00
34.S6b-5c 00:30:00 00:40:00
35.N2i-3g 00:30:00 00:40:00
36.B6d-7c 00:30:00 00:40:00
37.P1g-1f 00:31:00 00:40:00
38.P1c-1d 00:31:00 00:40:00
39.P2g-2f 00:32:00 00:40:00
40.P9c-9d 00:32:00 00:40:00
41.R2h-3h 00:33:00 00:40:00
42.S3c-2d 00:33:00 00:40:00
43.L1i-1h 00:33:00 00:40:00
44.P9d-9e 00:33:00 00:45:00
45.P6f-6e 00:58:00 00:45:00
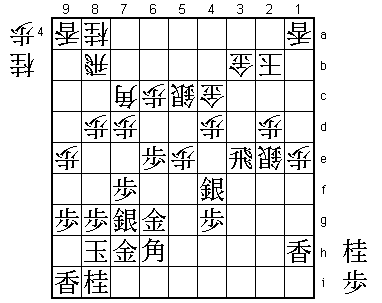
46.N2a-3c 00:58:00 00:49:00
Another Yagura game after the first and third game, both won by Moriuchi. The move
46.N3c is not new, but it has not been played since Fukaura played it against Watanabe
more than two years ago. Even then it was not a common way of playing, because the
combination of the defensive N3c and the unfinished attacking formation with the pawn
still on 8d is considered a little suspect. For Habu, it had been seven years since
he had this move played against him (and six years since he had tried it himself last)
and after the game he admitted that he didn't remember it very well. With the pawn on 8e,
moving the knight up to 3c is much more effective (and played often, also by Habu),
because after an exchange of knights, white has a number of attacking options like the
famous Yagura attack N*8f. Still, Moriuchi may have found a way to revive N3c here.
47.P5f-5e 01:32:00 00:49:00
48.P5dx5e 01:32:00 01:07:00
49.P2f-2e 01:34:00 01:07:00
50.N3cx2e 01:34:00 01:27:00
51.N3gx2e 01:34:00 01:27:00
52.S2dx2e 01:34:00 01:29:00
53.P3f-3e 01:35:00 01:29:00
54.P3dx3e 01:35:00 01:45:00
55.P1f-1e 02:09:00 01:45:00
56.P1dx1e 02:09:00 01:49:00
57.R3hx3e 02:15:00 01:49:00
58.P2c-2d 02:15:00 01:55:00
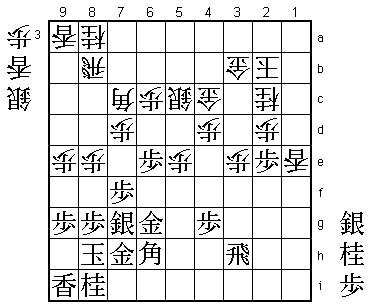
This is Moriuchi's new idea. There is a weakness on 2c, but driving the rook back is
an important tempo as we will see.
59.R3e-3i 03:02:00 01:55:00
60.P*3d 03:02:00 02:20:00
61.P*3e 03:04:00 02:20:00
62.P8d-8e 03:04:00 03:05:00
As explained before, with the pawn on 8e the exchange of a defensive knight against
an attacking knight is not bad for white because he can use this knight in attack.
Moriuchi has managed to create this position even with playing the knight to 3c
earlier. Also, by forcing the rook back to 3i, the square 8d is now a very effective
position for the bishop because it will be directed straight at the black rook.
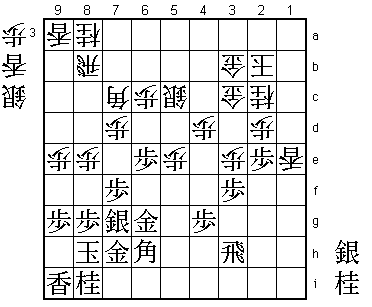
63.P3ex3d 04:48:00 03:05:00
Habu realized that this was not an easy position and took 1 hour and 44 minutes
for this move, which also was the sealed move.
64.S2ex3d 04:48:00 03:09:00
65.L1hx1e 04:50:00 03:09:00
66.L1ax1e 04:50:00 04:02:00
67.S4f-3e 04:51:00 04:02:00
Habu sacrifices a lance to speed up his attack. Whether this leads to a good
position for black is difficult to say, but in the post-mortem analysis Habu
said that he had no choice but to go for it.
68.S3dx3e 04:51:00 04:20:00
69.R3ix3e 04:51:00 04:20:00
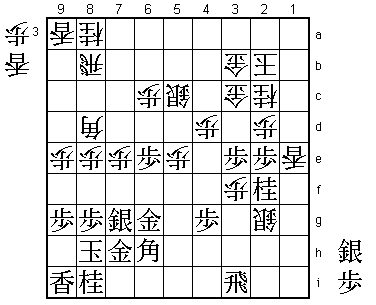
70.N*2c 04:51:00 04:43:00
Here 70.P*1d seems to be an alternative, but after 71.N*2f black is both threatening
72.P*3c followed by P*3d and Nx1d followed by Rx1e which is hard to defend against.
71.R3e-3h 05:31:00 04:43:00
72.P*3e 05:31:00 04:48:00
73.P*2e 05:32:00 04:48:00
The obvious move as the head of the knight that was dropped on 2c is weak.

74.G4c-3c?   05:32:00  04:59:00

This is the move Moriuchi regretted the most in this game. In the post-mortem
analysis he pointed out that 74.G3d would have been better. For example, 75.Px2d
Gx2d N*3f G3d P*2d Px3f and it looks like white has goof fighting chances. Actually,
74.G3b-3c also is better than the game after 75.Px2d Gx2d N*3f G2d-3d P*2d S*2g.

75.P*3f!     05:38:00  04:59:00
Moriuchi underestimated the strength of this move. The sequence Px2d Gx2d N*3f is
very tempting, but here the pawn drop on 3f is much better. White cannot take this
pawn because of 75.Px3f Px2d and if he plays a move somewhere else, the attack on
the third file with Px3e followed by P3d is very fast. In the post-mortem analysis,
Moriuchi gave the impression that he had more or less given up on the game after
75.P*3f.

76.S*2g      05:38:00  05:57:00
77.R3h-3i    05:44:00  05:57:00
78.B7c-8d    05:44:00  05:58:00

Or 78.Sx3f+ Px2d Gx2d Rx3f Px3f Bx2d and black has an overwhelming position.

79.P7f-7e!   05:57:00  05:58:00

Good reply to win time for attacking the third file. If white tries to keep the
pressure on the rook with 80.Bx7e then black can answer with S6f.

80.P7dx7e    05:57:00  06:03:00
81.P3fx3e    06:00:00  06:03:00
82.P*3f      06:00:00  06:13:00
83.N*2f!     06:10:00  06:13:00
Another good move by Habu, threatening both P3d and making sure that the white
king cannot escape through 1d. White's only hope here is to make an entering king,
but this is actually quite a realistic aim here with the lance on 1e and the silver
on 2g.

84.P7e-7f    06:10:00  06:34:00
85.S7g-6f    06:10:00  06:34:00
86.S2g-1f+   06:10:00  06:45:00
87.P3e-3d    06:19:00  06:45:00
88.G3c-4c    06:19:00  06:46:00
89.S*3c?     06:28:00  06:46:00

Habu may be pushing a little too hard here. The quiet 89.R3f would have made things
a little easier. For example, 90.P*3e Px2d Px3f Px2c+ followed by P*2d is winning
for black.

90.G4cx3c    06:28:00  06:55:00
91.P3dx3c+   06:28:00  06:55:00
92.K2bx3c    06:28:00  06:55:00
93.G*3d      07:06:00  06:55:00
94.K3c-4b    07:06:00  06:56:00
95.P*5d!     07:07:00  06:56:00

This is better than 95.P*2d because after 96.+Sx2f Px2c+ Gx2c Gx2c L*7a P*7e N*5d
white is getting a lot of pressure on the 6th and 7th file, and black needs to
be very careful.

96.S5cx5d    07:07:00  06:58:00
97.G3dx4d    07:07:00  06:58:00
98.+S1fx2f   07:07:00  07:20:00
99.G4dx5d    07:09:00  07:20:00
100.+S2fx2e  07:09:00  07:21:00
101.B6h-4f   07:21:00  07:21:00
102.N*4c     07:21:00  07:30:00
103.S*4d     07:28:00  07:30:00
104.L*5a     07:28:00  07:36:00
105.P*5c     07:29:00  07:36:00
106.S*3c     07:29:00  07:55:00
107.S4dx3c+  08:06:00  07:55:00
108.G3bx3c   08:06:00  07:57:00

Moriuchi has been keeping his hopes of an entering king alive by pulling back the
promoted silver to 2e, but unfortunately it is not so easy here to get the king up
the board. For example, 108.Kx3c fails to 109.Gx5e and the fork G4d is a nasty
threat that makes it impossible to make an entering king.

109.S*4d     08:09:00  07:57:00
110.R8b-7b   08:09:00  08:20:00
111.R3i-2i   08:18:00  08:20:00
112.P*4e     08:18:00  08:53:00
113.B4f-6h?  08:30:00  08:53:00

Again, Habu could have made it easier for himself if he had played 113.Rx2e here.
Then 114.Px2e B1c+ or 114.Px4f R4e wins for black. Fortunately for him, the black
position is still winning.

114.N2c-3e   08:30:00  08:54:00
115.S4dx3c+  08:38:00  08:54:00
116.K4bx3c   08:38:00  08:54:00
117.G*8c     08:38:00  08:54:00
118.B8dx6f   08:38:00  08:56:00
119.G6gx6f   08:38:00  08:56:00
120.R7b-7d   08:38:00  08:56:00
121.P6e-6d   08:39:00  08:56:00
122.P3f-3g+  08:39:00  08:58:00
123.G5dx4c   08:40:00  08:58:00
124.K3cx4c   08:40:00  08:58:00
125.B*6e     08:40:00  08:58:00
126.K4c-3d   08:40:00  08:58:00
127.B6ex7d   08:40:00  08:58:00
128.L1e-1h+  08:40:00  08:58:00
129.N*2f     08:41:00  08:58:00
130.+S2ex2f  08:41:00  08:58:00
131.R2ix2f   08:41:00  08:58:00
132.S*2e     08:41:00  08:58:00
133.S*4c     08:42:00  08:58:00
134.K3dx4c   08:42:00  08:58:00
135.R2fx2e   08:42:00  08:58:00
136.P2dx2e   08:42:00  08:58:00
137.B6hx3e   08:42:00  08:58:00
138.K4c-3d   08:42:00  08:58:00
139.S*4d     08:43:00  08:58:00
140.G*2c     08:43:00  08:59:00
141.B7d-6e   08:44:00  08:59:00
142.R*4a     08:44:00  08:59:00
143.R*3a     08:44:00  08:59:00
Resigns      08:44:00  08:59:00

A very nice way to finish this game. 144.Rx3a B4c+ is mate and after 144.S*3c Rx4a+
there is no defense to Moriuchi resigned here. A good win by Habu, making this the
fourth game in a row in which the player with the black pieces wins. Will it be the
same story in game 5?