70th Meijin Match Game 3
[Black "Moriuchi Toshiyuki, Meijin"]
[White "Habu Yoshiharu, Challenger"]
[Event "70th Meijin-sen, Game 3"]
[Date "May 8th and 9th 2012"]
1.P7g-7f 00:00:00 00:00:00
2.P8c-8d 00:00:00 00:00:00
3.S7i-6h 00:02:00 00:00:00
4.P3c-3d 00:02:00 00:01:00
5.P6g-6f 00:02:00 00:01:00
6.S7a-6b 00:02:00 00:02:00
7.P5g-5f 00:02:00 00:02:00
8.P5c-5d 00:02:00 00:03:00
9.S3i-4h 00:02:00 00:03:00
10.S3a-4b 00:02:00 00:04:00
11.G4i-5h 00:10:00 00:04:00
12.G4a-3b 00:10:00 00:12:00
13.G6i-7h 00:10:00 00:12:00
14.K5a-4a 00:10:00 00:13:00
15.K5i-6i 00:10:00 00:13:00
16.P7c-7d 00:10:00 00:15:00
17.G5h-6g 00:11:00 00:15:00
18.S6b-5c 00:11:00 00:17:00
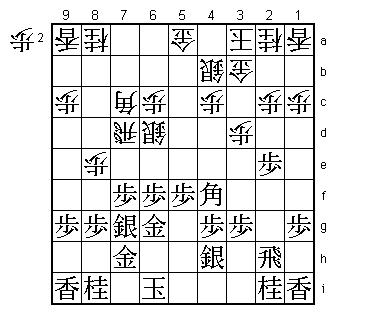
In this game Habu uses a quick attacking plan against Moriuchi's Yagura formation.
19.P2g-2f 00:18:00 00:17:00
20.P8d-8e 00:18:00 00:20:00
21.S6h-7g 00:29:00 00:20:00
22.P5d-5e 00:29:00 00:22:00
23.P5fx5e 00:31:00 00:22:00
24.B2bx5e 00:31:00 00:22:00
25.B8h-7i 00:44:00 00:22:00
26.B5e-7c 00:44:00 00:27:00
27.B7i-4f 00:45:00 00:27:00
28.S5c-6d 00:45:00 00:27:00
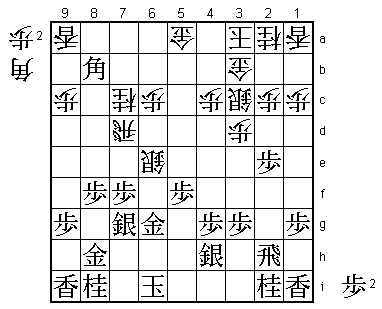
29.P7f-7e 00:51:00 00:27:00
This is the standard move to attack the head of the bishop after it has moved to
the other side of the board.
30.R8b-8d 00:51:00 00:38:00
31.P7ex7d 01:01:00 00:38:00
32.R8dx7d 01:01:00 00:39:00
33.P*5f 01:02:00 00:39:00
34.K4a-3a 01:02:00 01:01:00
35.P2f-2e 01:10:00 01:01:00
36.G6a-5a 01:10:00 01:14:00
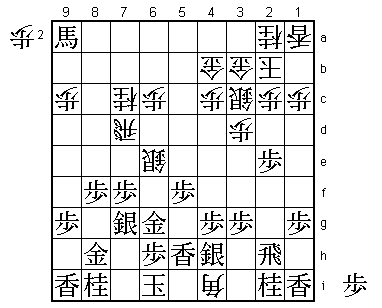
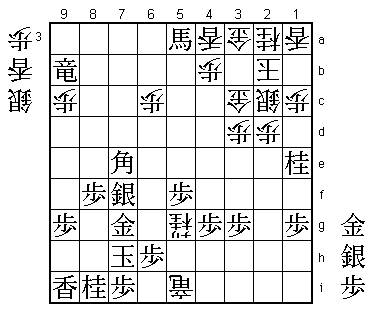
37.P*7f! 01:40:00 01:14:00
This is a new move by Moriuchi and an improvement. In the famous Ryu-O match in
2008, where Watanabe overcome a 3-0 deficit to keep his title against Habu, the
6th game proceeded with 37.P2d Px2d Bx2d to exchange the pawn in front of the rook,
but Watanabe strongly countered with B6b P3f P*2g Rx2g P*2f R2h Rx7g+ G6gx7g S*2g
and won the game. Moriuchi closes the rook line first and now P2d is a real threat.
38.S4b-3c?! 01:40:00 02:21:00
This defends against the pawn exchange on the second file, but it is also very
risky because the gold on 5i is now no longer connected to the castle formation.
If white would get the time to play G5a-4b, his position would be alright, but...
39.P6f-6e 02:12:00 02:21:00
Moriuchi sees the hanging gold on 5a and immediately starts attacking.
40.S6dx6e 02:12:00 02:43:00
41.B4fx7c+ 02:14:00 02:43:00
42.N8ax7c 02:14:00 02:43:00
43.B*8b 02:19:00 02:43:00
If white doesn't do anything, black will just get a lance in hand and promote the
bishop at the same time.
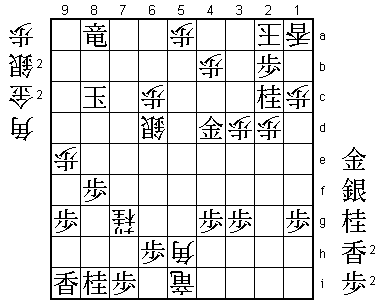
44.P8e-8f 02:19:00 02:54:00
45.P8gx8f 03:11:00 02:54:00
46.P*8h 03:11:00 04:12:00
47.G7hx8h 03:50:00 04:12:00
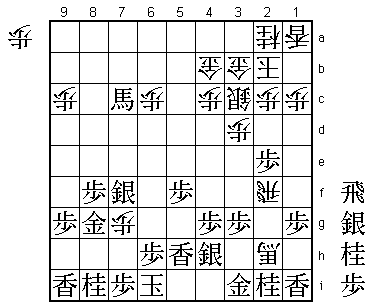
The sealed move.

48.B*4i?     03:50:00  04:14:00

Now white gets into serious trouble. The best way to keep the game close is 48.P*8e.
Then 49.Px8e Nx8e just invites another piece into the attack so black must play
49.Bx9a+ 50.Px8f, but then there are a number of alternatives, none of which seem
to give black a clear advantage. For example, 51.P7e Rx7e Sx8f S7f G6h R6e P*6f
Rx6f S7g Rx6h+ Sx6h P*5g or 51.L*7e R5d P5e Rx5e +Bx7c B*5h K6h Bx6g+ Kx6g S5f K5h
or 51.P*6f P8g+ Gx8g Sx5f Gx5f B*6g S5g Bx8i+ were variations that were analyzed in
the press room and the post-mortem analysis, but no conclusion was reached in any of
them. Habu admitted after the game that he should have played 48.P*8e here.

49.P*6h      04:11:00  04:14:00
50.K3a-2b    04:11:00  04:20:00

Very unnatural to give up the initiative after the very aggressive 48.B*4i, but it
is too risky to go all out attack, most likely giving up a bishop in the process.
This bishop would come back to hunt white with B*5c or B*7e as long as the king
is on 3a.

51.B8bx9a+   04:25:00  04:20:00
52.G5a-4b    04:25:00  04:24:00
53.L*5h!     04:59:00  04:24:00
Very strong defensive move that forced Habu into additional material sacrifice.

54.S6ex7f    04:59:00  05:11:00

This sacrifices an inordinate amount of material, but the alternative 54.P*7e K5i
Px7f Kx4i Px7g+ G7g-6g S6f P*7f seems to stop the white attack.

55.G6gx7f    05:16:00  05:11:00
56.R7dx7f    05:16:00  05:11:00
57.S7gx7f    05:16:00  05:11:00
58.P*8g      05:16:00  05:11:00
59.G8hx8g    05:45:00  05:11:00
60.G*2g      05:45:00  05:11:00
61.R2hx2g    05:52:00  05:11:00
62.B4ix2g+   05:52:00  05:11:00
63.G*3i      05:57:00  05:11:00
64.P*7g      05:57:00  05:28:00
65.P*7i      06:39:00  05:28:00
66.R*2f      06:39:00  06:11:00
67.+B9ax7c   06:54:00  06:11:00
68.+B2g-2h   06:54:00  06:11:00
Habu is desperately trying to get back into the game and almost gets his reward here.

69.G3ix2h?   07:00:00  06:11:00

This turns the game into a very close fight. Correct was to have the promoted bishop
work in defense with 69.+B8d. For example 70.+Bx3i Sx3i Rx2i+ R*7a and the black attack
is very strong (N*4e is answered by Gx7g and P*5g K7h +Rx3i P*2d).

70.R2fx2h+   07:00:00  06:16:00
71.S*5i      07:00:00  06:16:00
72.P*5g      07:00:00  06:48:00
73.L5hx5g    07:09:00  06:48:00
74.+R2hx1i   07:09:00  07:27:00
75.R*7a      07:20:00  07:27:00
76.+R1ix2i   07:20:00  07:27:00
77.G8gx7g    07:22:00  07:27:00
78.G*4i      07:22:00  07:32:00
79.K6i-7h    07:28:00  07:32:00
80.G4ix5i    07:28:00  07:33:00
81.S4hx5i    07:32:00  07:33:00
82.+R2ix5i   07:32:00  07:33:00
83.P2e-2d    07:33:00  07:33:00
84.P2cx2d    07:33:00  07:34:00
85.P*2c      07:46:00  07:34:00
86.G3bx2c    07:46:00  07:34:00
87.G*3a      08:04:00  07:34:00
88.L*4a      08:04:00  07:45:00
89.G3ax4a    08:13:00  07:45:00
90.G4bx4a    08:13:00  07:46:00
91.R7ax4a+   08:13:00  07:46:00
92.G*3a      08:13:00  07:46:00
93.+R4a-5b   08:15:00  07:46:00
94.S*3b      08:15:00  07:46:00
95.+B7c-8d   08:22:00  07:46:00
96.N*4e      08:22:00  07:49:00
97.L*4f      08:26:00  07:49:00
98.P*5a      08:26:00  08:00:00
99.+R5b-9b   08:31:00  08:00:00
100.N4ex5g+  08:31:00  08:00:00
101.L4fx4c+  08:31:00  08:00:00
102.P*4b     08:31:00  08:00:00
103.+L4cx3c  08:38:00  08:00:00
104.G2cx3c   08:38:00  08:05:00
105.P*2c     08:38:00  08:05:00
106.K2bx2c   08:38:00  08:10:00
107.N*1e     08:41:00  08:10:00
108.K2c-1b   08:41:00  08:10:00
109.P*2c     08:41:00  08:10:00
110.S3bx2c   08:41:00  08:10:00
111.P*2b     08:43:00  08:10:00
112.K1bx2b   08:43:00  08:10:00
113.+B8dx5a  08:43:00  08:10:00
114.L*4a     08:43:00  08:11:00
115.B*7e!    08:51:00  08:11:00
What seemed likely to be a routine win for Moriuchi and an early end to the game
has turned into a very exciting endgame. Unfortunately for Habu, Moriuchi still
has the lead in this endgame and with 115.B*7e he ensures it. A lance drop on 7d
is inviting, but Bx4b+ is too strong to play that. Also 116.P1d is answered by
117.Bx4b+ Lx4b +Bx4b Gx4b +Rx4b L*3b S*3a K1c +Rx3c and black wins.

116.S*6d     08:51:00  08:52:00
117.B7ex9c+  08:51:00  08:52:00

This opens the escape route for the black king up the board. An entering king
becomes unavoidable, but the white king has no hope of entering.

118.P*7e     08:51:00  08:54:00
119.S7f-8e   08:51:00  08:54:00
120.+N5gx5f  08:51:00  08:55:00
121.S*5b     08:57:00  08:55:00
122.L*7f     08:57:00  08:55:00
123.K7h-8g   08:57:00  08:55:00
124.P*9e     08:57:00  08:55:00
125.S8ex7f   08:57:00  08:55:00
126.P7ex7f   08:57:00  08:55:00
127.K8gx7f   08:57:00  08:55:00
128.P*8d     08:57:00  08:58:00
129.+B9cx8d  08:57:00  08:58:00
130.S*7c     08:57:00  08:58:00
131.K7f-8e   08:57:00  08:58:00
132.S7cx8d   08:57:00  08:58:00
133.K8ex8d   08:57:00  08:58:00
134.B*5h     08:57:00  08:58:00
135.K8d-8c   08:57:00  08:58:00
136.+N5f-6f  08:57:00  08:58:00
137.+B5ax4a  08:58:00  08:58:00
138.G3c-3b   08:58:00  08:59:00
139.+R9b-8a  08:59:00  08:59:00
140.G3ax4a   08:59:00  08:59:00
141.S5bx4a=  08:59:00  08:59:00
142.+N6fx7g  08:59:00  08:59:00
143.G*4d     08:59:00  08:59:00
144.P*5a     08:59:00  08:59:00
145.S4ax3b+  08:59:00  08:59:00
146.S2cx3b   08:59:00  08:59:00
147.P*2c     08:59:00  08:59:00
148.S3bx2c   08:59:00  08:59:00
149.S*3a     08:59:00  08:59:00
150.K2bx3a   08:59:00  08:59:00
151.N1ex2c=  08:59:00  08:59:00
152.K3a-3b   08:59:00  08:59:00
153.G*3a     08:59:00  08:59:00
154.K3b-2b   08:59:00  08:59:00
155.G3ax2a   08:59:00  08:59:00
156.K2bx2a   08:59:00  08:59:00
157.P*2b     08:59:00  08:59:00
Resigns      08:59:00  08:59:00
And now 158.K1b Nx1a+ Kx1a (K2c N*1e also leads to mate) P2a+ Kx2a L*2c followed
by G*3c and white has no defense, so Habu resigned here. Again, the black player
wins, but Habu will have taken some comfort in how he managed to keep the game
close despite the early middle game problems. Still, he needs to keep his service
game as well to avoid going 1-3 down.