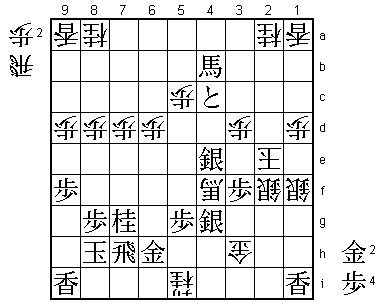
70th Meijin Match Game 2
[Black "Habu Yoshiharu, Challenger"]
[White "Moriuchi Toshiyuki, Meijin"]
[Event "70th Meijin-sen, Game 2"]
[Date "April 24th and 25th 2012"]
1.P7g-7f     00:00:00  00:00:00
2.P8c-8d     00:00:00  00:00:00
3.P2g-2f     00:02:00  00:00:00
4.G4a-3b     00:02:00  00:04:00
5.G6i-7h     00:04:00  00:04:00
6.P8d-8e     00:04:00  00:07:00
7.B8h-7g     00:06:00  00:07:00
8.P3c-3d     00:06:00  00:08:00
9.S7i-8h     00:07:00  00:08:00
10.B2bx7g+   00:07:00  00:17:00
11.S8hx7g    00:07:00  00:17:00
12.S3a-4b    00:07:00  00:17:00
13.S3i-3h    00:12:00  00:17:00
14.S7a-7b    00:12:00  00:17:00
15.P9g-9f    00:14:00  00:17:00
16.P9c-9d    00:14:00  00:17:00
17.P4g-4f    00:18:00  00:17:00
18.P6c-6d    00:18:00  00:17:00
19.S3h-4g    00:20:00  00:17:00
20.S7b-6c    00:20:00  00:17:00
21.K5i-6h    00:22:00  00:17:00
22.S6c-5d    00:22:00  00:25:00
23.S4g-5f    00:26:00  00:25:00
24.P4c-4d    00:26:00  00:47:00
25.G4i-5h    00:34:00  00:47:00
26.G6a-5b    00:34:00  00:47:00
27.P3g-3f    00:35:00  00:47:00
28.K5a-4a    00:35:00  00:47:00
29.P1g-1f    00:36:00  00:47:00
30.P1c-1d    00:36:00  00:47:00
31.K6h-7i    00:38:00  00:47:00
32.K4a-3a    00:38:00  00:49:00
33.P6g-6f    00:43:00  00:49:00
34.P7c-7d    00:43:00  00:50:00
35.N2i-3g    00:49:00  00:50:00
36.S4b-3c    00:49:00  00:50:00
37.R2h-4h    01:12:00  00:50:00
38.G5b-4b    01:12:00  00:53:00
39.K7i-8h    01:18:00  00:53:00
40.K3a-2b    01:18:00  00:53:00
41.N3g-2e    01:27:00  00:53:00
42.S3c-2d    01:27:00  00:54:00
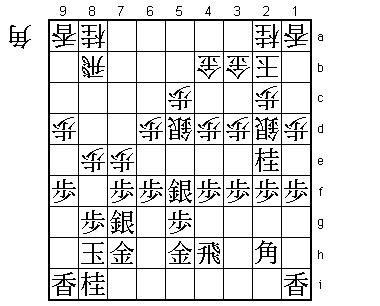
43.B*2h      01:27:00  00:54:00

This combination of moving the knight to 2e and dropping the bishop on 2h to put
pressure on the long diagonal was first played by Tanigawa. The plan is simply to
open up the diagonal with 4e and take the pawn on 6d, but it is surprisingly hard
for white to find a good way to defend against this.

44.P7d-7e    01:27:00  00:54:00

This pawn push is Kio Goda's idea. If black takes this pawn, white can protect
the pawn on 6d with R8d. The bishop on 2h might be putting pressure on the long
diagonal, it is also in a rather awkward place. If black is unable to activate
this bishop, white could get the better position.

45.P4f-4e    01:28:00  00:54:00
46.P7ex7f    01:28:00  00:57:00
47.S7gx7f    01:28:00  00:57:00
48.P4dx4e    01:28:00  00:57:00
49.B2hx6d    01:29:00  00:57:00
50.P*7c      01:29:00  00:57:00

Having to drop back the pawn here is not something white wants to do. Although
the theoretical battle continues, according to Hashimoto it is quite possible
that white already has a worse position here.

51.P*7d      01:31:00  00:57:00
52.R8b-6b    01:31:00  00:57:00
53.B6d-3g    01:33:00  00:57:00
54.R6bx6f    01:33:00  00:58:00
55.G5h-6g    01:35:00  00:58:00
56.B*4d      01:35:00  01:02:00
57.N8i-7g    01:54:00  01:02:00
58.R6fx6g+   01:54:00  01:12:00
59.S5fx6g    01:54:00  01:12:00
60.P*6f      01:54:00  01:18:00
61.S6g-5h    02:02:00  01:18:00

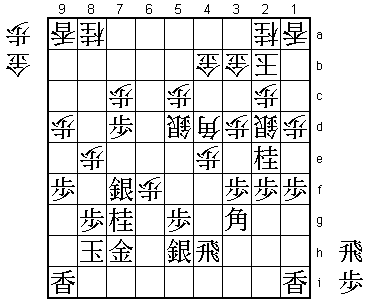
62.G*2g?!    02:02:00  01:36:00

This move is Moriuchi's new idea. In the third game of last year's  Kisei match,
Habu played 62.G*4f here and won. However, in the first game of the Oza match
against Watanabe, he tried it again and lost without much of fight. Because of
this game, 62.G*4f is considered suspect and Sato Yasumitsu tried 62.N9c instead
against Kimura in the first group of the Ryu-O qualifying tournament. Again, this
did not lead to a very promising position for white. Moriuchi said after the game
that he wasn't satisfied with the moves that had been tried here and that's why
he played 62.G*2g. It is not completely clear whether he prepared this at home or
decided to play this at the board, but he had to admit that 62.G*2g is not the
solution to white's problems. The gold on 2g is not working very well here.

63.B3g-6d    02:15:00  01:36:00
64.B4dx2f    02:15:00  01:36:00
65.R4h-4i    02:17:00  01:36:00
66.G2g-3h    02:17:00  02:42:00
67.R4i-7i    03:46:00  02:42:00
68.S2dx2e    03:46:00  04:03:00
69.R*6a      03:53:00  04:03:00
70.B2f-4h+   03:53:00  04:30:00
71.G7h-6h    03:53:00  04:30:00
72.P4e-4f    03:53:00  04:35:00
73.B6dx4f    04:23:00  04:35:00
74.N*6g      04:23:00  04:55:00
75.R7i-7h    04:56:00  04:55:00
76.N6g-5i+   04:56:00  05:01:00
77.P*2d      05:00:00  05:01:00
78.P*4a      05:00:00  05:06:00
79.P2dx2c+   05:14:00  05:06:00
80.K2bx2c    05:14:00  05:18:00
81.P*2d      05:15:00  05:18:00
82.K2c-3c    05:15:00  05:53:00

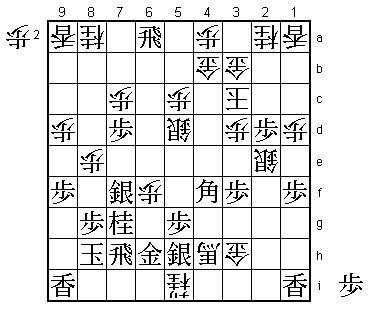
83.R6ax6f+?! 06:08:00  05:53:00

This move was predicted by Takahashi, although the consensus in the press room
was that 83.Rx8a+ is the objectively better move. For example, 84.+Nx5h Gx5h +B4i
(threatening S*6i) +Rx8e which gives the black king thickness at the head and also
attack the silver on 2e. Still, 83.Rx6f+ is a typical Habu move. It takes away a
lot of obvious moves involving the attacking base on 6f while handing over the
initiative. With the initiative but without obvious moves a mistake is readily made.

84.+B4h-2f   06:08:00  06:24:00

Here 84.+Nx5h might have been better. For example, 85.Gx5h +B2f G4g +B4d +R7e S*5e
Rx3h P*7d and if the bishop is removed from 4f, the white king can escape up the
board with Kx2d. Therefore, it seems black has to play G*2c Gx2c Px2c+ Kx2c P*2d
but after K3b it is not easy to get to the white king. Moriuchi obviously didn't
like to activate the black rook which might take the gold on 3h on the way.
However, 84.+B2f also has an important problem.

85.S5h-6g    06:23:00  06:24:00

Now the promoted knight on 5i is very hard to activate.

86.+B2f-4d   06:23:00  06:36:00
87.+R6f-7e   06:32:00  06:36:00
88.P*6e      06:32:00  06:39:00
89.S7fx6e    06:43:00  06:39:00
90.S5d-4e    06:43:00  06:55:00
91.B4f-6d    06:57:00  06:55:00
92.P*6c      06:57:00  06:58:00
93.S6e-5f    06:58:00  06:58:00
94.P6cx6d    06:58:00  07:00:00
95.S5fx4e    06:58:00  07:00:00
96.+B4d-2f   06:58:00  07:00:00
97.P*4c      07:19:00  07:00:00
98.G4bx4c    07:19:00  07:00:00
99.P*4d      07:19:00  07:00:00
100.G4c-4b   07:19:00  07:00:00
101.S*4c     07:19:00  07:00:00
102.P7cx7d   07:19:00  08:08:00
103.+R7ex8e  07:37:00  08:08:00
104.P*8d     07:37:00  08:08:00
105.+R8e-5e  07:50:00  08:08:00
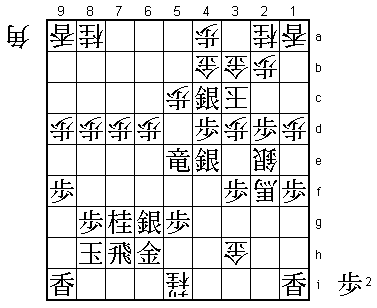
106.P*2b!    07:50:00  08:40:00

Moriuchi had a bad position, but he is not throwing the towel. He is taking away
the obvious attacking moves, hoping to lure his opponent into a mistake. After
the game Habu admitted that he had a hard time finding a good endgame plan here.

107.S4cx3b+  08:03:00  08:40:00

This is good enough, but as arbiter Iizuka pointed out, 107.S4ex3d would have
made things a little bit easier. For example, 108.Sx3d Sx3d+ Kx3d S*3e K2e +R4e
B*1b S3d K2d P*2e K1c P1e Px1e P*1d Kx1d P4c+ and if black gets a gold in hand
it is immediately mate after G*2d. Habu was easily convinced, but Moriuchi commented
dryly that the game continuation was just as hard for him.

108.G4bx3b   08:03:00  08:40:00
109.G*4c     08:03:00  08:40:00
110.K3cx2d   08:03:00  08:47:00
111.G4cx3b   08:03:00  08:47:00
112.B*2h     08:03:00  08:47:00
113.P*2g     08:19:00  08:47:00
114.B2hx5e+  08:19:00  08:48:00
115.P2gx2f   08:19:00  08:48:00
116.S2ex2f   08:19:00  08:48:00
117.S6g-5f   08:20:00  08:48:00
118.+B5e-4f  08:20:00  08:57:00
119.B*5b     08:27:00  08:57:00
120.S*2e     08:27:00  08:58:00
121.G3bx2b   08:28:00  08:58:00
122.P*2c     08:28:00  08:58:00
123.G2bx2c   08:32:00  08:58:00
124.K2dx2c   08:32:00  08:58:00
125.B5bx4a+  08:32:00  08:58:00
126.G*3b     08:32:00  08:58:00
127.P4d-4c+  08:32:00  08:58:00
128.K2c-2d   08:32:00  08:58:00
129.+B4ax3b  08:32:00  08:58:00
130.S2ex1f   08:32:00  08:58:00
131.+B3b-4b  08:33:00  08:58:00
132.K2d-2e   08:33:00  08:58:00
133.S5f-4g   08:33:00  08:58:00
Resigns      08:33:00  08:59:00

Mate after 134.+Bx4g G*2d K1e G*2e or 134.+Bx1i Sx3d Kx3d G*2d K4e G*4f. A very
convincing victory for Habu after a failed opening experiment by Moriuchi. This
levels the match at 1-1 with both players winning their game with the black pieces.
This promises to be a long match.
