70th Kisei Match Game 2
Black: Goda Masataka, Kisei
White: Tanigawa Koji, Challenger
70th Kisei-sen, Game 2, June 23rd 1999

Interesting detail before the game. It is a custom that the challenger first
enters the playing room, after a couple of minutes followed by the titleholder.
At the start of the second game, it was Goda who first sat down at the board.
With this, Goda showed how important winning this game was for him.

1.P7g-7f           0/0          0/0
2.P3c-3d           0/0          2/2
3.P2g-2f           0/0          0/2
4.P8c-8d           0/0          0/2
5.P2f-2e           1/1          0/2
6.P8d-8e           0/1          0/2
7.G6i-7h           0/1          0/2
8.G4a-3b           0/1          0/2
9.P2e-2d           0/1          0/2
10.P2cx2d          0/1          0/2
11.R2hx2d          0/1          0/2
12.P8e-8f          0/1          1/3
13.P8gx8f          0/1          0/3
14.R8bx8f          0/1          0/3
15.R2dx3d          0/1          0/3
16.B2b-3c          0/1          0/3
17.R3d-3f          24/25        0/3
18.S3a-2b          0/25         0/3
19.P*8g            3/28         0/3
20.R8f-8e          0/28         5/8

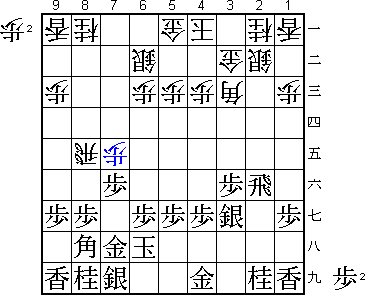
There it is again. The R8e-variation of the Yokofudori. A couple of years ago
it was impossible to imagine that a Yagura game would become a rarity. These
days, the R8e-variation is much more popular than the Yagura.

21.R3f-2f          2/30         0/8
22.K5a-4a          0/30         2/10
23.K5i-6h          25/55        0/10
24.S7a-6b          0/55         4/14
25.S3i-3h          3/58         0/14
26.G6a-5a          0/58         3/17
27.P3g-3f          4/62         0/17
28.P7c-7d          0/62         5/22
29.S3h-3g          15/77        0/22
30.P7d-7e          0/77         49/71

31.P3f-3e          57/134       0/71
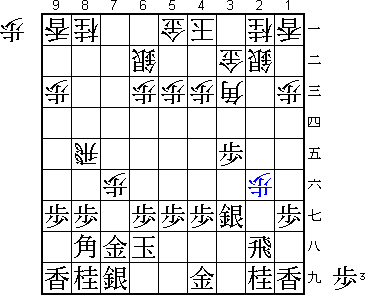
32.P*2e!           0/134        5/76

Nice move. White's biggest problem in this variation is the weak point 3d.
Goda was aiming for that in his previous move, but this pawn sacrifice gives
white an extra tempo for building his own attacking base on 7f.

33.R2fx2e          6/140        0/76
34.P7ex7f          0/140        1/77
35.R2e-2h          1/141        0/77

Since 35.P3d loses the rook, black retreats.

36.P*2f!?          0/141        23/100

Another nice looking pawn sacrifice. It should not have worked, though.

37.S3gx2f?!        53/194       0/100

Both players see the same thing. 37.Rx2f fails because of 38.P*8f Px8f Rx8f
P*8g P7g+ and after exchanging rooks black's camp has too many holes. However,
both players missed that black can play K5h instead of P*8g. Then black seems
to have a good position. Even though taking with the rook was probably better,
it can not be said that white has the better position from here.

38.N8a-7c          0/194        1/101
39.P3e-3d          34/228       0/101
40.B3cx8h+         0/228        16/117
41.S7ix8h          0/228        0/117
42.R8e-4e          0/228        1/118
43.B*5f            31/259       0/118
44.R4e-5e          0/259        11/129
45.S2f-3g          1/260        0/129
46.N7c-6e          0/260        18/147
47.S3g-4f          7/267        0/147
48.B*8d            0/267        2/149
49.P*7e            8/275        0/149
50.B8dx7e          0/275        10/159
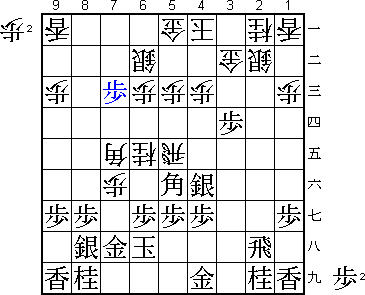
51.P*7c!           0/275        0/159

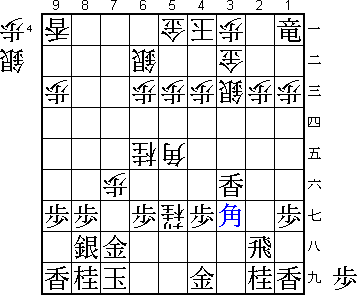
It is hard to say where white went wrong, but here black takes over the
position. It is very hard to defend against the promotion of the pawn.
Tanigawa thought he had seen this and that the following variation was not
so bad for white. A mistake in judgement: black gets the better position.

52.R5ex5f          0/275        24/183
53.P5gx5f          3/278        0/183
54.B*9e            0/278        0/183
55.K6h-7i          1/279        0/183
56.B9ex7c          0/279        0/183
57.P3d-3c+?        0/279        0/183

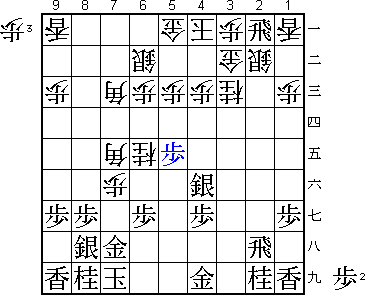
Too eager. It was better to defend by closing the bishop diagonal with 57.P5e
first. White then has nothing else but to defend against the same variation as
in the game with 58.P*2c. After that, black can safely attack with 59.R*8a
followed by P*7b.

58.N2ax3c          0/279        0/183
59.R*2a            1/280        0/183
60.P*3a            0/280        3/186
61.P5f-5e?         13/293       0/186

If you are playing well, the timing for switching between attack and defence
is good. Goda shows in this game that he is not in good form. Before, he
attacked where he should have defended. Here, he defends where he should have
attacked. It seems he still could have won this game had he played 61.Rx2b+
Gx2b Rx2b+ Bx4f Px4f N5g= G6h Nx4i+ S*6a! and it seems there is no way to get
to the black king.

62.P*2c            0/293        0/186
63.P*3d            0/293        0/186
64.N3c-4e          0/293        2/188
65.P3d-3c+         1/294        0/188
66.S2bx3c          0/294        0/188
67.R2ax1a+         0/294        0/188
68.B7e-5g+         0/294        1/189
69.S4fx5g          2/296        0/189
70.N4ex5g+         0/296        0/189
71.L*3f            0/296        0/189
72.B7cx5e          0/296        3/192
73.B*3g            0/296        0/192

74.B5ex8h+!        0/296        28/220

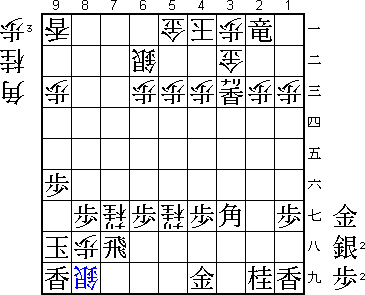
Lightning speed endgame. This bishop sacrifice ends the game in a flash.

75.K7ix8h          2/298        0/220
76.S*7g            0/298        0/220
77.K8h-9h          0/298        0/220

77.Nx7g fails to 78.S*7i, but this just prolongs the agony. There is no way
that Tanigawa will make a mistake from a position like this.

78.S7gx7h+         0/298        0/220
79.R2hx7h          0/298        0/220
80.P7f-7g+         0/298        0/220
81.N8ix7g          0/298        0/220
82.P*8h            0/298        0/220
83.P9g-9f          0/298        0/220
84.N6ex7g+         0/298        0/220
85.B*2a            0/298        0/220
86.G*2b            0/298        4/224
87.L3fx3c+         1/299        0/224
88.G2bx2a          0/299        0/224
89.+R1ax2a         0/299        0/224
90.S*8i            0/299        0/224
Resigns            0/299        0/224
Time:              04:59:00     03:44:00

And an easy mate after 91.K9g B*7e P8f N*8e.

With this win, Tanigawa takes a 2-0 lead to get within one win of taking Goda's
Kisei title. There seems to be no way Goda can get back into this match. This
second game might even be worse for Goda than the first one. He had chances
to win, but two consecutive mistakes showed that he is nowhere near the level
of shogi he is capable of. Winning three games in a row against such a strong
opponent seems very unlikely.
