69th Meijin Match Game 5
[Black "Moriuchi Toshiyuki, Challenger"]
[White "Habu Yoshiharu, Meijin"]
[Event "69th Meijin-sen, Game 5"]
[Date "May 31st and June 1st 2011"]
1.P7g-7f 00:00:00 00:00:00
2.P3c-3d 00:00:00 00:01:00
3.P2g-2f 00:02:00 00:01:00
4.P8c-8d 00:02:00 00:03:00
5.P2f-2e 00:03:00 00:03:00
6.P8d-8e 00:03:00 00:05:00
7.G6i-7h 00:04:00 00:05:00
8.G4a-3b 00:04:00 00:08:00
9.P2e-2d 00:04:00 00:08:00
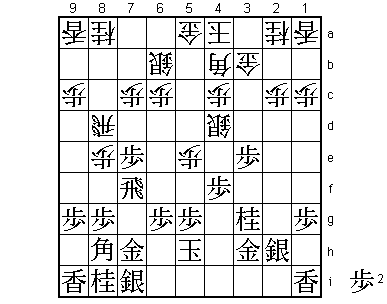
10.P2cx2d 00:04:00 00:09:00
11.R2hx2d 00:04:00 00:09:00
12.P8e-8f 00:04:00 00:14:00
13.P8gx8f 00:04:00 00:14:00
14.R8bx8f 00:04:00 00:15:00
With his back to the wall and playing the white pieces where black has dominated
the head-to-head between these two players, Habu's choice of opening was the topic
of some serious debate. Playing the Gokigen Nakabashi was a viable option, but in
the end Habu opts to play the Yokofudori. Habu is an Ibisha player by nature, so
it comes as no surprise that when he is in a fix, he picks the type of position
he is familiar with most.
15.R2dx3d 00:04:00 00:15:00
16.B2b-3c 00:04:00 00:18:00
17.R3d-3f 00:05:00 00:18:00
18.S3a-2b 00:05:00 00:19:00
19.K5i-5h 00:12:00 00:19:00
20.K5a-4a 00:12:00 00:21:00
21.G4i-3h 00:18:00 00:21:00
22.R8f-8d 00:18:00 00:31:00
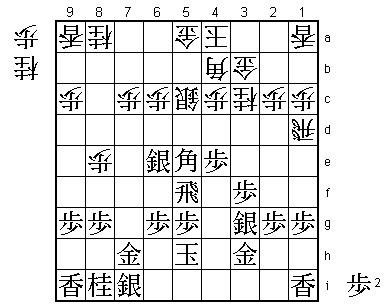
23.P*8g 00:35:00 00:31:00
24.R8d-2d 00:35:00 00:37:00
25.S3i-2h 00:35:00 00:37:00
26.G6a-5a 00:35:00 00:38:00
27.P7f-7e 00:40:00 00:38:00
28.R2d-8d 00:40:00 00:42:00
29.R3f-8f 00:41:00 00:42:00
30.P*8e 00:41:00 00:49:00
31.R8f-5f 00:45:00 00:49:00
32.S7a-6b 00:45:00 01:04:00
33.P3g-3f 00:59:00 01:04:00
34.P5c-5d 00:59:00 01:17:00
35.P3f-3e 01:04:00 01:17:00
36.B3c-4b 01:04:00 01:32:00
37.R5f-2f 01:49:00 01:32:00
38.P*2c 01:49:00 01:47:00
39.R2f-7f 01:50:00 01:47:00
40.S2b-3c 01:50:00 02:30:00
41.N2i-3g 03:10:00 02:30:00
42.S3c-4d 03:10:00 03:10:00
43.P4g-4f 03:35:00 03:10:00
44.P5d-5e 03:35:00 03:52:00
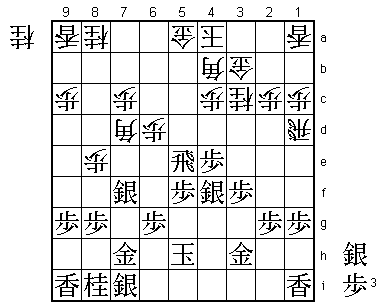
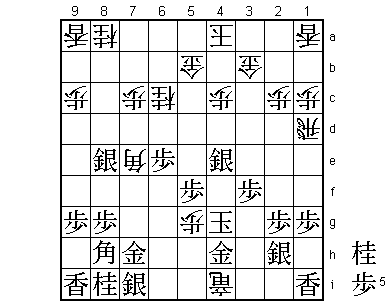
45.P4f-4e?! 04:13:00 03:52:00
The sealed move, but probably not a good one. Hard to see, but probably
better was 45.S2g because after 46.Sx3e P4e R5d S6h S5c S3f Sx3f Rx3f S6d
P4d Rx4d S4e R2d P2e R1d P1f it is not easy to save the white rook.
46.S4dx3e 04:13:00 03:58:00
47.P*3f 04:16:00 03:58:00
48.S3e-2f 04:16:00 04:01:00
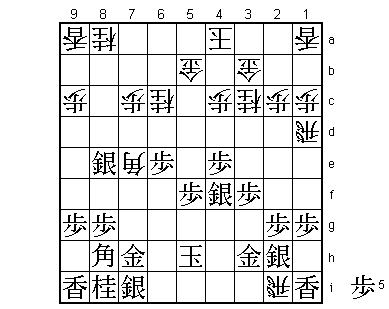
49.P*2g 04:35:00 04:01:00
50.S2fx3g+ 04:35:00 04:58:00
51.S2hx3g 04:35:00 04:58:00
52.S6b-5c 04:35:00 05:04:00
Black has won material and the extra general can be very effectively to thicken
the defense. Moriuchi said after the game that he initially thought that the
material advantage gave black the edge in this position, but here he realized
that forcing the pawn drop on 2g might have given white more than enough compensation.
Indeed, the Yokofudori side doesn't want to use the second file pawn on 2g, but
instead use it in attack.
53.B8hx5e 05:33:00 05:04:00
54.N2a-3c 05:33:00 06:05:00
55.P7e-7d 05:43:00 06:05:00
56.P*5f 05:43:00 06:06:00
57.R7fx5f 06:02:00 06:06:00
58.R8dx7d 06:02:00 06:16:00
59.S*6e 06:06:00 06:16:00
60.R7d-1d 06:06:00 06:22:00
61.S3g-4f?!  06:14:00  06:22:00

Again, it is hard to criticize this move, because it is the most natural way for
black to develop his pieces. Better was 61.P*7d and after 62.P6d Px7c+ Nx7c S7d
P*7b R7f the black pieces are much more active than in the game. For a professional
player this is a hard variation to play for black, because black forces the sleeping
knight on 8a into action, which under normal circumstances is something that should
be avoided. However, it is clearly better for black than what happened in the game,
so Moriuchi should have swallowed his pride and play this.

62.P6c-6d    06:14:00  06:27:00
63.S6e-7f    06:14:00  06:27:00
64.S5c-5d    06:14:00  06:27:00
65.B5e-8h    06:26:00  06:27:00
66.P*5e      06:26:00  06:37:00
67.B8hx5e    06:32:00  06:37:00

Black wants to take with the silver, but after 67.Sx5e Sx4e R6f N*7d the black rook
dies.

68.S5dx5e    06:32:00  06:59:00
69.R5fx5e    06:38:00  06:59:00
70.B*7d      06:38:00  07:00:00
71.P5g-5f    06:52:00  07:00:00
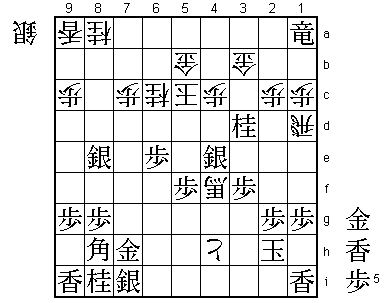
72.G5a-5b!   06:52:00  07:33:00

For Kubo, who was one of the referees for this game, this was the highlight of
 Habu's play. White wants to go for the black rook with N*6c, but if white plays
this immediately then 72.N*6c Rx8e Bx8e Sx8e P6e B*7b and black gets a chance to
fight back. 72.G5b prepares for N*6c, making sure that the knight on 6c is protected
so that the previous variation is harmless. The difficulty of 72.G5b is that Habu
had to make sure that black has no way to improve his position before white plays N*6c.

73.P6g-6f    07:43:00  07:33:00
74.N*6c      07:43:00  07:39:00
75.R5ex8e    07:45:00  07:39:00
76.B7dx8e    07:45:00  07:40:00
77.S7fx8e    07:45:00  07:40:00
78.P6d-6e    07:45:00  08:00:00
79.P6fx6e    07:50:00  08:00:00
80.B4b-7e    07:50:00  08:03:00

With this bishop joining in the attack, the white position is winning.

81.B*8h      08:06:00  08:03:00
82.R*2i      08:06:00  08:16:00
83.S*2h      08:11:00  08:16:00
84.N3cx4e!   08:11:00  08:17:00

Very strong knight sacrifice. Black has no choice but to accept it.

85.S4fx4e    08:20:00  08:17:00
86.P*5g!     08:20:00  08:21:00

The point of 84.Nx4e. The black king has no good square to run to.

87.K5h-4g    08:26:00  08:21:00

Here 87.K4h is answered by R6i+ and 87.K6h with R4i+ and black has no defence.

88.R2i-4i+   08:26:00  08:26:00
89.G3h-4h    08:26:00  08:26:00
90.P5g-5h+!  08:26:00  08:26:00

The final blow. Of course there was no way that white would move the promoted
rook from 4i here: 89.+R2i S3g and black is actually given a chance to run to
the 7th file where a number of friendly pieces are waiting. It would then be
quite hard to win for white.

91.G4hx4i    08:44:00  08:26:00
92.B7e-5g+   08:44:00  08:28:00
93.K4g-3h    08:44:00  08:28:00
94.+P5hx4i   08:44:00  08:28:00

The game is over. Black has no way to make a mating threat.

95.R*7a      08:44:00  08:28:00
96.K4a-4b    08:44:00  08:34:00
97.N*3d      08:50:00  08:34:00
98.K4b-5c    08:50:00  08:36:00
99.R7ax1a+   08:54:00  08:36:00
100.+P4i-4h  08:54:00  08:38:00
101.K3h-2i   08:54:00  08:38:00
102.G*3h     08:54:00  08:38:00
103.K2i-1h   08:54:00  08:38:00
104.G3hx2h   08:54:00  08:38:00
105.K1hx2h   08:54:00  08:38:00
106.+B5g-4f  08:54:00  08:38:00
Resigns      08:56:00  08:38:00
Mate after 106.K1h +Bx1i and hisshi after 106.G*3g S*3i K1h +Bx3g. Black then
can try L*5d K6b Lx5b+ Kx5b but there is no mate. Moriuchi took two minutes to
confirm this and then resigned. A flawless win for Habu, but a little bit tough
on Moriuchi because there seemed to be no obvious mistake he made. With Habu
taking two games in a row and the match back at 3-2, the momentum suddenly
seems to have shifted. Furthermore, Habu has the black pieces in game 6. Moriuchi
has to remember that he is still ahead in the match and regroup to try and win
that single game that he needs.