69th Meijin Match Game 4
[Black "Habu Yoshiharu, Meijin"]
[White "Moriuchi Toshiyuki, Challenger"]
[Event "69th Meijin-sen, Game 4"]
[Date "May 17th and 18th 2011"]
1.P7g-7f     00:00:00  00:00:00
2.P8c-8d     00:00:00  00:01:00
3.S7i-6h     00:06:00  00:01:00
4.P3c-3d     00:06:00  00:01:00
5.P6g-6f     00:07:00  00:01:00
6.S7a-6b     00:07:00  00:02:00
7.P5g-5f     00:08:00  00:02:00
8.P5c-5d     00:08:00  00:04:00
9.S3i-4h     00:11:00  00:04:00
10.S3a-4b    00:11:00  00:06:00
11.G4i-5h    00:15:00  00:06:00
12.G4a-3b    00:15:00  00:12:00
13.G6i-7h    00:24:00  00:12:00
14.K5a-4a    00:24:00  00:15:00
15.K5i-6i    00:25:00  00:15:00
16.G6a-5b    00:25:00  00:16:00
17.S6h-7g    00:34:00  00:16:00
18.S4b-3c    00:34:00  00:16:00
19.B8h-7i    00:36:00  00:16:00
20.B2b-3a    00:36:00  00:16:00
21.P3g-3f    00:46:00  00:16:00
22.P4c-4d    00:46:00  00:19:00
23.G5h-6g    00:51:00  00:19:00
24.P7c-7d    00:51:00  00:19:00
25.S4h-3g    00:53:00  00:19:00
26.B3a-6d    00:53:00  00:22:00
27.B7i-6h    00:55:00  00:22:00
28.G5b-4c    00:55:00  00:27:00
29.K6i-7i    00:57:00  00:27:00
30.K4a-3a    00:57:00  00:34:00
31.K7i-8h    01:02:00  00:34:00
32.K3a-2b    01:02:00  00:37:00
33.S3g-4f    01:05:00  00:37:00
34.S6b-5c    01:05:00  00:40:00
35.N2i-3g    01:06:00  00:40:00
36.P9c-9d    01:06:00  00:41:00
37.P1g-1f    01:10:00  00:41:00
38.P1c-1d    01:10:00  00:41:00
39.P2g-2f    01:11:00  00:41:00
40.S3c-2d    01:11:00  00:41:00
41.R2h-3h    01:13:00  00:41:00
42.B6d-7c    01:13:00  00:51:00
43.L1i-1h    01:15:00  00:51:00
44.P8d-8e    01:15:00  00:51:00
45.L9i-9h    01:28:00  00:51:00
46.S5c-4b    01:28:00  00:58:00
47.K8h-9i    01:30:00  00:58:00

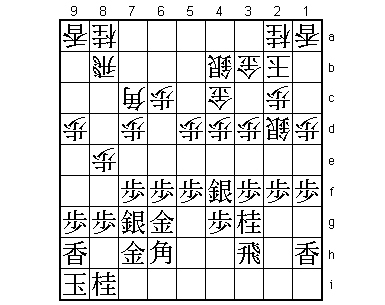
A Yagura opening like in the second game, but the type of position is completely
different. In the second game Habu played a quick attack, but in this game we have
a classic Yagura with both sides developing all their pieces before the actual
fighting starts. Of course, Habu and Moriuchi have played this type of position
against each other many times in the past. 47.K9i moves the black king into an
Anaguma formation, a well-known strategy here. Actually, Moriuchi has a lot of
experience against this strategy. In this game he played 44.P8e, not only allowing
but actually inviting the Anaguma. However, he was also the first player to play P9e
instead of P8e to make it less attractive for black to move into the Anaguma because
of the attack N9c followed by N8e. Neither strategy is bad for white, but white
cannot allow black to move into the Anaguma castle for free, because the difference
in castle strength would be an advantage for black.

48.B7c-6d    01:30:00  01:00:00

This is also opening theory, but a very important move. After this, black cannot
play 49.S8h because white can exchange the rook pawn for free with 50.P8f.

49.P6f-6e    02:31:00  01:00:00
50.B6d-7c    02:31:00  01:00:00

Black has chased the bishop back to 7c, but still cannot play 51.S8h here because
of 52.B9e G6g-7g N7c and Nx6e next is hard to defend.

51.N3g-2e    02:31:00  01:00:00

Black has no option but to start the fighting with an Anaguma castle that is
only half finished.

52.N2a-3c    02:31:00  01:08:00
53.P1f-1e    02:32:00  01:08:00
54.P1dx1e    02:32:00  01:11:00
55.P3f-3e    02:32:00  01:11:00
56.P3dx3e    02:32:00  01:12:00
57.P5f-5e    02:33:00  01:12:00
58.P5dx5e    02:33:00  01:14:00
59.S4fx3e    02:38:00  01:14:00
60.S2dx3e    02:38:00  01:15:00
61.B6hx3e    02:38:00  01:15:00
62.P*3d      02:38:00  02:36:00
63.B3e-7i    03:44:00  02:36:00
64.N3cx2e    03:44:00  02:37:00
65.P2fx2e    03:44:00  02:37:00
66.N*3e      03:44:00  02:37:00
67.P*1d      05:07:00  02:37:00

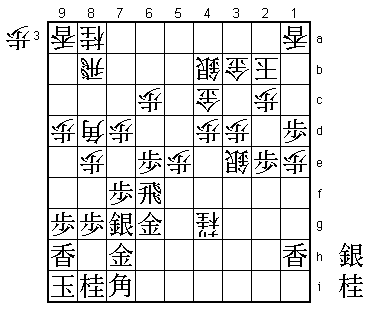
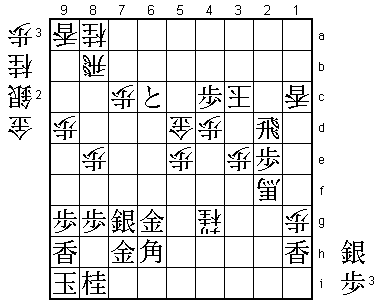
The sealed move. After one day of play Habu has used 5 hours and 7 minutes and
Moriuchi only 2 hours and 37 minutes. Not unprecedented, but quite a big difference.

68.N3ex4g+   05:07:00  03:32:00

Still in known territory, especially for Moriuchi, who played this in the final
of the Ginga tournament against Watanabe on September 13th, 2007. He lost that game,
but has an improvement prepared.

69.R3h-3f    05:45:00  03:32:00
70.S*3e      05:45:00  03:40:00
71.R3f-6f    05:46:00  03:40:00
72.B7c-8d!   05:46:00  03:42:00

This is Moriuchi's new move and the general opinion in the press room and in the
post-mortem analysis was that it is a good move, giving white more than enough
play in this position. Habu admitted that the promoted knight on 4g is a nuisance
and that he was not happy about his position here.

73.P7f-7e    05:46:00  03:42:00

Black cannot simply give white the rook, but the space of the rook is limited and
this pawn sacrifice is necessary to give the rook more breathing space.

74.B8dx7e    05:46:00  03:45:00
75.R6f-7f    05:46:00  03:45:00
76.B7e-4h+   05:46:00  03:53:00
77.R7fx7d    05:46:00  03:53:00
78.P*7c      05:46:00  03:53:00
79.R7d-7f    05:46:00  03:53:00
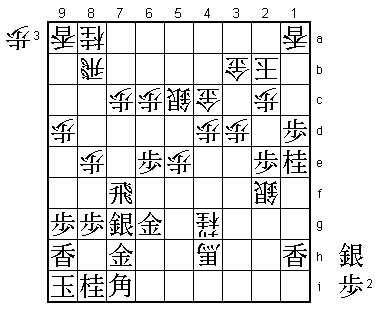
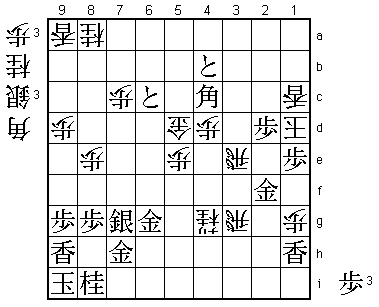
80.S4b-5c?   05:46:00  04:01:00

Moriuchi played well up until here, but this is a mistake. Correct was 80.Lx1d.
Both Moriuchi and Habu thought that after 81.P6d Px6d P*7d black would be better
because of Px7d Rx7d P*7c Rx6d, but they both overlooked that after P*7d, white
can play the strong R8d! because Px7c+ can be answered with P*7e and white has a
good position. The post-mortem analysis resulted in the following variation: R8d
N*2g Px7d Nx3e Px3e Bx3e P7e R3f P*3d S*1c K3a B7i and both players agreed that
the position is very hard to judge. However, as Moriuchi pointed out, the line
played in the game leads to a bad position for white, so he should have tried
80.Lx1d here.

81.N*2g      06:19:00  04:01:00
82.S3e-2f    06:19:00  04:42:00
83.N2gx1e    06:53:00  04:42:00

84.P*1g?     06:53:00  05:09:00

This seems a bit too risky. White seems to be in trouble, but things would not
have been so clear if Moriuchi had played 84.P3e. For example, 85.P2d Px2d P*2c
K3c P1c+ Lx1c S*2b Gx2b Px2b+ Lx1e and the king has a lot of support for an escape
up the board. Best for black then seems P*2g Sx1g+ Lx1e +Bx1e Bx3e and it is hard
for the defending side as well, but Habu didn't think the attack had enough power.

85.S*1c      07:02:00  05:09:00
86.K2b-3a    07:02:00  05:36:00
87.N1ex2c+   07:02:00  05:36:00
88.G3bx2c    07:02:00  05:36:00
89.S1c-2d+   07:02:00  05:36:00

With the king unable to escape up the board, the black attack is much easier now.

90.K3a-3b    07:02:00  06:12:00
91.P1d-1c+   07:54:00  06:12:00
92.L1ax1c    07:54:00  06:13:00
93.P*5d!     07:55:00  06:13:00

Very strong move, although Habu admitted after the game that he didn't play it
for the right reason. The point of 93.P*5d is that after 94.Sx5d P*7d Px7d P*3c
G4cx3c +Sx3c Kx3c Rx7d P*7c black has the strong B2d!. Habu said that he hadn't
been aiming for this variation at all, but just figured he could play Bx1c+ at
some point. The strength of B2d is that K2b is answered by Rx5d Gx5d G*3c, K2c
by Rx5d Gx5d B5a+ and K3b by Rx5d Gx5d G*3c K4a G4c and white cannot defend in
any of the resulting positions. Of course, if play would have continued with
94.Sx5d, it is quite likely that Habu would have found these variations.

94.S5c-4b    07:55:00  06:52:00

White played up this silver from 4b, so to be forced to retreat it again is very
painful. However, there was no alternative.

95.P6e-6d    08:01:00  06:52:00
96.G4cx5d    08:01:00  07:59:00

Or 96.Px6d P*7d Px7d Rx7d and this time the rook switch to 6d works perfectly.

97.P6dx6c+   08:02:00  07:59:00

Only here Habu finally had the feeling that he got the upper hand in this game.

98.P*6h      08:02:00  07:59:00
99.B7ix6h    08:10:00  07:59:00
100.P3d-3e   08:10:00  08:00:00
101.+S2dx2c  08:30:00  08:00:00
102.K3bx2c   08:30:00  08:00:00
103.R7fx2f   08:30:00  08:00:00
104.+B4hx2f  08:30:00  08:01:00
105.G*2d     08:30:00  08:01:00
106.K2c-3b   08:30:00  08:01:00
107.P*4c     08:30:00  08:01:00
108.S4b-3c   08:30:00  08:14:00
109.S*3d     08:30:00  08:14:00
110.S3cx3d   08:30:00  08:14:00
111.G2dx3d   08:30:00  08:14:00
112.R*3c     08:30:00  08:14:00
113.G3dx3c   08:32:00  08:14:00
114.K3bx3c   08:32:00  08:14:00
115.R*2d     08:32:00  08:14:00

There may have been a more beautiful way to finish this game, but in this game
Habu opts for a no-nonsense finish. A wise decision under any circumstances,
but especially considering that he is 3-0 down in the match.

116.G*3d     08:32:00  08:26:00
117.S*4b     08:35:00  08:26:00
118.R8bx4b   08:35:00  08:26:00
119.P4cx4b+  08:35:00  08:26:00
120.G3dx2d   08:35:00  08:26:00
121.R*3b     08:35:00  08:26:00
122.K3c-2c   08:35:00  08:26:00
123.P2ex2d   08:35:00  08:26:00
124.K2c-1d   08:35:00  08:37:00
125.R3bx3e+  08:37:00  08:37:00
126.+B2fx3e  08:37:00  08:38:00
127.B6hx3e   08:37:00  08:38:00
128.R*3f     08:37:00  08:38:00
129.B*4c     08:38:00  08:38:00
130.R3fx3e   08:38:00  08:41:00
131.G*2f     08:38:00  08:41:00
132.R*3g     08:38:00  08:54:00
133.P*1e     08:42:00  08:54:00
Resigns      08:42:00  08:57:00

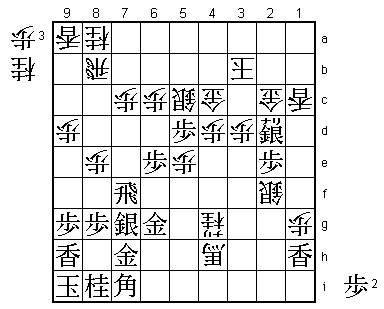
Moriuchi took three minutes to resign here. It is not mate, but after 134.Rx1e
P*1f R1e-3e Bx5d+ black takes a gold with tempo because this is a mating threat.
Also, 134.Kx2d P*2e forces the white king back where it is doomed. On the other
hand, the black king is still safely tucked away in the Anaguma and there is no
way to threaten mate against it. Habu gets one back, but it is only like holding
serve when behind. He still needs to beat Moriuchi with the white pieces in this
match. The next game is his last opportunity to do it. If he fails, the match is
over and Moriuchi takes his Meijin crown.
