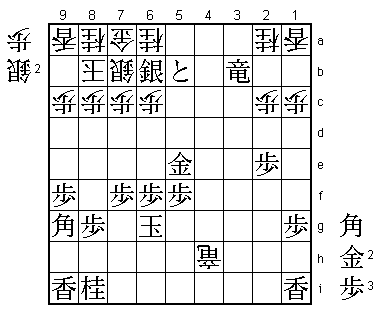
69th Meijin Match Game 3
[Black "Moriuchi Toshiyuki, Challenger"]
[White "Habu Yoshiharu, Meijin"]
[Event "69th Meijin-sen, Game 3"]
[Date "May 6th and 7th 2011"]
1.P7g-7f     00:00:00  00:00:00
2.P3c-3d     00:00:00  00:01:00
3.P2g-2f     00:02:00  00:01:00
4.P5c-5d     00:02:00  00:03:00

In the first game Habu played 4.P8d here and the game developed into one
of the latest Yokofudori variations. Habu plays more or less anything, and
this time he gives the Nakabisha a try, also a very popular opening.

5.P2f-2e     00:08:00  00:03:00
6.R8b-5b     00:08:00  00:05:00
7.S3i-4h     00:08:00  00:05:00
8.P5d-5e     00:08:00  00:09:00
9.K5i-6h     00:11:00  00:09:00
10.B2b-3c    00:11:00  00:11:00
11.P3g-3f    00:18:00  00:11:00
12.K5a-6b    00:18:00  00:51:00
13.S4h-3g    00:19:00  00:51:00
14.K6b-7b    00:19:00  00:57:00
15.S3g-4f    00:19:00  00:57:00

Moriuchi doesn't shy away from the latest fashion and plays the ultra-quick
attack S3g-4f with the king still on 6h.

16.K7b-8b    00:19:00  01:12:00
17.K6h-7h    00:49:00  01:12:00
18.S7a-7b    00:49:00  01:27:00
19.S7i-6h    01:11:00  01:27:00
20.G4a-3b    01:11:00  02:10:00
21.G4i-5h    01:12:00  02:10:00
22.S3a-4b    01:12:00  02:18:00
23.P6g-6f    01:15:00  02:18:00
24.P4c-4d    01:15:00  02:32:00
25.P3f-3e    02:30:00  02:32:00
26.S4b-4c    02:30:00  02:38:00
27.R2h-3h    02:31:00  02:38:00
28.P3dx3e    02:31:00  03:08:00
29.S4fx3e    02:31:00  03:08:00
30.P5e-5f    02:31:00  03:37:00
31.P5gx5f    02:41:00  03:37:00
32.R5bx5f    02:41:00  03:41:00
33.G5h-6g    02:44:00  03:41:00
34.R5f-5b    02:44:00  04:14:00
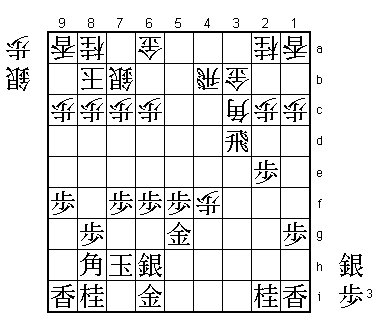
35.P*5f      03:20:00  04:14:00
36.P4d-4e    03:20:00  04:55:00

The sealed move.

37.R3h-3f    04:04:00  04:55:00
38.P*3d      04:04:00  05:37:00
39.S3ex3d    04:06:00  05:37:00
40.S4cx3d    04:06:00  05:37:00
41.R3fx3d    04:06:00  05:37:00
42.R5b-4b    04:06:00  05:37:00
43.G6g-5g    04:24:00  05:37:00
44.P4e-4f    04:24:00  05:46:00
45.P4gx4f    04:38:00  05:46:00
46.P*4e      04:38:00  05:47:00
47.P9g-9f    04:55:00  05:47:00
48.P4ex4f    04:55:00  06:11:00

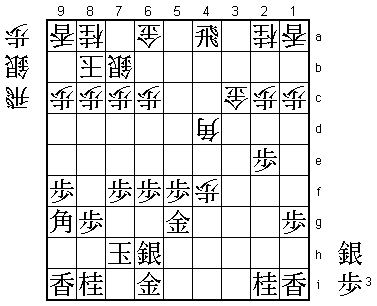
49.B8h-9g!   04:55:00  06:11:00

Very positive way of playing by Moriuchi. The obvious defense here is 49.P*4h,
but Moriuchi commented after the game that he didn't really want to drop a
pawn here. The rest of this game shows that he was correct about his feeling
that B9g was the right move here.

50.R4b-4d?!  04:55:00  06:51:00

Habu thought for 40 minutes before playing this move, but it is questionable
if this was the right way to play here. Of course, white wants to play 50.P4g+
here, but after Bx4b+ Gx4b Gx4g Bx6f the problem is that because white has removed
the pawn on the 6th file, black give a huge boost to a future attack because a
pawn drop on 6b is now possible. Habu didn't like that and decided to play 50.R4d
instead, but this gives black the opportunity to drop the rook in the enemy camp
first. It seems that white is already in trouble here.

51.R3dx4d    05:06:00  06:51:00
52.B3cx4d    05:06:00  06:51:00
53.R*4a      05:07:00  06:51:00
54.G3b-3c!   05:07:00  06:54:00

Actually a very good way to fight back. It is clear that white would be better
off with the gold on 5b than on 3b, but the incomplete Mino castle is not as
weak as a it seems. After 54.G3c, it is not so easy to find a good way to
continue for black.

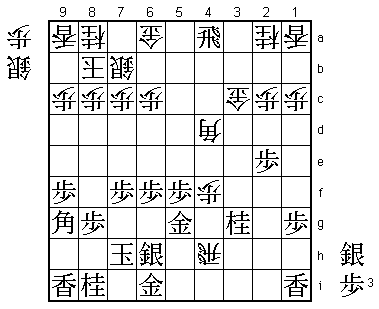
55.N2i-3g!   07:14:00  06:54:00

Played after 2 hours and 7 minutes, which is an illustration of the difficulties
that Habu has put into the position. In the press room 55.P*3d Gx3d B4b+ was
analyzed deeply, but no position was found that was clearly better for black.
Moriuchi himself admitted after the game that he suddenly had no idea how to
continue in this position. Often thinking for a long time is counter-productive,
leading to bad decisions, but this is an exception. The two hours were well spent,
because Moriuchi probably found the only way to keep the pressure on Habu. White
cannot allow this knight to enter the attack, so Habu is forced to attack.

56.R*4h?     07:14:00  07:14:00

This is probably the wrong square to drop the rook. Better is either 56.R*2g S*5e
P4g+ Gx4g B7a Rx2a+ P*3f Gx3f R2h+ or 56.R*4i S*5h Rx1i+ N4e G3d N5c+ although
black seems to be better in both cases. Still, Habu admitted that especially 56.R*2g
was probably better than 56.R*4h.

57.S*5h!     07:19:00  07:14:00

Strong defense. Now the problem with 56.R*4h becomes clear. The obvious move here
is 58.S*3f, threatening P*4g next. However, with the rook on 4h, even if white
promotes the pawn on 4g, black can answer +Px5g next with Sx5g or +Px5h next with
G5g-5h. In both cases the rook on 4h is attacked and has to move. This all just
gives black too much time to attack.

58.P*5b      07:19:00  07:51:00
59.P*4c      07:55:00  07:51:00
60.R4h-2h+   07:55:00  08:14:00
61.P4c-4b+   07:56:00  08:14:00
62.S*4h      07:56:00  08:14:00

Looks bad and in the press room 62.N*4f was analyzed here. If black responds with
the natural 63.S5-h6g then 64.Bx5e Px5e G*5h suddenly gives white a strong attack.
However, after 63.S4g it seems white cannot make the attack work. For example,
64.Bx5e Px5e G*5h +Px5b Gx6i Kx6i G*5h K7h Gx6h K7g G7h K6g and the black king
escapes.

63.G5gx4f    08:02:00  08:14:00
64.S4hx3g=   08:02:00  08:15:00
65.G4f-5e    08:04:00  08:15:00
66.S3g-4h+   08:04:00  08:17:00
67.S5h-6g    08:10:00  08:17:00
68.B4d-2f    08:10:00  08:20:00
69.+P4b-5a   08:12:00  08:20:00
70.G6a-7a    08:12:00  08:20:00
71.+P5ax5b   08:16:00  08:20:00
72.N*6a      08:16:00  08:21:00
73.R4a-4f+!  08:26:00  08:21:00

The decisive move. This forces the white bishop from the all-important diagonal
7a-1g. There it not only defends the gold on 7a, but also the vital drop squares
on 6b and 5c.

74.B2f-3g+   08:26:00  08:25:00
75.+R4f-4b   08:31:00  08:25:00
76.+B3g-2f   08:31:00  08:25:00

White has no choice but to move back the promoted bishop to the vital diagonal,
but the difference between an unpromoted rook on 4a or a promoted one on 4b is
too big.

77.P*4i      08:37:00  08:25:00
78.+S4h-5i   08:37:00  08:29:00
79.G6ix5i    08:42:00  08:29:00
80.+B2fx5i   08:42:00  08:29:00
81.P4i-4h    08:42:00  08:29:00
82.+B5ix6h   08:42:00  08:44:00
83.K7hx6h    08:42:00  08:44:00
84.G3c-3b    08:42:00  08:44:00
85.+R4bx3b   08:45:00  08:44:00
86.+R2hx4h   08:45:00  08:46:00
87.K6h-7g    08:45:00  08:46:00
88.G*5g      08:45:00  08:59:00
89.S*6b      08:54:00  08:59:00
90.G5gx6g    08:54:00  08:59:00
91.K7gx6g    08:54:00  08:59:00
Resigns      08:54:00  08:59:00

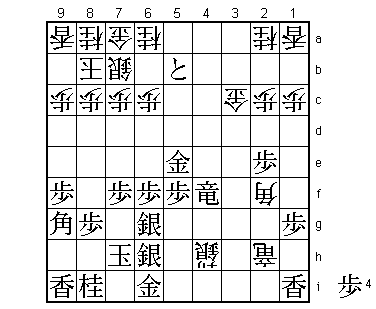
No mate against the black king, but a simple mating threat against the white
king after Sx7a= next. There is no defense: for example, 92.Gx6b is also mate
after 93.B*7a Kx7a +Px6b etc. Therefore Habu resigned here. Another great win
for Moriuchi who now is one win away from regaining the Meijin title he lost
to Habu in 2008. Winning four games in a row is not as impossible as it was a few
years ago, but considering that Habu is being outplayed by Moriuchi in the match
so far, a comeback seems unlikely.
