69th Meijin Match Game 2
[Black "Habu Yoshiharu, Meijin"]
[White "Moriuchi Toshiyuki, Challenger"]
[Event "69th Meijin-sen, Game 2"]
[Date "April 20th and 21st 2011"]
1.P7g-7f 00:00:00 00:00:00
2.P8c-8d 00:00:00 00:01:00
3.S7i-6h 00:04:00 00:01:00
4.P3c-3d 00:04:00 00:01:00
5.P6g-6f 00:05:00 00:01:00
6.S7a-6b 00:05:00 00:02:00
7.P5g-5f 00:08:00 00:02:00
8.P5c-5d 00:08:00 00:02:00
9.S3i-4h 00:15:00 00:02:00
10.S3a-4b 00:15:00 00:06:00
11.G4i-5h 00:19:00 00:06:00
12.G4a-3b 00:19:00 00:08:00
13.G5h-6g 00:29:00 00:08:00
14.K5a-4a 00:29:00 00:19:00
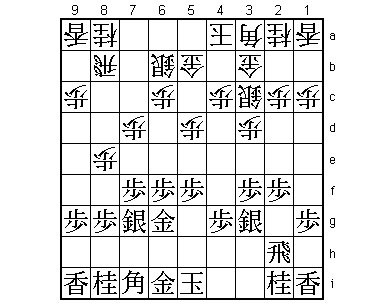
15.P2g-2f 00:32:00 00:19:00
After a Yokofudori in the first game, this game seems to start as a slow paced
Yagura. The most popular strategy for black is to leave the rook pawn on 2g as
long as possible, but Habu moves the rook pawn to 2f quickly here. He combines
this with leaving the gold on 6i, keeping the option of moving into the castle
quickly with K6h-K7h. This is the type of strategy that Fujii likes.
16.P7c-7d 00:32:00 00:27:00
17.S6h-7g 00:35:00 00:27:00
18.G6a-5b 00:35:00 00:37:00
19.B8h-7i 00:42:00 00:37:00
20.S4b-3c 00:42:00 00:51:00
21.P3g-3f 00:51:00 00:51:00
22.B2b-3a 00:51:00 00:52:00
23.S4h-3g 01:10:00 00:52:00
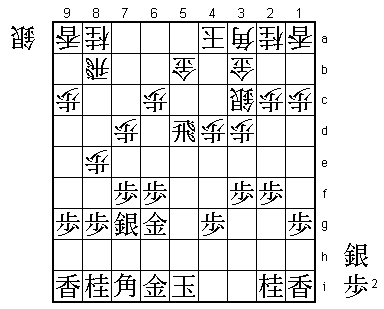
24.P8d-8e 01:10:00 01:00:00
Tries to force the gold to 7h after which the game will develop into one of the
most classic Yagura formations.

25.S3g-4f?!  02:30:00  01:00:00

Habu has other ideas. With 25.S4f he is aiming at a quick attack through the center.
When the fighting is concentrated in the middle of the board, pushing the pawn to
8e might become a vital loss of tempo. However, not defending the 8th file seems
risky here and starting the fight with a sitting king is not something to be
recommended. Now we suddenly get into a wild middle game fight that moves quickly
into the endgame.

26.P4c-4d    02:30:00  01:06:00
27.P5f-5e    02:44:00  01:06:00
28.S6b-5c    02:44:00  01:18:00
29.R2h-5h    02:49:00  01:18:00
30.P5dx5e    02:49:00  02:14:00
31.S4fx5e    02:49:00  02:14:00
32.P*5d      02:49:00  02:24:00
33.S5ex5d    03:02:00  02:24:00
34.S5cx5d    03:02:00  02:30:00
35.R5hx5d    03:03:00  02:30:00
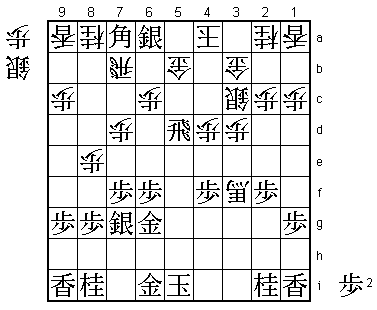
Black has won a pawn, but white has a strong counter attack.
36.B3a-6d 03:03:00 02:31:00
37.B7i-4f 03:04:00 02:31:00
38.B6dx4f 03:04:00 03:05:00
39.P4gx4f 03:06:00 03:05:00
40.B*4g 03:06:00 03:06:00
This creates a promoted bishop. Black has to act quickly or the strong bishop will
decide the game.
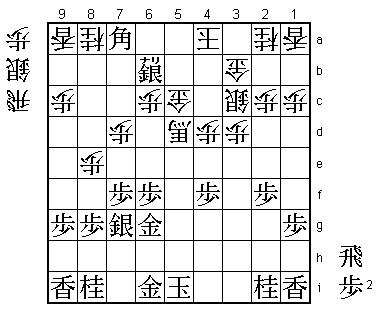
41.B*7a 04:39:00 03:06:00
42.R8b-7b 04:39:00 03:27:00
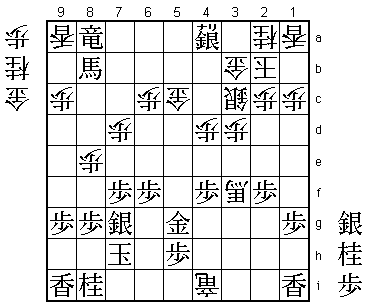
The sealed move.
43.S*6a 04:45:00 03:27:00
44.B4gx3f+ 04:45:00 04:06:00
It is still very early on the second day, but this is already the decisive position
of this game.

45.S6ax7b+?  05:42:00  04:06:00

Not the right move. The obvious alternative 45.Rx5b+ is also not good after 46.Rx5b
Sx5b+ Kx5b and with the rook in hand the sitting king is impossible to defend. For
example, P*5h R*3i K6h +Bx4f K7h S*6b R*7b S*6a the black attack is stopped (if black
gives up the bishop, then B*4e is too strong). Correct was to pull back the rook once
with 45.R5g. For example, 46.Rx7a 47.Rx5b+ 48.K3a and if black now rushes with 49.+R6b
then 50.P*4e is the perfect answer because +Rx7a can be answered with the fork +Bx2f
and if white can play Px4f next, the king on 5i cannot be defended. However, if black
chases away the bishop first with 49.P*3g +B4g (Habu didn't like inviting the bishop
closer to the king at the cost of a pawn, so he abandoned this variation here) G5h!
+Bx2i +R6b and with the promoted bishop out of play on 2i, black suddenly has good
fighting chances. After the game, Habu admitted that this was his only chance of the
game.

46.+B3fx5d   05:42:00  04:08:00
47.+S7b-6b   05:42:00  04:08:00
48.G5b-5c!   05:42:00  05:10:00
Not the best shape, but the right move here. If 48.G3b-4b, then 49.+Sx5b Gx5b P*5c
Gx5c R*8b S*4b Rx8a+ K3b N*2e is unclear.

49.R*5a      06:27:00  05:10:00

It seems like 49.R*6a is better because it keeps the option of R6a+, but after 50.K4b
B8b+ (Rx2a+ G3a) R*3a and after Rx3a+ Kx3a the king escapes into the castle and after
+Bx9a Rx6a +Sx6a the promoted silver is a major liability.

50.K4a-4b    06:27:00  05:10:00
51.B7a-8b+   06:27:00  05:10:00
52.R*2h      06:27:00  05:47:00

Again the correct move. If white defends with 52.R*3a here like in the variation above,
then 53.+Bx9a Rx5a +Sx5a is a mating threat and Kx5a is answered by L*5h which works
both in attack and defense. 52.R*2h is a strong counter attack aiming straight at
the sitting king.

53.R5ax8a+   06:34:00  05:47:00

It is still around three o'clock in the afternoon, but the mood in the press room
was that the game was almost over. So much so, that people were talking about the
possibility that the record for the shortest Meijin match game ever (Kimura beat
Tsukada in 1947 in 63 moves) could be broken here. White is clearly winning, but
must be careful not to allow things like 54.+R5a K4c N*5e here. Moriuchi finds a
pretty way to finish this game quickly.

54.+B5d-3f   06:34:00  06:34:00
55.P*5h      07:06:00  06:34:00
56.S*7h!     07:06:00  06:34:00

Nice silver drop. Black cannot take this silver with 57.Gx7h because of 58.+Bx5h
and 57.K6h fails to 58.Sx6i+.

57.G6g-5g    07:12:00  06:34:00

Black can try to chase the white king here, but after 57.+R5a K4c N*5e K5d +Rx5c
Kx5c +Sx6c +Bx6c (not K4b?? +B6d and mate) Nx6c+ Kx6c black can still not take
the silver on 7h because Gx7h S*4h K6h R*6i Kx6i Rx2i+ and mate. This deep variation
is the real reason the silver drop on 7h was so strong. 57.G5g drags the game beyond
the 63 move mark, but the outcome is not in doubt.

58.R2hx2i+   07:12:00  06:37:00
59.N*4i      07:12:00  06:37:00
60.S7hx6i+   07:12:00  06:45:00
61.K5ix6i    07:12:00  06:45:00
62.+R2ix4i   07:12:00  06:45:00
63.K6i-7h    07:12:00  06:45:00
64.N*4a      07:12:00  06:50:00
65.+S6b-5a   07:16:00  06:50:00
66.K4b-3a    07:16:00  06:58:00
67.+S5ax4a   07:17:00  06:58:00
68.K3a-2b    07:17:00  07:02:00
Resigns      07:17:00  07:02:00
The white king has escaped into the Yagura castle and the only reasonable attacking
move 68.+R7b is answered by 69.P*5b and black has nothing to follow up. On the other
hand, white has devastating moves like +Bx5h or P*5f so the black king cannot be
properly defended, so Habu resigned here. A one-sided game in a one-sided match so
far. Moriuchi is controlling everything and Habu needs to do something quickly or
he will be without a Meijin title in a flash. Taking this game with the white pieces
is especially important, because the winning percentage with black is so high between
these two players. Habu therefore already faces the huge task of winning with white
as well in game three to avoid a nearly decisive 3-0 deficit.