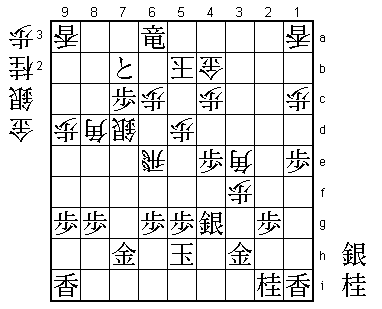
69th Meijin Match Game 1
[Black "Moriuchi Toshiyuki, Challenger"]
[White "Habu Yoshiharu, Meijin"]
[Event "69th Meijin-sen, Game 1"]
[Date "April 7th and 8th 2011"]
1.P7g-7f     00:00:00  00:00:00

It has been 25 years since two Lifetime Meijins played for the title (of course, it
were Oyama and Nakahara back then). This is the sixth time that Habu and Moriuchi meet
in the Meijin match (last time in 2008, when Habu won 4-2). They play their 102nd official
game, so they know each other's game very well. One interesting statistic that gave some
weight to the furigoma: black has a 64% winning percentage in their mutual games. Actually,
the first pawn toss resulted in two pawns, two tokins and a piece on its side, so the
furigoma had to be done again. This time it were four tokins, so challenger Moriuchi
starts this match with the black pieces.

2.P3c-3d     00:00:00  00:00:00
3.P2g-2f     00:00:00  00:00:00
4.P8c-8d     00:00:00  00:04:00
5.P2f-2e     00:00:00  00:04:00
6.P8d-8e     00:00:00  00:07:00
7.G6i-7h     00:00:00  00:07:00
8.G4a-3b     00:00:00  00:11:00
9.P2e-2d     00:03:00  00:11:00
10.P2cx2d    00:03:00  00:12:00
11.R2hx2d    00:03:00  00:12:00
12.P8e-8f    00:03:00  00:20:00
13.P8gx8f    00:04:00  00:20:00
14.R8bx8f    00:04:00  00:20:00
15.R2dx3d    00:04:00  00:20:00
16.B2b-3c    00:04:00  00:22:00
17.R3d-3f    00:04:00  00:22:00
18.S3a-2b    00:04:00  00:27:00
19.R3f-2f    00:29:00  00:27:00
20.K5a-5b    00:29:00  00:40:00
21.P*8g      00:34:00  00:40:00
22.R8f-8e    00:34:00  00:46:00
23.S3i-4h    00:38:00  00:46:00
24.P7c-7d    00:38:00  01:12:00
25.G4i-3h    00:40:00  01:12:00
26.G6a-5a    00:40:00  01:17:00
27.K5i-5h    00:45:00  01:17:00
28.S7a-6b    00:45:00  01:21:00
29.P1g-1f    00:47:00  01:21:00
30.N8a-7c    00:47:00  01:29:00
31.P1f-1e    00:47:00  01:29:00
32.S2b-2c    00:47:00  01:33:00

The combination of K5b and S2c is currently a very popular opening strategy. The
reason for playing the king to 5b instead of 4a (which is the normal way of playing)
is to make it less attractive for black to attack along the third file. The reason
for 32.S2c is to take away a later P*1b Lx1b B*2a.

33.B8hx3c+   01:27:00  01:33:00
34.N2ax3c    01:27:00  01:34:00
35.S7i-8h    01:27:00  01:34:00
36.P9c-9d    01:27:00  01:56:00
37.R2f-2h    01:50:00  01:56:00
38.P*2d      01:50:00  02:41:00
39.S8h-7g    02:30:00  02:41:00
40.R8e-8d    02:30:00  02:58:00
41.P3g-3f    03:56:00  02:58:00
42.P7d-7e    03:56:00  04:11:00

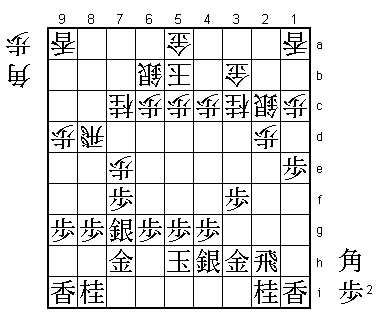
The sealed move.

43.P4g-4f    04:00:00  04:11:00

Black cannot take the pawn on 7e because after 43.Px7e B*5e B*4f Bx7g+ Nx7g (Gx7g
P*8h) P*7f gives white both the silver and the knight for the bishop, which is good
for white. Please note that white played 40.R8d to be able to play this bishop
sacrifice. If the rook still had been on 8e, then Nx7g would attack the rook and
the bishop sacrifice would fail. 43.P4f allows white the attack on head of the
knight on 7g, but in return black can promote the bishop, which is a serious problem
for white.

44.N7c-8e    04:00:00  05:23:00
45.S7g-6f    04:34:00  05:23:00
46.P7ex7f    04:34:00  05:25:00
47.P*7d      04:36:00  05:25:00
48.R8dx7d    04:36:00  05:52:00
49.B*8c      04:39:00  05:52:00
50.R7d-7a    04:39:00  05:53:00
51.P*7b      05:37:00  05:53:00
52.R7a-8a    05:37:00  05:54:00
53.B8c-6e+   05:37:00  05:54:00
54.P7f-7g+   05:37:00  06:10:00
55.N8ix7g    05:37:00  06:10:00
56.N8ex7g+   05:37:00  06:10:00
57.S6fx7g    05:37:00  06:10:00

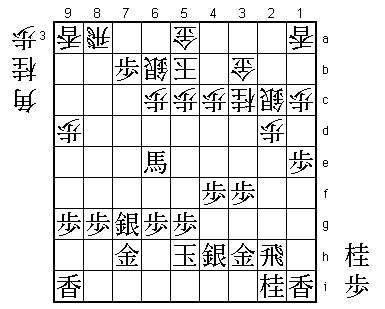
58.P*3e?     05:37:00  06:10:00

In the press room, 58.B*5d was analyzed here. Exchanging the bishops is not an
option for black, because he has sacrificed a couple of pawns to promote the bishop.
If 58.+B5e then 59.R8e +Bx9a Bx8g+ is good for white. However, in the post-mortem
analysis both players pointed out that after 58.P7a+ Sx7a (Rx7a takes away R8e)
+B5e R8e +Bx9a Bx8g+ P*8f +Bx7h Px8e +Bx7g R*7c is a strong fork and it is difficult
for white to attack the black king. This being said, 58.P*3e leads to a clear black
advantage and Ryu-O Watanabe wasn't so sure that 58.P7a+ Rx7a was so bad for white,
because white gets four pawns as compensation for the promoted bishop. Despite the
fact that the players agreed that B*5d wasn't satisfactory for white, it seems clear
that it was better than what happened in the game.

59.S4h-4g    05:54:00  06:10:00
60.P3ex3f    05:54:00  06:21:00
61.N*3e      06:09:00  06:21:00
62.S2c-3d    06:09:00  06:43:00
63.R2hx2d    06:55:00  06:43:00

64.R8a-8e    06:55:00  06:59:00

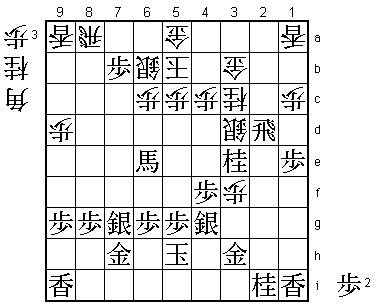
Again, in the press room 64.B*1b was viewed as a desperate attempt to hold the white
position together, but after 65.Nx4c+ Sx4c P*3d R8e Px3c+ Rx6e +Px4c Gx4c R2b+ black
still has a big advantage.

65.R2d-2a+!  07:15:00  06:59:00

Black ignores the attack on the bishop and sets up an attack at both side of the
white king.

66.R8ex6e    07:15:00  07:43:00
67.+R2ax3b   07:16:00  07:43:00
68.N*4b      07:16:00  07:44:00
69.+R3bx3c   07:34:00  07:44:00
70.R6ex3e    07:34:00  07:46:00
71.N*7d      07:39:00  07:46:00
72.S6b-7c    07:39:00  07:49:00
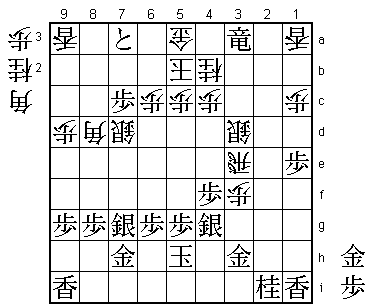
73.P7b-7a+   07:48:00  07:49:00

With the promoted rook on the one side and the promoted pawn on the other side,
the white king is squeezed. The game has already been decided.

74.S7cx7d    07:48:00  07:52:00
75.+R3c-3a   08:00:00  07:52:00
76.B*8d      08:00:00  08:04:00
77.P*7c      08:33:00  08:04:00

Threatens to create a second promoted pawn.

78.N*6e      08:33:00  08:15:00

Here 78.R2e seems to be an alternative, because 79.G*3b (like in the game) can be
answered by P6d, which is not so clear. However, if black plays 79.+P7b instead,
then P6d P*2g is a cool-headed move and Habu admitted that it was hard to find a
good move for white. In the end, a lot of different variations were explored, but
none of them led to a better position for white. Habu commented after the game
that probably his opening strategy was flawed and needed a little more effort.

79.S7g-6f    08:34:00  08:15:00
80.R3e-2e    08:34:00  08:16:00
81.G*3b!     08:40:00  08:16:00

Vulgar move, but white has no defense.

82.P5c-5d    08:40:00  08:32:00
83.+P7a-7b   08:43:00  08:32:00

Threatens simple mate with +Rx5a Kx5a G*6b.

84.B*5c      08:43:00  08:43:00
85.P*2g      08:45:00  08:43:00
86.R2e-3e    08:45:00  08:44:00
87.S6fx6e    08:54:00  08:44:00
88.R3ex6e    08:54:00  08:51:00
89.N*4e      08:54:00  08:51:00
90.S3dx4e    08:54:00  08:51:00
91.P4fx4e    08:54:00  08:51:00
92.B5c-3e    08:54:00  08:51:00
93.G3bx4b    08:55:00  08:51:00
94.G5ax4b    08:55:00  08:51:00
95.+R3a-6a   08:55:00  08:51:00
Resigns      08:55:00  08:51:00

Mate after 96.K5c +R6b K6d N*7f K7f (K5e S*5f) S*8f K7f G7g so Habu resigned here.
A rather one-sided game and a great start for Moriuchi. But then again, the winning
percentage for black doesn't lie, so it will be more important to see how Moriuchi
does with the white pieces in the second game. This Meijin match has only just begun.
