69th Kisei Match Game 2
Black: Goda, Challenger
White: Yashiki, Kisei
69th Kisei-sen, Game 2, June 23rd 1998
1.P7g-7f           0/0          0/0
2.P8c-8d           0/0          6/6

A small surprise. The professionals that came to watch the game expected
Yashiki to play Shikenbisha. However, after thinking for six minutes, Yashiki
decides to play Ibisha.

3.S7i-6h           2/2          0/6
4.P3c-3d           0/2          1/7
5.S6h-7g           0/2          0/7

The classic Yagura move. Goda prefers this to the also very common 5.P6f,
which keeps options open for a strategy other than Yagura.

6.S7a-6b           0/2          0/7
7.P5g-5f           1/3          0/7
8.P5c-5d           0/3          0/7
9.S3i-4h           0/3          0/7
10.S3a-4b          0/3          0/7
11.G6i-7h          0/3          0/7
12.G4a-3b          0/3          2/9
13.K5i-6i          1/4          0/9
14.K5a-4a          0/4          0/9
15.G4i-5h          1/5          0/9
16.P7c-7d          0/5          3/12
17.P6g-6f          20/25        0/12
18.G6a-5b          0/25         2/14
19.B8h-7i          0/25         0/14
20.S4b-3c          0/25         4/18
21.P3g-3f          0/25         0/18
22.B2b-3a          0/25         5/23
23.R2h-3h          4/29         0/23
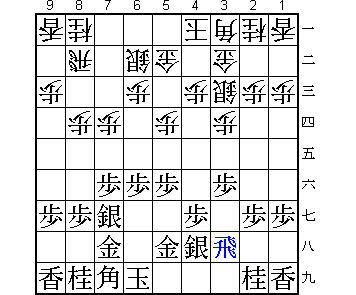
The first point of the game. This looks a bit quick according to the old school
of Yagura play, but according to commentator Tanigawa it is a move that Goda
likes to play this early. The aim of the move is the pawn exchange on 3e.

24.B3a-6d          0/29         24/47
25.N2i-3g          0/29         0/47

Now the game has become a Morishita System opening, where N3g and R3h are
usually reversed. This was a very popular strategy about five years ago,
but recently this type of position is not seen that much in professional play.

26.P4c-4d          0/29         2/49
27.G5h-6g          0/29         0/49
28.G5b-4c          0/29         6/55
29.B7i-6h          1/30         0/55
30.K4a-3a          0/30         11/66
31.K6i-7i          0/30         0/66
32.K3a-2b          0/30         33/99
33.P2g-2f          8/38         0/99
34.P8d-8e          0/38         1/100
35.P1g-1f          10/48        0/100
36.S6b-7c          0/48         9/109
37.S4h-5g          10/58        0/109
38.S7c-8d          0/58         13/122
39.P6f-6e          7/65         0/122
40.B6d-4b          0/65         15/137
41.S5g-6f          0/65         0/137
42.P9c-9d          0/65         8/145
43.N3g-2e          21/86        0/145
44.S3c-2d          0/86         0/145
45.B6h-4f          0/86         0/145
46.R8b-9b?         0/86         1/146
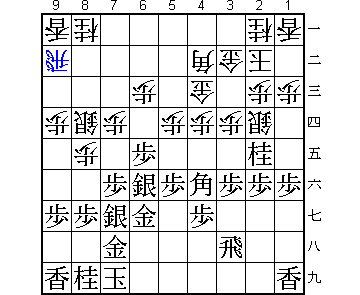
New move, but not an idea that is worth repeating. Normal is 46.N7c, which has
been played in professional games before and which leads to a difficult
position. After 46.R9b, white soon runs out of moves. The rook in front of
the lance is not good for the edge attack.
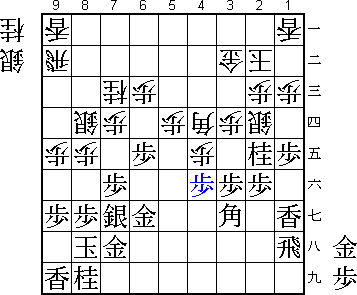
47.K7i-8h 50/136 0/146
48.P9d-9e? 0/136 13/159
Bad moves invite other bad moves. This is an attempt to make the formation
R9b-L9a more active, but white should have switched to defense with 49.P1d.
After that 49.P9f is too dangerous for black, so he is a bit stuck for moves
as well.
49.P1f-1e 2/138 0/15
50.N8a-7c 0/138 27/186
51.L1i-1g 26/164 0/186
52.P4d-4e 0/164 24/210
Yashiki, realising he is in trouble, takes his time to find a way out. There
is no good continuation, so he gambles on attacking the black attacking side,
hoping to break through and make an entering king.
53.B4f-3g 9/173 0/210
54.B4b-5c 0/173 7/217
55.R3h-1h 5/178 0/217
56.N2a-3c? 0/178 7/224
This further weakens white position, but it is hard to find a good alternative.
57.N2ex3c+ 32/210 0/224
58.G4cx3c 0/210 0/224
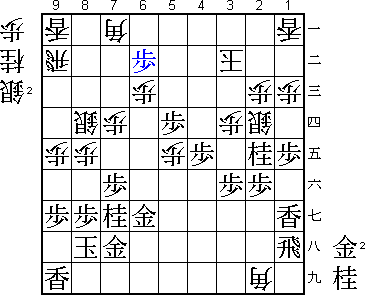
59.P5f-5e! 1/211 0/224
Good move at another weak point in white's camp. This also brings the silver
on 6f into the attack.
60.P5dx5e 0/211 1/225
61.N*2e 2/213 0/225
62.G3c-4d 0/213 7/232
63.S6fx5e 4/217 0/232
64.P*5d 0/217 1/233
65.S5ex4d 45/262 0/233
The last time in this game that Goda uses a lot of time. He might have
calculated it all through the end from here.
66.B5cx4d 0/262 0/233
67.P4g-4f! 0/262 0/233
This brings all black's pieces to the right spots after 68.Px4f G*4e B7a
Bx4f. In that case white can only wait helplessly for the end, so Yashiki
decides to counterattack.

68.N7cx6e          0/262        21/254
69.P4fx4e          0/262        0/254
70.N6ex7g+         0/262        9/263
71.N8ix7g          0/262        0/263
72.B4d-7a          0/262        5/268
73.N*4d            0/262        0/268
74.N*5e            0/262        5/273
75.B3gx5e!         6/268        0/273

Ends white's attacking hopes.

76.P5dx5e          0/268        0/273
77.N4dx3b+         1/269        0/273
78.K2bx3b          0/269        0/273
79.P*5d!           2/271        0/273
80.B*2i            0/271        15/288
81.P*6b!           3/274        0/288
The winning move. The two pawn drops on 5d and 6b show the strength of
dangling pawns. Black now threatens mate with 83.N*4d.

82.B7ax6b          0/274        1/289
83.G*5c            0/274        0/289

Game over, there is no defense.

84.B2ix1h+         0/274        6/295
85.N*4d            1/275        0/295
86.K3b-2b          0/275        0/295
87.G*3b            0/275        0/295
88.K2b-1b          0/275        0/295
89.G5cx6b          0/275        0/295
90.S*2a            0/275        0/295
91.P1e-1d          1/276        0/295
92.+B1hx1g         0/276        0/295
93.B*3a            1/277        0/295
Resigns            0/277        1/296
Time:              04:37:00     04:56:00

After 94.Sx3b, white is mated by 95.Px1c+ etc. Also, 94.L*2b Gx2a Kx2a S*3c
and white has no defense. Another easy win for Goda, who seems to be cruising
to his first Kisei title. Yashiki desperately needs to improve his shogi to
avoid an embarrassing defeat.
