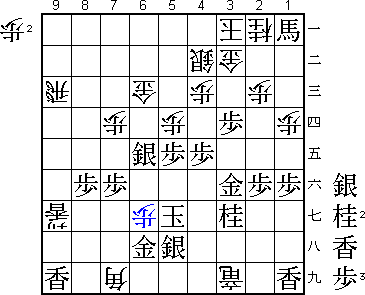
69th Kisei Match Game 1
Black: Yashiki, Kisei
White: Goda, Challenger
69th Kisei-sen, Game 1, June 13th 1998
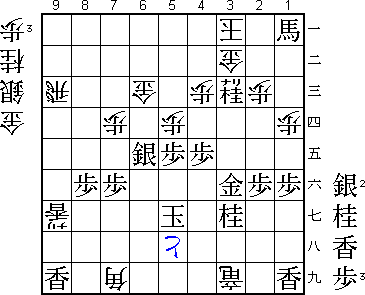
1.P7g-7f 1/1 0/0
2.P8c-8d 0/1 1/1
3.P2g-2f 7/8 0/1
4.P8d-8e 0/8 2/3
5.B8h-7g 1/9 0/3
The Kakugawari (Bishop Exchange) again. The Meijin match between Tanigawa and
Sato seems to indicate that black has good chances to get the advantage in this
complicated opening.
6.P3c-3d 0/9 0/3
7.S7i-8h 0/9 0/3
8.G4a-3b 0/9 6/9
9.G6i-7h 2/11 0/9
10.B2bx7g+ 0/11 0/9
11.S8hx7g 0/11 0/9
12.S3a-4b 0/11 0/9
13.S3i-3h 0/11 0/9
14.S7a-7b 0/11 12/21
15.P4g-4f 4/15 0/21
16.P6c-6d 0/15 5/26
17.S3h-4g 0/15 0/26
18.S7b-6c 0/15 0/26
19.G4i-5h 1/16 0/26
20.K5a-4a 0/16 1/27
21.K5i-6h 1/17 0/27
22.G6a-5b 0/17 2/29
23.K6h-7i 1/18 0/29
24.P9c-9d 0/18 0/29
25.P9g-9f 4/22 0/29
26.S6c-5d 0/22 0/29
27.S4g-5f 3/25 0/29
28.P7c-7d 0/25 2/31
29.P3g-3f 10/35 0/31
30.K4a-3a 0/35 0/31
The problem with this opening is that even though the moves to be played are
pretty fixed, the number of permutations is enormous and all seem to have
meaning. In this game Goda chooses for a slow build-up. A more positive (and
this risky) strategy would be 30.P6e followed by B*6d.

31.P1g-1f          8/43         0/31
32.P1c-1d          0/43         3/34
33.P4f-4e          16/59        0/34
34.N8a-7c          0/59         6/40
35.P6g-6f          2/61         0/40
36.G5b-6c          0/61         9/49
37.R2h-4h          20/81        0/49
38.R8b-6b          0/81         5/54
39.B*4f            5/86         0/54
40.L9a-9c          0/86         5/59
41.N2i-3g          7/93         0/59
42.R6b-9b          0/93         0/59
43.G5h-4g          8/101        0/59
44.P9d-9e          0/101        55/114

Both players seemed to be hesitant to start the attack. From black's point of
view this is not a good sign. Yashiki might have thought he would get more out
of the opening. Instead, it is Goda who after long deliberation opens the
hostilities.

45.P9fx9e          2/103        0/114
46.L9cx9e          0/103        0/114
47.P*9g            2/105        0/114
48.P6d-6e!?        0/105        85/199
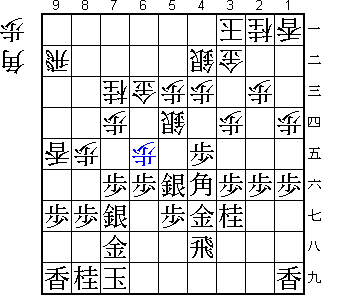
The second time in a couple of moves that Goda takes his time to make up his
mind. This standard attacking move is risky, but Goda felt that he needed it
to give his attack more power.
49.P3f-3e? 63/168 0/199
Goda is rewarded for his positive play. Of course Yashiki saw that 49.Px6e P7e
Nx6e S6f Lx9g+ Lx9g P*9f Lx9f Rx9f would lead to disaster. Now the silver on
6f hangs and this was made possible by 48.P6e. If in this variation black does
not play S6f, but pulls back to S8h, then P8f Px8f B*5i is winning for white.
Yashiki decides to counter-attack with 49.P3e, but this backfires. His best
chance would have been the suicidal looking 49.P9f! Lx9f Lx9f P*9e L*6d Gx6d
Bx6d L*7a G*8c R9d Gx7c. It was because of this variation that Goda took such
a long time for 48.P6e. Goda: "If it would go like this, I really don't know".
Another alternative to 49.P3e would have been P1e. This also gives black
chances for attack and does not leave the hole on 3f, which will become a big
factor later.
50.P6ex6f 0/168 10/209
51.P3ex3d 5/173 0/209
Black has to keep going. 51.Sx6f is again met by P8f Px8f B*5i.
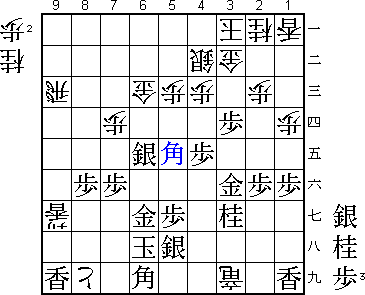
52.P*3f! 0/173 0/209
53.G4gx3f 19/192 0/209
This shows how painful the pawn drop was. The gold is now in a very bad
position. This could not be helped, because after 53.N2e P2d Bx2d B*5i
black can not move the rook to 2h because of P3g+. So he has to play R3h,
after which Bx2f+ makes a promoted bishop, wins the knight and might even
win the bishop.
54.S5d-6e 0/192 13/222
55.S5fx6e 11/203 0/222
56.P6f-6g+ 0/203 0/222
57.G7hx6g 7/210 0/222
58.N7cx6e 0/210 0/222
59.S7g-6f 13/223 0/222
60.P8e-8f 0/223 4/226
61.P8gx8f 0/223 0/226
62.S*4g 0/223 0/226
63.R4hx4g 1/224 0/226
64.B*5h 0/224 0/226
65.S*5f 1/225 0/226
66.B5hx4g+ 0/225 0/226
67.S5fx4g 0/225 0/226
68.R*4i 0/225 0/226
69.B*6i? 10/235 0/226
Black's position looks a mess and you would expect white to win easily from
here. However, it is only after this mistake that things become a lot easier.
After 69.K7h Rx4g+ B5e +Rx3f B*8a R9c Bx6c+ Rx6c S*5b black threatens mate
and to take the rook. So white has go for the all-out attack after S*5h
instead of +Rx3f, but then things become really wild and white might lose
control of the game.
70.P*8h 0/235 1/227
71.K7i-6h 1/236 0/227
72.P8hx8i+ 0/236 0/227
73.S6fx6e 0/236 0/227
74.L9ex9g+ 0/236 8/235
75.S4g-5h 3/239 0/235
76.R4i-3i+ 0/239 4/239
77.P*9c 2/241 0/239
78.R9bx9c 0/241 0/239
79.B4f-5e 4/245 0/239
80.P5c-5d!         0/245        18/257

Beautiful move. White allows the bishop promotion and strengthens his attack
by immediately cutting off the horse from defense.

81.B5ex1a+         0/245        0/257
82.N*5e            0/245        0/257
83.P5g-5f          28/273       0/257
84.+P8i-7i         0/273        1/258
85.P5fx5e          1/274        0/258
86.+P7ix6i         0/274        4/262
87.K6h-5g          0/274        0/262
88.B*7i            0/274        1/263
89.P*6h            8/282        0/263
90.+P6ix6h         0/282        1/264
91.G6gx6h          0/282        0/264
92.P*6g            0/282        0/264
The deciding move.

93.N*3c            3/285        0/264

Yashiki decides to go out in a flame instead of the quiet 93.Kx6g P*6f K5g
Bx6h+ Kx6h +R4h.

94.N2ax3c          0/285        0/264
95.P3dx3c+         0/285        0/264
96.S4bx3c          0/285        1/265
97.N*2e            0/285        0/265
98.P6gx6h+         0/285        0/265
99.N2ex3c+         0/285        0/265
100.+P6hx5h        0/285        0/265
Resigns            0/285        0/265
Time:              04:45:00     04:25:00

Black is mated after 101.Kx5h G*5g or 101.K6f Bx5g+ K7g G*6g. It must be a
worrying experience for Yashiki to be outplayed like this even when he had
the black pieces. In the next game he will have to show some brilliance with
white or this match might be over before it has properly started.