68th Meijin Match Game 4
[Black "Habu Yoshiharu, Meijin"]
[White "Miura Hiroyuki, Challenger"]
[Event "68th Meijin-sen, Game 4"]
[Date "May 18th and 19th 2010"]
1.P7g-7f 00:00:00 00:00:00
2.P3c-3d 00:00:00 00:01:00
3.P2g-2f 00:05:00 00:01:00
4.G4a-3b 00:05:00 00:03:00
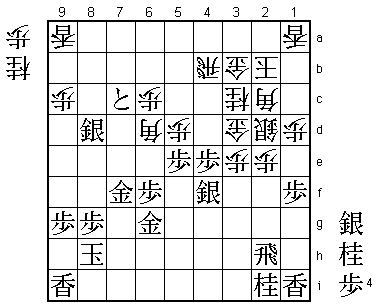
After three consecutive losses in the Yokofudori, which is Miura's favorite opening,
he decides to change his opening strategy. 4.G3b is an invitation to play the
Kakugawari with tempo loss.
5.G6i-7h 00:11:00 00:03:00
Black has moved the pawn in front of the rook, but white hasn't. With 5.G7h is
daring white to play P8d, after which black will play 6.P2e.
6.P4c-4d 00:11:00 00:25:00
Instead of pushing the rook pawn, Miura changes his plans and is now aiming to
move into the Yagura position. With the gold on 7h, it is more difficult for black
to exchange the pawn in front of the rook. An alternative is to switch to the
Furibisha because the gold on 7h is not in its natural position for the Ibisha side:
6.P9d P2e B3c Bx3c+ Gx3c S3h R2b. Even though the gold on 3c looks out of place, this
is quite a popular strategy these days and even renowned Ibisha player Watanabe has
given it a try.
7.P2f-2e 00:25:00 00:25:00
8.B2b-3c 00:25:00 00:33:00
Again white has the alternative to switch to a Furibisha opening, this time with 8.R4b.
9.S3i-4h 00:37:00 00:33:00
10.G6a-5b 00:37:00 00:37:00
11.P5g-5f 00:40:00 00:37:00
12.G5b-4c 00:40:00 00:44:00
13.B8h-7g 00:53:00 00:44:00
This is the only way to exchange the rook pawn. If 13.S6h, then white has time to move
into the Yagura with 14.S2b S7g B4b B7i S3c.
14.S3a-2b 00:53:00 00:57:00
15.B7g-6h 01:02:00 00:57:00
16.P5c-5d 01:02:00 01:01:00
17.S7i-8h 01:14:00 01:01:00
18.K5a-4a 01:14:00 01:04:00
19.S8h-7g 01:19:00 01:04:00
20.S7a-6b 01:19:00 01:10:00
21.K5i-6i 01:26:00 01:10:00
22.S6b-5c 01:26:00 01:18:00
23.G4i-5h 01:34:00 01:18:00
24.K4a-3a 01:34:00 01:22:00
25.P3g-3f 02:05:00 01:22:00
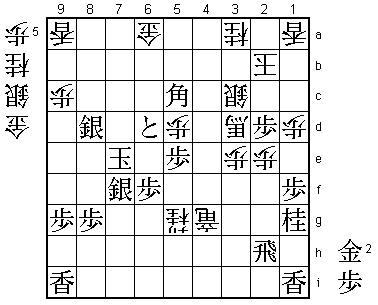
Black delays the exchange of the pawns on the rook file until white has played B4b.
In that case, exchange of the bishops will mean an extra loss of tempo for white.
26.B3c-4b 02:05:00 01:57:00
27.P2e-2d 02:16:00 01:57:00
28.P2cx2d 02:16:00 02:18:00
29.B6hx2d 02:17:00 02:18:00
30.N2a-3c 02:17:00 02:25:00
Because exchanging bishops is a tempo loss for white, this looks like the best move,
but actually 30.Bx2d Rx2d S2c R2h P*2d has been played quite often as well. The idea
is that white has compensation for the pawn exchange and the tempo loss because the
silver crown castle is stronger than the Yagura. Actually, Habu played that strategy
himself in the 6th game of the Oi against Fukaura two years ago.
31.B2d-6h 02:37:00 02:25:00
32.P4d-4e 02:37:00 02:37:00
33.P4g-4f 02:48:00 02:37:00
34.P4ex4f 02:48:00 02:57:00
35.B6hx4f 02:52:00 02:57:00
36.S5c-4d 02:52:00 03:02:00
37.S4h-4g 03:26:00 03:02:00
38.P*4e 03:26:00 03:12:00
39.B4f-3g 03:30:00 03:12:00
40.P3d-3e 03:30:00 03:14:00

Black has used a number of moves to activate rook and bishop, and white uses these
moves to build up pressure in the center with the minor pieces. The position seems
to be unclear.
41.K6i-7i 04:12:00 03:14:00
Habu took some time for this move and admitted after the game that he didn't like
his position here. It is unclear what he had overlooked, but clearly 41.Px3e is good
for white here after Sx3e P*3f P*2g! because Rx2g fails to P4f Sx4f Sx3f attacking
both rook and bishop. Therefore, after P*2g black must play R4h, which seems to be
alright after N2e Px3e Nx3g+ Nx3g because black gets two pieces for the bishop, but
then B1e! is very strong. The knight on 3g cannot move and is hard to defend.
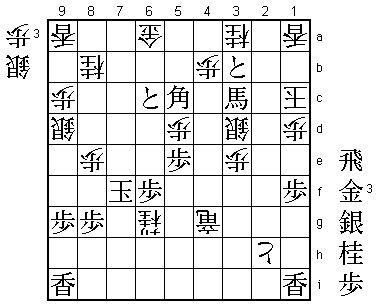
42.P3ex3f 04:12:00 03:25:00
43.S4gx3f 04:16:00 03:25:00
44.P*3e 04:16:00 03:25:00
45.S3f-4g 04:40:00 03:25:00
The two vanguard pawns on 4e and 3e are very strong and the general opinion was that
white had the upper hand here.
46.S2b-2c 04:40:00 03:28:00
47.P6g-6f 04:41:00 03:28:00
48.P*2d 04:41:00 03:38:00
49.K7i-8h 04:42:00 03:38:00
50.P1c-1d 04:42:00 03:44:00
51.P1g-1f 04:47:00 03:44:00
52.K3a-2b 04:47:00 03:47:00
53.G5h-6g 04:52:00 03:47:00
54.P8c-8d 04:52:00 03:51:00
55.P7f-7e 05:09:00 03:51:00
56.B4bx7e 05:09:00 04:46:00
57.S7g-7f 05:23:00 04:46:00
58.B7e-5c 05:23:00 05:24:00
59.P*7d 05:27:00 05:24:00
60.P4e-4f 05:27:00 05:31:00
61.B3gx4f 06:07:00 05:31:00
62.S4d-4e 06:07:00 05:31:00
63.P*2e 06:08:00 05:31:00
64.P2dx2e 06:08:00 06:03:00
65.P7dx7c+ 06:09:00 06:03:00
66.S4ex4f 06:09:00 06:03:00
67.S4gx4f 06:09:00 06:03:00
68.N8ax7c 06:09:00 06:04:00
69.P*7d 06:09:00 06:04:00
70.P*7g 06:09:00 06:47:00
71.N8ix7g 06:56:00 06:47:00
72.P*7e 06:56:00 06:49:00
73.S7fx7e 06:57:00 06:49:00
74.N7c-8e 06:57:00 06:55:00
75.P7d-7c+ 07:01:00 06:55:00
76.R8b-4b 07:01:00 07:19:00
77.P*2d 07:08:00 07:19:00
78.N8ex7g+ 07:08:00 07:23:00
79.G7hx7g 07:10:00 07:23:00
80.S2cx2d 07:10:00 07:25:00
81.S7ex8d 07:12:00 07:25:00
82.G4c-3d 07:12:00 07:39:00
83.P*4e 07:25:00 07:39:00
84.B5c-6d 07:25:00 07:46:00
85.P5f-5e 07:33:00 07:46:00
86.P*7f 07:33:00 08:04:00
87.G7gx7f 07:37:00 08:04:00
88.B*2c!? 07:37:00 08:04:00
Habu has skillfully found a way to put pressure on the white position and it seems
like he has closed the gap. The problem for white is that Gx4e fails to the fork
N*3d and the head of the king is also weak. The bishop 88.B*2c fixes these problems,
and this bishop also aims indirectly at the undefended gold on 6g. All in all, this
looks like a good move, but Miura wasn't too sure, feeling that if the best move in
this position was this bishop drop, then something must have been gone wrong before.

89.+P7cx6c!  07:56:00  08:04:00

Great reply by Habu. In the press room 89.N*5g was analyzed, but this is much stronger,
taking the strong bishop off the board and establishing running space for the king.

90.G3dx4e    07:56:00  08:07:00
91.+P6cx6d   07:59:00  08:07:00
92.G4ex4f    07:59:00  08:07:00
93.K8h-7g!   08:00:00  08:07:00

Moving the king up looks dangerous, but it has a lot of space to run (especially up the
board), so it is not easy to catch.

94.G4f-5f    08:00:00  08:44:00
95.G6gx5f    08:09:00  08:44:00
96.B2cx5f    08:09:00  08:44:00
97.P*4e      08:10:00  08:44:00
98.R4bx4e    08:10:00  08:49:00
99.P*4f      08:10:00  08:49:00
100.R4ex4f   08:10:00  08:50:00
101.G*5g     08:10:00  08:50:00
102.G*6g     08:10:00  08:54:00
103.G5gx6g   08:10:00  08:54:00
104.B5fx6g+  08:10:00  08:54:00
105.K7gx6g   08:10:00  08:54:00
106.R4f-4g+  08:10:00  08:54:00
107.N*5g     08:11:00  08:54:00
108.N3c-4e   08:11:00  08:54:00
109.G7f-7e   08:26:00  08:54:00
110.P*7d     08:26:00  08:54:00
111.K6g-7f   08:26:00  08:54:00
112.P7dx7e   08:26:00  08:54:00
113.K7fx7e   08:27:00  08:54:00
114.N4ex5g+  08:27:00  08:54:00
115.B*6a?    08:33:00  08:54:00

This allows Miura back in. Correct was to attack the silver on 2d with 115.B*5a. Then
116.N*8b looks like it might give black problems, but after 117.S*8c white cannot get
to the black king.

116.G*6b     08:33:00  08:55:00

Attacks the bishops and makes sure that black cannot make an entering king.

117.P*3c     08:48:00  08:55:00

After 117.B8c+ P*7d! Kx7d (+Bx7d +N5f and the promoted rook on 4g is activated) N*7a
+B8b S*6c and the black king is driven back after which black cannot win. Habu decides
to attack with 117.P*3c, but even in the post-mortem analysis there was no way found
to make this attack work.

118.G3bx3c   08:48:00  08:55:00
119.P*3d     08:48:00  08:55:00
120.G6bx6a   08:48:00  08:55:00
121.P3dx3c+  08:49:00  08:55:00
122.S2dx3c   08:49:00  08:55:00
123.P*2d     08:52:00  08:55:00
124.N*3a     08:52:00  08:55:00
125.B*5c     08:55:00  08:55:00
126.B*6g     08:55:00  08:55:00
127.S*7f     08:56:00  08:55:00
128.B6g-3d+  08:56:00  08:55:00
129.N2i-1g!  08:56:00  08:55:00
With this knight joining the attack, the white position suddenly becomes a lot more
dangerous.

130.S3cx2d?  08:56:00  08:56:00

The most natural move in this position, but it is just Miura's luck in this match
that it probably is also the losing move. If he plays 130.S*4b here, white still
seems to have chances. For example, 131.Nx2e Sx5c +Px5c is not threatening mate against
the white king and the black king looks quite vulnerable. In the post-mortem analysis
no clear win for white was found, but Miura should have tried this instead of 130.Sx2d.

131.P*3c     08:56:00  08:56:00
132.P*4b     08:56:00  08:56:00

Tanigawa suggested 132.S*2c, which seems to put up the most resistance, but black is
probably winning anyway.

133.N1gx2e   08:56:00  08:56:00
134.S2dx2e   08:56:00  08:56:00
135.G*4d     08:56:00  08:56:00
136.P*2g     08:56:00  08:56:00
137.G4dx3d   08:56:00  08:56:00
138.S2ex3d   08:56:00  08:56:00
139.B*4d     08:56:00  08:56:00

The decisive move. White can no longer stop the black attack.

140.N*6c     08:56:00  08:59:00
141.+P6dx6c  08:56:00  08:59:00
142.P2gx2h+  08:56:00  08:59:00
143.P3c-3b+  08:57:00  08:59:00
144.K2b-1c   08:57:00  08:59:00
145.B4d-3c+  08:57:00  08:59:00
146.S*7d     08:57:00  08:59:00
147.K7ex7d   08:57:00  08:59:00
148.N*8b     08:57:00  08:59:00
149.K7d-8e   08:57:00  08:59:00
150.G*9d     08:57:00  08:59:00
151.K8e-9f   08:57:00  08:59:00
152.R*9e     08:57:00  08:59:00
153.S8dx9e   08:57:00  08:59:00
154.G9dx9e   08:57:00  08:59:00
155.K9fx9e   08:57:00  08:59:00
156.S*9d     08:57:00  08:59:00
157.K9e-8f   08:57:00  08:59:00
158.P*8e     08:57:00  08:59:00
159.K8f-7g   08:57:00  08:59:00
160.G*6g     08:57:00  08:59:00
161.S7fx6g   08:57:00  08:59:00
162.+N5gx6g  08:57:00  08:59:00
163.K7g-7f   08:57:00  08:59:00
Resigns      08:57:00  08:59:00
If white wants to keep checking the black king, there is not much else but 164.+N7g,
but after 165.K6e S*7d K6d it is clear that there is no mate. On the other hand, the
white king cannot be defended, so Miura resigned here. Habu wins his third consecutive
Meijin title and seventh overall with the perfect score of 4-0. Despite this easy
looking victory, he acknowledged after the game that in three of the four games he
had a losing position in the endgame at some point, so that he felt he had been very
fortunate to win this match. Miura will be disappointed that he was unable to take a
single game from Habu in this match.