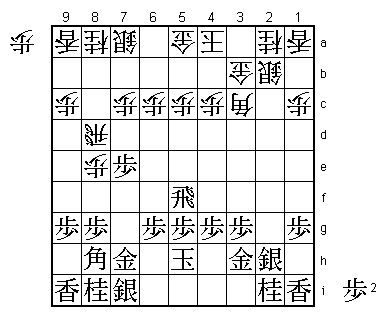
68th Meijin Match Game 3
[Black "Miura Hiroyuki, Challenger"]
[White "Habu Yoshiharu, Meijin"]
[Event "68th Meijin-sen, Game 3"]
[Date "May 6th and 7th 2010"]
1.P7g-7f 00:00:00 00:00:00
2.P3c-3d 00:00:00 00:01:00
3.P2g-2f 00:01:00 00:01:00
4.P8c-8d 00:01:00 00:05:00
5.P2f-2e 00:06:00 00:05:00
6.P8d-8e 00:06:00 00:11:00
7.G6i-7h 00:08:00 00:11:00
8.G4a-3b 00:08:00 00:16:00
9.P2e-2d 00:14:00 00:16:00
10.P2cx2d 00:14:00 00:19:00
11.R2hx2d 00:15:00 00:19:00
12.P8e-8f 00:15:00 00:23:00
13.P8gx8f 00:16:00 00:23:00
14.R8bx8f 00:16:00 00:24:00
15.R2dx3d 00:18:00 00:24:00
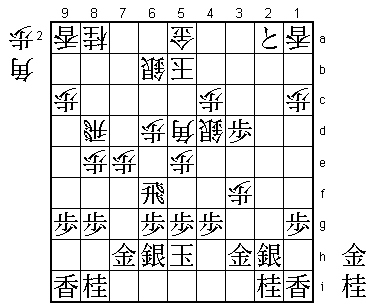
The third game of this match and the third time that we see a Yokofudori opening.
It is not often that we see the same opening so often in the same match. This being
said, there are so many themes in this opening that there is little risk that the
players (or the audience) will get bored.
16.B2b-3c 00:18:00 00:29:00
17.R3d-3f 00:21:00 00:29:00
18.S3a-2b 00:21:00 00:35:00
19.K5i-5h 00:27:00 00:35:00
20.K5a-4a 00:27:00 00:46:00
21.G4i-3h 00:34:00 00:46:00
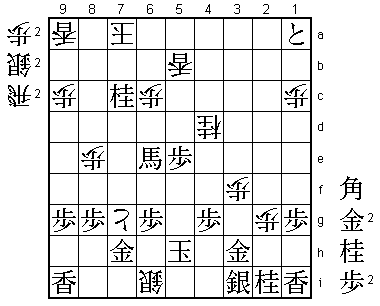
22.R8f-8d 00:34:00 00:59:00
This rook wants to shift to 2d, to force the silver to 2h, where it will become a
wall silver. However, black has no way to avoid this, because 23.R2f fails to Bx8h+
Sx8h B*4d.
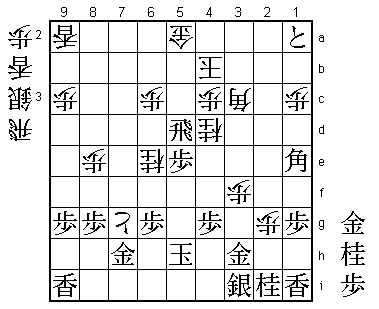
23.P*8g 00:45:00 00:59:00
24.R8d-2d 00:45:00 01:17:00
25.S3i-2h 00:59:00 01:17:00
This is not good shape, but dropping the pawn back on 2g is not an option for a
professional player. Black will now aim at developing this silver on 2h.
26.G6a-5a 00:59:00 01:35:00
27.P7f-7e 01:09:00 01:35:00
28.R2d-8d 01:09:00 01:54:00
White has to move back here, because otherwise black will play R8f and white is
forced to drop the pawn way back to avoid the promotion of the rook.
29.R3f-8f 01:19:00 01:54:00
30.P*8e 01:19:00 02:16:00
31.R8f-5f 01:29:00 02:16:00
The alternative is 31.R7f S6b P3f P9d P3e R2d which was played in last A Junisen
between Goda and Inoue. The final move R2d is very important because it makes sure
that black cannot repair the piece shape on the right side. After R2d, S3g is of
course impossible and N3g is answered by Bx8h+ Sx8h B*5d which is good for white.
The reason why black played 31.R5f here is to make sure that white doesn't have
B*5d in the variation above. As a result, white cannot play R2d in that variation
because of N3g, but if white plays something else, for example P9e, then black can
play R2f and take control of the important second file, followed by S3g-S4f and N3g,
which would be the ideal shape for black. The rest of the opening and early middle
game now centers on this theme. If Habu doesn't do anything, Miura will play the
silver and knight up to get the ideal formation on the right side. Therefore, Habu
needs to make sure to keep black too busy to execute this plan.
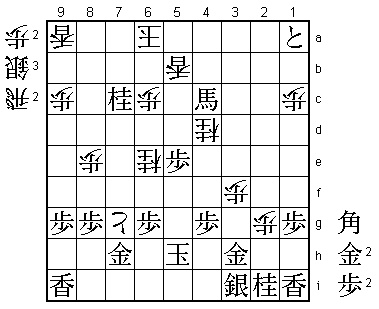
32.S7a-6b 01:29:00 02:46:00
33.P3g-3f 02:51:00 02:46:00
34.P5c-5d 02:51:00 03:02:00
35.B8hx3c+ 03:08:00 03:02:00
36.S2bx3c 03:08:00 03:56:00
37.P3f-3e 03:29:00 03:56:00
38.S3c-4d 03:29:00 04:40:00
39.R5f-3f 04:22:00 04:40:00
40.P5d-5e 04:22:00 04:50:00
41.S7i-6h 04:30:00 04:50:00
42.P7c-7d 04:30:00 05:11:00
43.R3f-7f 05:24:00 05:11:00
44.B*5d 05:24:00 05:21:00
45.R7f-6f 05:41:00 05:21:00
46.P7dx7e 05:41:00 05:31:00
47.P*2c 05:42:00 05:31:00
48.G3bx2c 05:42:00 06:23:00
49.P*2d 05:43:00 06:23:00
50.G2c-2b 05:43:00 06:23:00
51.B*3d 05:59:00 06:23:00
52.G2b-3c 05:59:00 06:40:00
53.P2d-2c+ 05:59:00 06:40:00
54.G3cx3d 05:59:00 06:41:00
55.P3ex3d 05:59:00 06:41:00
56.K4a-5b 05:59:00 06:41:00
57.+P2c-3b 06:20:00 06:41:00
58.P*3f 06:20:00 06:46:00
59.+P3bx2a 06:23:00 06:46:00
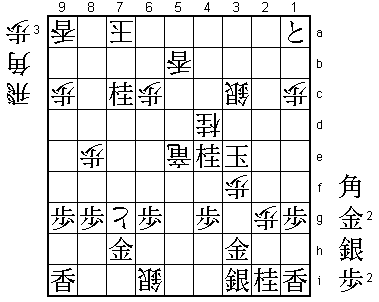
60.P6c-6d 06:23:00 06:52:00
White has found counterplay by putting pressure on the rook. This rook is now in
real danger of being captured after P6e R9f P9d followed by P9e. The general opinion
in the press room was that Habu was better here, mainly because the white king is so
difficult to catch in the secure open space on the right side of the board. In the
postmortem analysis, Miura agreed but Habu wasn't so sure, pointing out that he is
down in material in this position (only a bishop for Gold, Knight and Tokin).

61.P3d-3c+   06:53:00  06:52:00
62.S4dx3c    06:53:00  07:01:00
63.+P2ax1a   07:02:00  07:01:00
64.P6d-6e    07:02:00  07:05:00
65.R6f-9f    07:12:00  07:05:00
66.S3c-4d    07:12:00  07:09:00
67.N8i-7g    07:45:00  07:09:00
68.N8a-7c    07:45:00  07:14:00
69.L*4f      07:48:00  07:14:00
70.S4d-5c    07:48:00  07:24:00
71.P5g-5f    07:54:00  07:24:00
72.R8d-7d    07:54:00  07:54:00
73.P5fx5e    08:05:00  07:54:00
74.B5d-6c    08:05:00  07:54:00
75.R9f-5f    08:20:00  07:54:00
76.B*3d      08:20:00  08:15:00
77.N*4e      08:25:00  08:15:00
78.B6cx4e    08:25:00  08:25:00
79.L4fx4e    08:25:00  08:25:00
80.B3dx4e    08:25:00  08:25:00
81.S6h-5g    08:33:00  08:25:00
82.B4ex5f    08:33:00  08:31:00
83.S5gx5f    08:33:00  08:31:00
84.N*4d      08:33:00  08:32:00
85.B*1b      08:49:00  08:32:00
86.P*2g      08:49:00  08:38:00
87.S2h-3i    08:50:00  08:38:00
88.P7e-7f    08:50:00  08:43:00
89.N7gx6e    08:51:00  08:43:00
90.P7f-7g+   08:51:00  08:43:00
91.N6ex5c+   08:51:00  08:43:00
92.S6bx5c    08:51:00  08:43:00
93.B1b-4e+   08:54:00  08:43:00
94.P*6c      08:54:00  08:48:00
95.S*5d      08:55:00  08:48:00
96.S5cx5d    08:55:00  08:52:00
97.P5ex5d    08:55:00  08:52:00
98.N*6e      08:55:00  08:55:00
99.P5d-5c+   08:55:00  08:55:00
100.K5bx5c   08:55:00  08:55:00
101.S5fx6e   08:58:00  08:55:00
102.N7cx6e   08:58:00  08:56:00
103.S*5d     08:58:00  08:56:00
104.R7dx5d   08:58:00  08:56:00
105.+B4ex5d  08:58:00  08:56:00
106.K5cx5d   08:58:00  08:56:00
107.P*5e     08:59:00  08:56:00
108.K5d-5c   08:59:00  08:57:00
109.R*5d     08:59:00  08:57:00
110.K5c-4b   08:59:00  08:57:00
111.B*1e     08:59:00  08:57:00
112.B*3c?    08:59:00  08:59:00
Habu has skillfully extended his lead in this game, but just when he is about to
cash in, he makes a mistake that throws all this careful work out of the window.
The reason for playing 112.B*3c is clear, because there is no mate against the white
king and white is threatening mate with S*5g K6i S*6h Gx6h +Px6h. Despite this,
giving black the bishop with check is very dangerous. Correct would have been 112.S*3c
which is clearly not mate after 113.N*3d K3b G*2b Sx2b Nx2b+ Kx2b S*3c K2c S2d+ K3b
+S3c K4a. Habu saw this variation, but didn't see the final K4a in this variation.

113.R5dx5a+  08:59:00  08:59:00
114.K4bx5a   08:59:00  08:59:00
115.B1ex3c+  08:59:00  08:59:00
116.K5a-6a   08:59:00  08:59:00

The problem of 112.B*3c is that white cannot drop a silver on 4b here because of
117.+Bx4b Kx4b N*5d and black has mate with the bishop wherever the white king
goes to.

117.+B3cx4c  08:59:00  08:59:00
118.L*5b     08:59:00  08:59:00
119.N*7c?    08:59:00  08:59:00
Miura misses a great opportunity here. The winning move was 119.B*8c. Then after
120.P*7b N*7c K6b +Bx4d S*5c N*5d Kx7c G*8d! K8b (Kx8d leads to mate after G*7d)
K8b Bx6e+ white has managed to take both of the white knights off the board and
now white is no longer threatening mate.

120.K6a-7a   08:59:00  08:59:00
121.+B4cx6e  08:59:00  08:59:00

Miura has taken away the first knight on 6e, but the second knight on 4d is still
there and that is the foothold that white needs.

122.S*6i!    08:59:00  08:59:00

This should have been the winning move.
123.K5h-5g   08:59:00  08:59:00

Forced, because 123.Kx6i S*6h Gx6h R*4i N*5i R*7i Kx7i Rx5i+ G*6i S*8h is mate.

124.S*5f     08:59:00  08:59:00
125.+B6ex5f  08:59:00  08:59:00
126.R*5h     08:59:00  08:59:00
127.K5g-4f   08:59:00  08:59:00
128.R5hx5f+  08:59:00  08:59:00
129.K4f-3e   08:59:00  08:59:00
130.+R5fx5e  08:59:00  08:59:00
131.N*4e     08:59:00  08:59:00
132.S*3c?    08:59:00  08:59:00

A big mistake. Correct was 132.+Px7h which threatens mate with +Rx4e Kx4e B*2c and
white has no good defense against that.

Resigns      08:59:00  08:59:00
A rare event at this level, but resigning was Miura's biggest mistake in this game.
Actually, the position is still unclear after 133.G*8a K7b G*8b because K7c fails
to B*5a followed by Bx3c+ and K6b N6a+ Kx6a G8a-7a K5a B*7c which is a fork on the
king and promoted rook. The conclusion of the post-mortem analysis was that the
position is still unclear and Miura will be kicking himself that he resigned here.
A lucky win for Habu, but he was dominating the game for the most part, so it is not
so strange that Miura finally succumbed to the pressure. Still, a tough loss that
puts Miura in a 0-3 hole. Winning from there is no longer considered impossible, but
Miura needs a major turnaround in form and luck to make this Meijin match interesting.
First task, win game four with the white pieces or it is all over.