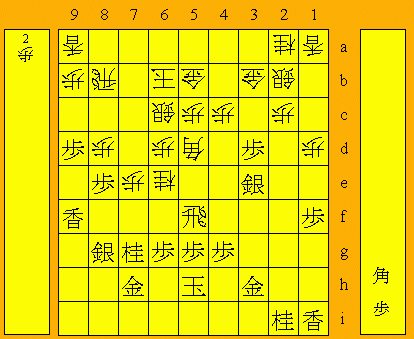
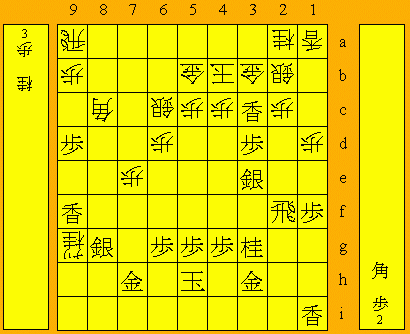
68th Kisei Match Game 4
Black: Yashiki, Challenger
White: Miura, Kisei
68th Kisei-sen, Game 4, July 15th 1997
1.P2g-2f           1/1          0/0
2.P8c-8d           0/1          1/1
3.P2f-2e           0/1          0/1
4.P8d-8e           0/1          0/1
5.G6i-7h           0/1          0/1
6.G4a-3b           0/1          0/1
7.P2e-2d           6/7          0/1
8.P2cx2d           0/7          0/1
9.R2hx2d           0/7          0/1
10.P*2c            0/7          0/1
11.R2d-2f          0/7          0/1
12.S7a-7b          0/7          0/1
13.P1g-1f          1/8          0/1
14.P1c-1d          0/8          1/2
15.S3i-3h          0/8          0/2
16.P6c-6d          0/8          1/3
17.P7g-7f          1/9          0/3
18.P8e-8f          0/9          0/3
19.P8gx8f          0/9          0/3
20.R8bx8f          0/9          0/3
21.P*8g            0/9          0/3
22.R8f-8b          0/9          0/3
23.P3g-3f          1/10         0/3
24.P3c-3d          0/10         0/3
25.P3f-3e          1/11         0/3

Thus far in this match all games have been won by white. Therefore, Yashiki's
choice of opening would be very important. In game 2 he played Hineribisha and
was surprised by a great new move of Miura. This time he chooses Aigakari with
the P3e attack, a speciality of Nakahara.

26.P3dx3e          0/11         0/3
27.S3h-3g          0/11         0/3
28.B2bx8h+         0/11         11/14
29.S7ix8h          0/11         0/14
30.S3a-2b          0/11         0/14
31.P*3d            1/12         0/14
32.S7b-6c          0/12         1/15
33.S3g-4f          0/12         0/15
34.G6a-5b          0/12         2/17
35.K5i-5h          1/13         0/17
36.P7c-7d?!        0/13         1/18

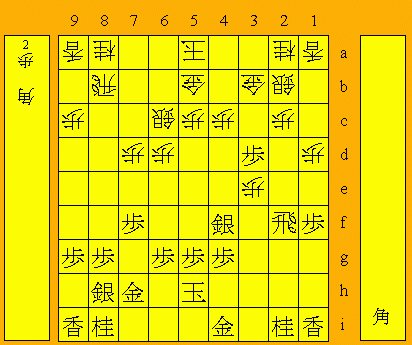
This is quite unusual. Miura aims for a right side king strategy, fearing that
the pawn on 3d will become a base for attack after the normal K4b. The right
side king has been played in this kind of position only two times before:
Nakahara-Takahashi (54th A-Junisen) and Namekata-Horiguchi (43rd Oza-sen).

37.G4i-3h          7/20         0/18
38.N8a-7c          0/20         1/19
39.P9g-9f          20/40        0/19
40.P9c-9d          0/40         1/20
41.S4fx3e          8/48         0/20
42.K5a-6b          0/48         11/31
43.N8i-7g          32/80        0/31
44.P9d-9e?         0/80         60/91

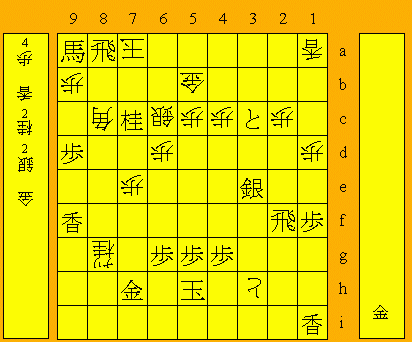
Miura's opening strategy has been a failure. The only possible other move
seems to be 44.R8a, but after 45.P8f followed by 47.S8g (if white plays
46.Rx8f he will lose the rook after 47.P*8e) and a later N8e, black has a
clear advantage. After long thought, Miura decides on 44.P9e, but this attack
backfires on him.

45.P8g-8f          44/124       0/91
46.P9ex9f          0/124        7/98
47.P7f-7e!         9/133        0/98
48.P7dx7e          0/133        4/102

Or 48.P9g+ Lx9g P*9f Lx9f Lx9f Px7d Sx7d P*7e S6c P*9g and the pawn on 7e will
be a great attacking base.

49.P*9d!           2/135        0/102

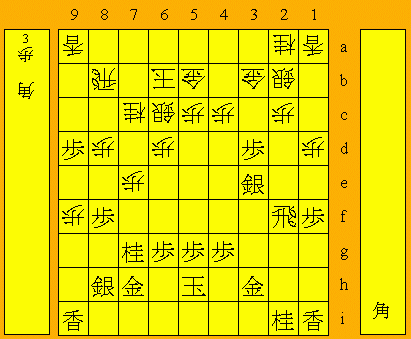
Suddenly white is in big trouble. After 50.Lx9d, 51.B*9c is too severe to be
allowed.

50.P*8d            0/135        45/147

Even though this move is admitting that he failed, I was tempted to give it
an exclamation mark. Instead of rushing into the sword by playing something
like 50.P*3f Lx9f P*9b Rx3f B*5d R5f P*7f N8e Nx8e B*9e, Miura digs in, hoping
his opponent will make a mistake in the attack. Unfortunately for him, Yashiki
plays an impeccable game after this and also never gets in time trouble.

51.L9ix9f          11/146       0/147
52.P*9b            0/146        3/150
53.S8h-8g          9/155        0/150
54.B*5d            0/155        38/188
55.R2f-5f          15/170       0/188
56.N7c-6e          0/170        15/203
57.P8f-8e!         9/179        0/203

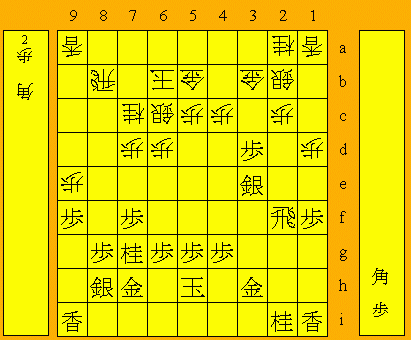
More or less the deciding move. The professionals in the press room expected
the slower S4f followed by S5e, but Yashiki goes straight for the kill.
White can not take this pawn: 58.Px8e B*9e K7b P*7d Sx7d Rx5d Px5d B*7c and
white has no defence.

58.N6ex7g+         0/179        7/210
59.G7hx7g          0/179        0/210
60.B5d-6e          0/179        0/210
61.R5f-2f          8/187        0/210
62.R8b-8a          0/187        5/215
63.P8ex8d          24/211       0/215

Of course white can not take this pawn because of B*9e. What follows is a
king chase from left to right and back again.

64.K6b-5a          0/211        4/219
65.N*8c            15/226       0/219
66.K5a-4b          0/226        6/225

The spot white did not want to go to in the first place. Now also the pawn on
3d and the silver on 3e are playing a role in black's attack.

67.N8cx9a+         9/235        0/225
68.R8ax9a          0/235        2/227
69.P8d-8c+         1/236        0/227
70.B6ex8c          0/236        21/248
71.N2i-3g          11/247       0/248
72.N*8e            0/247        2/250
73.G7g-7h          3/250        0/250
74.N8e-9g+         0/250        0/250
75.L*3c            4/254        0/250

76.N2ax3c          0/254        4/254
77.P3dx3c+         0/254        0/254
78.S2bx3c          0/254        0/254
79.P*3d            11/265       0/254
80.S3c-2b          0/265        1/255
81.N3g-4e          2/267        0/255
82.+N9gx8g         0/267        1/256
83.P3d-3c+         13/280       0/256
84.S2bx3c          0/280        2/258
85.N4ex3c+         2/282        0/258
86.G3bx3c          0/282        0/258
87.P*3d            0/282        0/258
88.P*3g            0/282        0/258
89.P3dx3c+         13/295       0/258
90.K4b-5a          0/295        0/258
91.B*7c            1/296        0/258
92.K5a-6a          0/296        0/258
93.B7cx9a+         1/297        0/258
94.P3gx3h+         0/297        0/258
95.N*7c            0/297        0/258
96.K6a-6b          0/297        0/258
97.S*7a            0/297        0/258
98.K6bx7a          0/297        0/258
99.R*8a            0/297        0/258
Resigns            0/297        0/258
Time:              04:57:00     04:18:00

Black has taken his time on the vital moves (79.P*3d, 83.P3c+ and 89.Px3c+) to
make sure that his attack is winning and that he can ignore white's desperate
attempts at counterattack. A perfect game by Yashiki, but it is a little
disappointing that the excitement of the first three games was lacking in this
one.
