68th Kisei Match Game 2
Black: N.Yashiki, Challenger
White: H.Miura, Kisei
68th Kisei-sen, Game 2, June 24th 1997
1.P2g-2f           1/1          0/0
2.P8c-8d           0/1          1/1
3.P2f-2e           1/2          0/1
4.P8d-8e           0/2          0/1
5.G6i-7h           0/2          0/1
6.G4a-3b           0/2          0/1
7.P2e-2d           8/10         0/1
8.P2cx2d           0/10         0/1
9.R2hx2d           0/10         0/1
10.P*2c            0/10         0/1
11.R2d-2f          0/10         0/1
12.S7a-7b          0/10         1/2
13.P1g-1f          0/10         0/2
14.P1c-1d          0/10         2/4
15.S3i-3h          0/10         0/4
16.P6c-6d          0/10         0/4
17.P7g-7f          1/11         0/4
18.P8e-8f          0/11         2/6
19.P8gx8f          0/11         0/6
20.R8bx8f          0/11         0/6
21.P9g-9f          11/22        0/6
22.R8f-8b          0/22         3/9
23.P7f-7e          6/28         0/9
24.K5a-4a          0/28         9/18
25.N8i-7g          6/34         0/18
26.P3c-3d          0/34         8/26
27.K5i-4h          11/45        0/26
28.S3a-4b          0/45         0/26
29.P*8e            4/49         0/26
30.S7b-6c          0/49         8/34
31.R2f-7f          5/54         0/34
32.P2c-2d!?        0/54         23/57
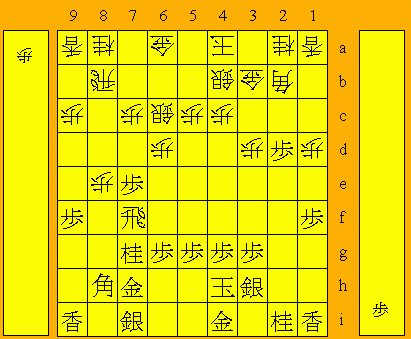
A very interesting new move by Miura. Being the hard worker that he is (it
is rumoured that he studies Shogi for as long as 10 hours a day), he must
have prepared this thoroughly (Miura after the game: "I looked briefly at this
before..."). Since it was a little surprising that Yashiki
played Hineribisha instead of Aigakari, the 23 minutes Miura used were
probably to decide if he would really play such a new strategy with 1-0 down
in a title match.

33.S7i-6h          9/63         0/57
34.B2b-4d          0/63         2/59
35.K4h-3i          26/89        0/59
36.P2d-2e          0/89         13/72
37.P5g-5f?!        1/90         0/72
A positive move, but 37.P*2g is probably better. However, playing P*2g is
something you would want to avoid at almost all costs in the Hineribisha. If
it turns out that 37.P*2g is the only move here, Miura's new strategy might
prove to be a serious blow to the Hineribisha strategy.
38.P2e-2f 0/90 5/77
39.S6h-5g 4/94 0/77
40.N2a-3c 0/94 1/78
41.S5g-4f 30/124 0/78
42.P5c-5d 0/124 39/117
43.P3g-3f 18/142 0/117
44.P1d-1e 0/142 3/120
45.P1fx1e 6/148 0/120
46.P*1g 0/148 4/124
47.L1ix1g 29/177 0/124
48.N3c-2e 0/177 0/124
49.L1g-1f 0/177 0/124
50.N2e-1g+ 0/177 0/124
51.N2ix1g 0/177 0/124
52.P2f-2g+ 0/177 0/124
53.S3hx2g 0/177 0/124
54.B4dx1g+ 0/177 0/124
55.P*2h 2/179 0/124
56.N*2d 0/179 10/134
57.N*2i 3/182 0/134
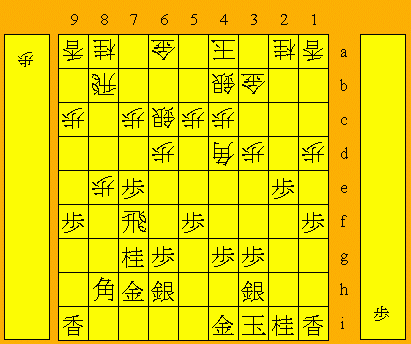
58.+B1g-6b? 0/182 24/158
After an almost forced sequence, white has screwed up black's castle and
promoted his bishop. His opening strategy has been a success. Retreating the
bishop to 6b is a mistake, though. After 58.+B5c B7i P6e Nx6e +B6d white has
a clear advantage.
59.B8h-7i 4/186 0/158
60.P7c-7d 0/186 59/217
61.P7ex7d 0/186 0/217
62.R8b-7b 0/186 6/223
63.B7i-5g 14/200 0/223
64.S6cx7d 0/200 5/228
65.P*7e 19/219 0/228
66.S7d-6c 0/219 9/237
67.P3f-3e 9/228 0/237
68.P6d-6e 0/228 21/258
69.P5f-5e 11/239 0/258
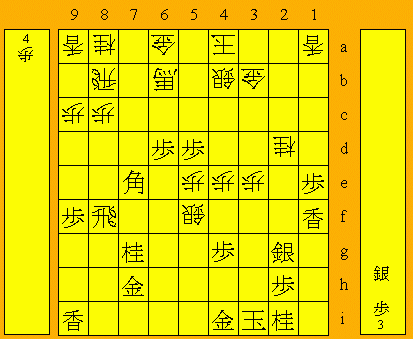
70.P5dx5e?! 0/239 11/269

After this, the game becomes a slugfest. Miura could have kept Yashiki's Ninja
tactics under control by playing 70.+B4d P8d P5e P8c+ R5b and after Px5f next,
white still has a slight advantage.

71.S4f-4e          3/242        0/269
72.P3dx3e          0/242        6/275
73.P8e-8d          11/253       0/275

Yashiki has made something out of very little. From now on the game becomes
very interesting and very difficult.

74.P*8b            0/253        6/281

Painful.

75.P8d-8c+         14/267       0/281
76.P8bx8c          0/267        0/281
77.P*8b            0/267        0/281
78.R7bx8b          0/267        8/289
79.P7e-7d          1/268        0/289
80.S6c-6d          0/268        0/289
81.P7d-7c+         4/272        0/289
82.S6dx7c          0/272        0/289
83.P*5d            5/277        0/289
84.S7c-6d          0/277        0/289
85.P6g-6f          1/278        0/289
86.P*7e            0/278        0/289
87.R7f-8f          1/279        0/289
88.P4c-4d          0/279        2/291
89.P6fx6e          2/281        0/291
90.P4dx4e          0/281        5/296
91.P6ex6d          1/282        0/296
92.S*5f            0/282        0/296
93.B5gx7e?         7/289        0/296
A mistake that gives Miura the advantage again. After 93.B6f +B4d P5c+! Sx5c
P6c+ the endgame becomes very close. Yashiki had not seen P5c+.

94.P4e-4f          0/289        0/296
95.P4gx4f          3/292        0/296
96.P*4h            0/292        0/296
97.K3ix4h          0/292        0/296
98.P*7d            0/292        0/296
99.B7e-6f          0/292        0/296
100.+B6b-4d        0/292        0/296
101.P6d-6c+        2/294        0/296
102.P*6e           0/294        0/296
103.N7gx6e         0/294        0/296
104.S5fx6e         0/294        0/296
105.B6f-8h         0/294        0/296
106.N2d-3f         0/294        1/297
107.K4h-5h         0/294        0/297
108.P*4g           0/294        0/297
109.P5d-5c+        0/294        0/297
110.P4g-4h+        0/294        0/297
111.G4ix4h         1/295        0/297
112.N*6f           0/295        0/297
113.B8hx6f         0/295        0/297
114.S6ex6f         0/295        0/297
115.S2gx3f         1/296        0/297
116.P5e-5f         0/296        0/297
117.N*2d           0/296        0/297

In the television program Igo-Shogi weekly Tanigawa suggested S*2a as quicker,
but commented that black in that case also seems to be a move too late.

118.P3ex3f         0/296        0/297
119.N2dx3b+        0/296        0/297
120.K4ax3b         0/296        0/297
121.+P5cx4b        0/296        0/297
122.R8bx4b         0/296        0/297
123.S*2d           0/296        0/297
124.P5f-5g+        0/296        1/298
125.G4hx5g         0/296        0/298
126.S6fx5g+        0/296        0/298
127.K5hx5g         0/296        0/298
128.N*6e           0/296        0/298
129.K5g-4g         0/296        0/298
130.G*5g           0/296        0/298
131.K4gx3f         0/296        0/298
132.S*3e           0/296        0/298
133.S2dx3e         0/296        0/298
134.B*4g           0/296        0/298
135.K3f-2f         0/296        0/298
136.P*2e           0/296        0/298
137.K2f-1g         0/296        0/298
138.+B4dx3e        0/296        0/298
139.K1g-1h         0/296        0/298
140.P2e-2f         0/296        0/298
141.S*3g           0/296        0/298
142.S*3h           0/296        0/298
143.+P6c-5c        0/296        0/298
144.+B3e-3f        0/296        0/298
Resigns            0/296        0/298
Time:              04:56:00     04:58:00

After 145.Sx3f Bx3f+ K1h S*1h is mate.