68th Kisei Match Game 1
Black: Miura, Kisei
White: Yashiki, Challenger
68th Kisei-sen, 1st Game, June 14th 1997
1.P2g-2f           0/0          0/0
2.P8c-8d           0/0          5/5
3.P2f-2e           0/0          0/5
4.P8d-8e           0/0          0/5
5.G6i-7h           0/0          0/5
6.G4a-3b           0/0          0/5
7.P2e-2d           0/0          0/5
8.P2cx2d           0/0          0/5
9.R2hx2d           0/0          0/5
10.P*2c            0/0          0/5
11.R2d-2h          0/0          0/5
12.P8e-8f          0/0          6/11
13.P8gx8f          0/0          0/11
14.R8bx8f          0/0          0/11
15.P*8g            0/0          0/11
16.R8f-8d          0/0          0/11
17.S3i-3h          2/2          0/11
18.P3c-3d          0/2          9/20
19.P9g-9f          3/5          0/20
20.S7a-7b          0/5          4/24
21.P4g-4f          1/6          0/24
22.S7b-8c          0/6          12/36
23.P7g-7f          11/17        0/36
24.S8c-7d          0/17         1/37
25.B8hx2b+         11/28        0/37
26.S3ax2b          0/28         0/37
27.N8i-7g          1/29         0/37
28.K5a-4b          0/29         6/43
29.S3h-4g          16/45        0/43
30.S2b-3c          0/45         10/53
31.S7i-8h          5/50         0/53
32.P9c-9d          0/50         9/62
33.S4g-5f          12/62        0/62
34.R8d-8b          0/62         14/76
35.K5i-6h          4/66         0/76
36.G6a-5b          0/66         3/79
37.G4i-5h          15/81        0/79
38.K4b-3a          0/81         11/90
39.K6h-7i          14/95        0/90
40.P1c-1d          0/95         12/102
41.P1g-1f          10/105       0/102
42.P6c-6d          0/105        15/117
43.G5h-6h          4/109        0/117
44.S7d-6c          0/109        21/138
45.P8g-8f          6/115        0/138
46.P7c-7d          0/115        1/139
47.S8h-8g          14/129       0/139
48.P4c-4d          0/129        2/141
49.P3g-3f          11/140       0/141
50.S6c-5d          0/140        29/170
51.P6g-6f          6/146        0/170
52.G5b-4c          0/146        4/174
53.K7i-8h          22/168       0/174
54.K3a-2b          0/168        9/183

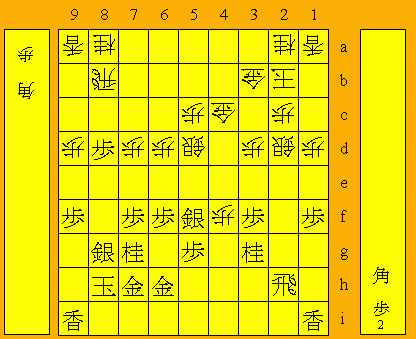
Actually, the game is only beginning now. Both players have taken their time
to build the strongest possible position.

55.G6h-5h          19/187       0/183
56.S3c-2d          0/187        13/196

In the pressroom there was already talk of sennichite, after repeatedly
G5h-6h-5h and S3c-2d-3c. However, Miura actually has a cunning plan...

57.G5h-6g          3/190        0/196
58.S2d-3c          0/190        5/201
59.G6g-6h          0/190        0/201
60.S3c-2d          0/190        4/205
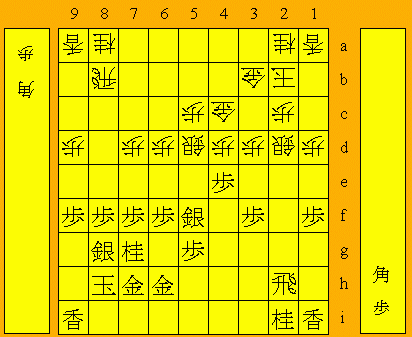
61.P4f-4e!         7/197        0/205

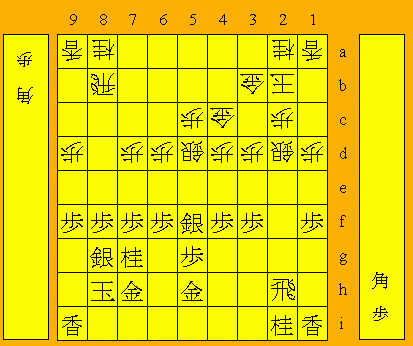
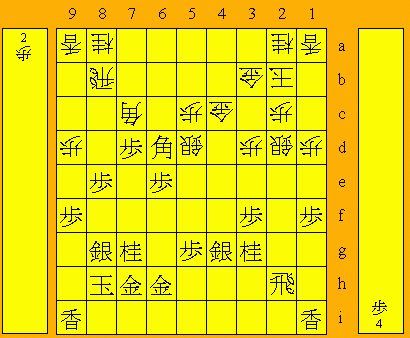
Brilliant opening play by Miura. By playing the triangle gold manouver
G6h-6g-6h he has managed to get the optimal defending position while Yashiki
has weakened his king with S2d. This is the time to start to attack.

62.P4dx4e          0/197        10/215
63.N2i-3g          8/205        0/215
64.P*8e!           0/205        15/230

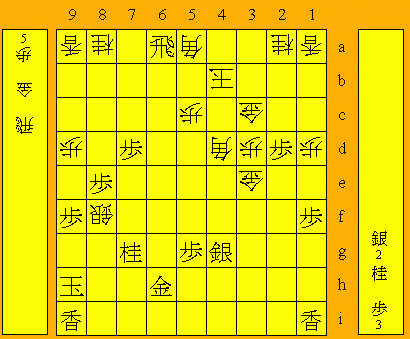
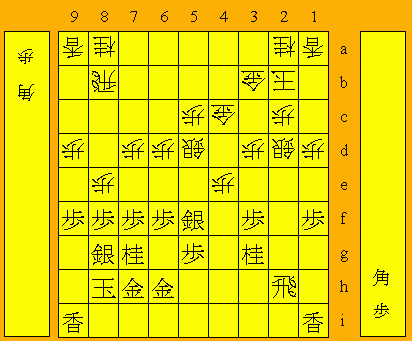
Great counter by Yashiki. Miura would have been very happy if Yashiki would
have played 64.P4f immediately: 64.P4f? P*4d Gx4d B*7a R5b Rx2d Px2d S*4a
and black wins. However, with blacks pawn on 8e, white has the counter P*8f
Sx8f P*8g and the rook sacrifice on 2d would be too dangerous for black.

65.P8fx8e          0/205        0/230
66.P4e-4f          0/205        2/232
67.P8e-8d!         12/217       0/232

This move is actually very difficult to deal with. After 68.Rx8d P*8f the
weakness on the head of the black king is gone and the white rook no longer
works well in defense. After 68.P*8f Sx8f Rx8d P*8g black's castle is also
intact. Finally, in the future black has the sacrifice P8c+ Rx8c B*6a.

68.P4f-4g+         0/217        19/251
69.S5fx4g          3/220        0/251
70.P6d-6e?!        0/220        1/252

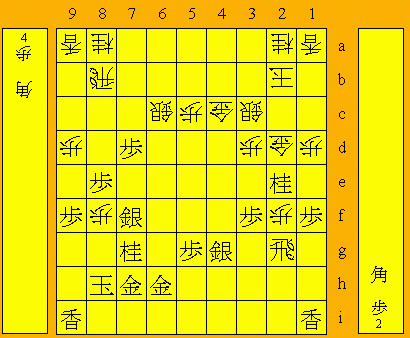
A mistake that opens the diagonal to the rook. From now on, white has to worry
about a bishop fork on rook and king on every move.

71.P6fx6e          17/237       0/252
72.P7d-7e          0/237        1/253
73.P7fx7e          3/240        0/253
74.R8bx8d          0/240        1/254
75.P*8e            0/240        0/254
76.R8d-8b          0/240        3/257
77.B*6d            3/243        0/257
78.B*7c            0/243        4/261
79.P7e-7d?         10/253       0/261

A mistake that tips the scales slightly in Yashiki's favour. After 79.S5f the
position is unclear.

80.B7cx6d          0/253        0/261
81.P6ex6d          0/253        0/261
82.P*8f            0/253        2/263
83.S8g-7f          0/253        0/263
84.S2d-3c          0/253        5/268
85.P6d-6c+         15/268       0/268
86.S5dx6c          0/268        0/268
87.P*2d            5/273        0/268
88.P2cx2d          0/273        0/268
89.P*2c            0/273        0/268
90.G3bx2c          0/273        3/271
91.P*2e            2/275        0/271
92.P2dx2e          0/275        11/282
93.P*2d            0/275        0/282
94.G2cx2d          0/275        2/284
95.N3gx2e          0/275        0/284
96.P*2g            0/275        8/292
97.R2hx2g          0/275        0/292
98.P*2f!           0/275        3/295

The right move. Very tempting is the bishop drop 98.B*4i, but both players
had seen that after 99.Nx3c+ Gx3c Rx2d Gx2d B*5e P*4d S5h white has no
continuation.

99.R2gx2f          0/275        0/295
100.B*4d           0/275        0/295
101.P3f-3e         1/276        0/295
102.P*7e           0/276        1/296
103.S7fx7e         3/279        0/296
104.P*7f           0/279        0/296
105.N2ex3c+        0/279        0/296
106.G4cx3c         0/279        0/296
107.R2fx7f         0/279        0/296
108.N*6d           0/279        0/296
109.S7ex6d         2/281        0/296
110.S6cx6d         0/281        0/296
111.P*2e           3/284        0/296
112.G2dx3e         0/284        1/297
113.P2e-2d         7/291        0/297
114.S*8g           0/291        1/298
115.G7hx8g         0/291        0/298
116.P8fx8g+        0/291        0/298
117.K8hx8g         0/291        0/298
118.G*7e           0/291        0/298
119.R7fx7e?        3/294        0/298

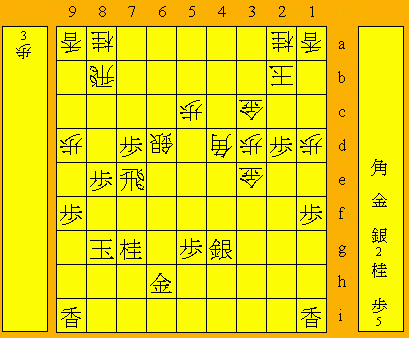
The losing move. Miura had planned to play 119.Rx7e Sx7e B*6e, but realised
too late that he would be mated after Rx8e: K7h (Nx8e R*8h) R*8h K6i Rx6h+
Kx6h R8h+ and after any drop on 7h, the game is finished after Bx7g+. If
Miura would have seen this earlier, he would probably have found the correct
119.S*2c Gx2c Px2c+ Kx2c B*4a S*3b P*2d and white does not get the time to
play the simple hisshi Gx7f Kx7f R*6f K8g Rx6h+.

120.S6dx7e         0/294        0/298
121.K8g-9h         2/296        0/298
122.S7e-8f         0/296        0/298

A very interesting way to lose. White has no immediate mate, but black can only
attack by giving white the material he needs to mate.

123.B*4a           1/297        0/298
124.K2b-3a         0/297        0/298
125.P*4b           1/298        0/298
126.R8bx4b         0/298        0/298
127.G*5a           1/299        0/298
128.R4bx4a         0/299        0/298
129.G5ax4a         0/299        0/298
130.K3ax4a         0/299        0/298
131.R*6a           0/299        0/298
132.B*5a           0/299        0/298
133.P*4b           0/299        0/298
134.K4ax4b         0/299        0/298
Resigns            0/299        0/298
Time:              04:59:00     04:58:00

Black has no mate, and there is no defense against G*8g K8i P*8h K7i R*8i.
