67th Meijin Match Game 7
[Black "Habu Yoshiharu, Meijin"]
[White "Goda Masataka, Challenger"]
[Event "67th Meijin-sen, Game 7"]
[Date "June 23rd and 24th 2009"]
1.P7g-7f     00:00:00  00:00:00

The furigoma for this final game of the Meijin match resulted in three pawns, giving
Habu the black pieces. After white won the first four games of this match, the black
player won game five and six, so maybe momentum is on the black side?

2.P8c-8d     00:00:00  00:08:00
3.S7i-6h     00:03:00  00:08:00
4.P3c-3d     00:03:00  00:08:00
5.P6g-6f     00:05:00  00:08:00
6.S7a-6b     00:05:00  00:09:00
7.P5g-5f     00:07:00  00:09:00
8.P5c-5d     00:07:00  00:11:00
9.S3i-4h     00:11:00  00:11:00
10.G6a-5b    00:11:00  01:32:00

Goda spent 81 minutes on this move, which can be called rather unusual, because
this is a position that has been played uncountable times. However, there is a
reason why Goda thought so long here. He is considering a rather daring opening
strategy.

11.G4i-5h    00:53:00  01:32:00
12.S3a-3b    00:53:00  01:32:00
13.S6h-7g    00:54:00  01:32:00
14.B2b-3a    00:54:00  01:33:00

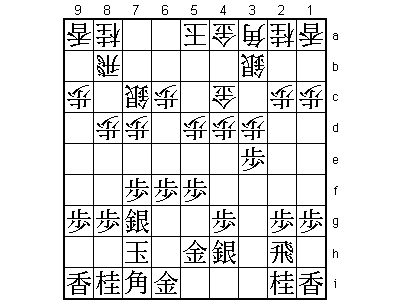
This is what Goda spent so much time on. Even though the game has started out
as a Yagura opening, Goda decides to play the Left Mino castle instead. This is
not a new idea, and has two important merits. First, white can attack first by
playing P7d-P7e followed by Px7e Bx7e. The second point of the white position
is that because the gold is not on 3b, it is often easier for white to move the
king to 2b.

15.P3g-3f    00:56:00  01:33:00
16.P4c-4d    00:56:00  01:33:00
17.B8h-7i    02:03:00  01:33:00
18.G5b-4c    02:03:00  01:33:00
19.K5i-6h    02:05:00  01:33:00
20.P7c-7d    02:05:00  01:41:00
21.K6h-7h    02:06:00  01:41:00
22.S6b-7c    02:06:00  01:42:00
23.P3f-3e!   02:17:00  01:42:00

Habu trumps Goda's opening play by pushing the pawn on the 3rd file first. If
black plays the natural 23.G6g here, white can exchange pawns first with 24.P7e
Px7e Bx7e and now P3e is answered by B6d. This is not necessarily devastating,
but Habu didn't like to play R1b in that position. If R1b is not good, then black
has no choice but to delay P3e, which may never be played at all, giving only
white the advantage of exchanging pawns. This lead Habu to the conclusion that
he had to forego 23.G6g here and immediately play 23.P3e instead.

24.P3dx3e    02:17:00  02:06:00
25.B7ix3e    02:17:00  02:06:00
26.P7d-7e    02:17:00  02:09:00
27.P7fx7e    02:35:00  02:09:00
28.B3ax7e    02:35:00  02:09:00
29.G5h-6g    02:35:00  02:09:00
30.K5a-4b?   02:35:00  02:17:00

This innocently looking king move gives black the advantage. Correct was 30.B6d
and after 31.S3g P*3f S4f S7d P5e or 31.B4f K4b S3g K3a (and it seems likely that
the position will return to a normal Yagura) or 31.R1h S7d S7f and in each case
white has enough chances.

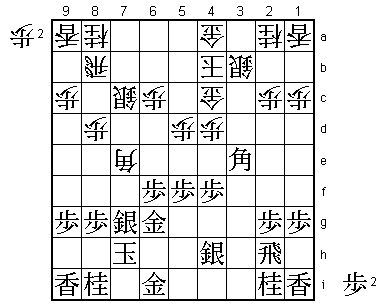
31.P4g-4f!   03:06:00  02:17:00

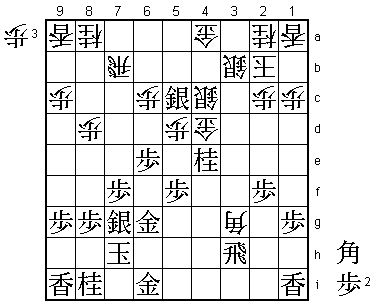
Goda had overlooked this move. The reason is that this looks risky because the
bishop has not many places to go with the silver on 4h. In a normal Yagura the
bishop would soon die because with the silver on 3c and the gold on 4c the generals
can move up the board immediately to 3d and 2e to catch the bishop. However, because
white has only a mino castle, there is no immediate danger to the bishop on 3e. The
black threat is to attack with P4e next or to bring the silver out first with S4g
followed by S3f. There is not much white can do about this, so black has the upper
hand here.

32.R8b-7b    03:06:00  04:06:00
33.P*7f      04:05:00  04:06:00

The sealed move.

34.B7e-5c    04:05:00  05:00:00
35.S4h-4g    04:19:00  05:00:00
36.S7c-6d    04:19:00  05:02:00
37.S4g-3f    04:43:00  05:02:00
38.K4b-3a    04:43:00  05:34:00
39.R2h-4h    04:55:00  05:34:00

40.K3a-2b?   04:55:00  05:54:00

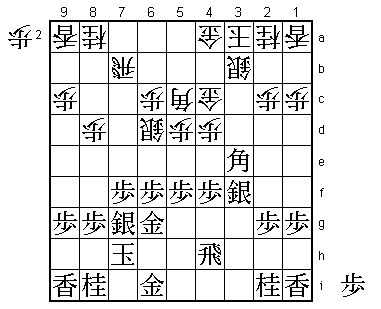
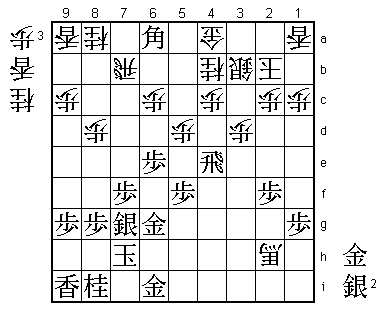
Just when it looked like white was getting back into this game, Goda spoils it with
another careless king move. He should have played 40.N7c or first 40.P*3d B2f and
only then K2b here. The reason we will see a little later.

41.P4f-4e    05:08:00  05:54:00
42.P4dx4e    05:08:00  05:57:00
43.P6f-6e!   05:08:00  05:57:00

Strong move. White should have prevented this by playing 40.N7c or soften the blow
by playing 40.P*3d B2f first.

44.B5cx3e    05:08:00  06:39:00

The only reply. 44.Sx6e is not possible because of the bishop fork after 45.Bx5c+
Gx5c B*8c. Of course, 44.S7c is out of the question as it kills all attacking potential
of the white position.

45.S3fx3e    05:08:00  06:39:00

This silver now joins the attack with tempo. If white would have played 40.P*3d, the
black bishop would have been on 2f, and Bx2f instead of Bx3e would have been a big
difference.

46.S6d-5c    05:08:00  06:42:00
47.N2i-3g    05:17:00  06:42:00
48.S5c-4d    05:17:00  07:39:00
49.S3ex4d    05:54:00  07:39:00
50.G4cx4d    05:54:00  07:39:00
51.S*5c      05:55:00  07:39:00
52.S*4c      05:55:00  08:09:00
53.N3gx4e    06:38:00  08:09:00

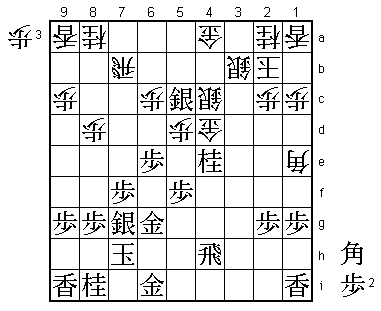
The knight now also joins the attack and black has a big advantage. Still, the game
is not decided yet.

54.B*1e?!    06:38:00  08:20:00

Strange move. Senzaki (8-dan) could only explain it by labeling it an attempt to
invite a Habu mistake. For example, 55.R4i P*4h R3i Gx4e and the bishop can also
move back to 3c. Still, he thought that 54.B*1e was pointless and that white should
have played 54.P*4g Rx4g B*3f R3g as analyzed in the press room. Then Gx4e P*4d Sx4d
Sx4d+ Bx6i+ Kx6i Gx4d seems to be good for white. On the day after the game, Habu
said he had looked at Bx6i+ instead of Gx4e, which is good for black after Kx6i Gx4e
P*3c Sx3c B*6a P*3f R3i R4b K7h.

55.B*2f      06:49:00  08:20:00

Habu just calmly forces the exchange of bishops, moving the pawn on the second file
up to the white king in the process.

56.B1ex2f    06:49:00  08:23:00
57.P2gx2f    06:49:00  08:23:00
58.B*3g      06:49:00  08:23:00
59.R4h-3h    07:04:00  08:23:00

60.B3gx1i+?  07:04:00  08:34:00

A big mistake that ends all hope for the white position. 60.Bx2f+ was the only way to
try and make a fight of it.

61.S5cx4d+   07:37:00  08:34:00
62.S4cx4d    07:37:00  08:34:00
63.P*3c      07:37:00  08:34:00
64.N2ax3c    07:37:00  08:34:00
65.N4ex3c+   07:37:00  08:34:00
66.S4dx3c    07:37:00  08:34:00
67.P*3d      07:38:00  08:34:00
68.S3cx3d    07:38:00  08:36:00
69.R3hx3d    07:41:00  08:36:00
70.S*4c      07:41:00  08:36:00
71.R3d-3i    07:43:00  08:36:00
72.+B1i-2h   07:43:00  08:36:00
73.N*3d      07:43:00  08:36:00
74.S4cx3d    07:43:00  08:39:00
75.R3ix3d    07:43:00  08:39:00
76.N*4b      07:43:00  08:40:00
77.R3d-3e    07:49:00  08:40:00
78.P*3d      07:49:00  08:40:00
79.R3e-4e    07:49:00  08:40:00
80.P*4c      07:49:00  08:46:00
81.B*6a      07:54:00  08:46:00
Resigns      07:54:00  08:49:00

Here Goda resigned. The position is clearly bad after 82.R6b Bx4c+ Sx4c Rx4c+ but even
Habu was surprised by this early resignation. It seems that the psychological damage of
a failed opening in this decisive game was too much for Goda. He is known for his resilience,
but this didn't show in this game at all. Habu comes back from 3-2 behind to defend his
Meijin title. It is his 73rd title match victory, but only six of those have been Meijin
titles.

