67th Meijin Match Game 6
[Black "Habu Yoshiharu, Meijin"]
[White "Goda Masataka, Challenger"]
[Event "67th Meijin-sen, Game 6"]
[Date "June 15th and 16th 2009"]
1.P7g-7f     00:00:00  00:00:00
2.P8c-8d     00:00:00  00:00:00
3.S7i-6h     00:08:00  00:00:00
4.P3c-3d     00:08:00  00:03:00
5.P6g-6f     00:10:00  00:03:00
6.S7a-6b     00:10:00  00:18:00
7.P5g-5f     00:14:00  00:18:00
8.P6c-6d     00:14:00  00:22:00
9.G6i-7h     00:24:00  00:22:00
10.S6b-6c    00:24:00  00:22:00
11.S3i-4h    00:25:00  00:22:00
12.S3a-4b    00:25:00  00:22:00
13.P2g-2f    00:56:00  00:22:00
14.P4c-4d    00:56:00  00:22:00
15.P2f-2e    01:13:00  00:22:00
16.B2b-3c    01:13:00  00:22:00
17.S6h-7g    01:13:00  00:22:00
18.S4b-4c    01:13:00  00:24:00
19.B8h-7i    01:14:00  00:24:00
20.R8b-2b    01:14:00  00:24:00

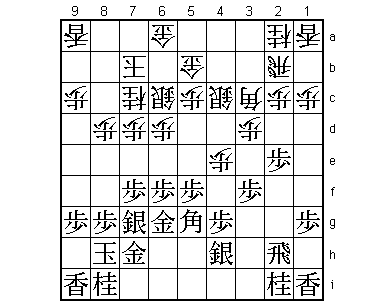
The Yodo-Furibisha opening is a rare occurrence at this level. It may be that
Goda felt the pressure of needing only one more win to become Meijin, but after
the game he commented that he wanted to try something different. Goda has the name
of always playing Ibisha, but he actually likes the Yodo-Furibisha opening, which
aims at playing Furibisha when it is hard for the Ibisha side to play the Anaguma.
Goda also played the third file version of this opening in his Oi league game against
Senzaki on April 15th this year. There Senzaki managed to slip into the Anaguma anyway
because Goda failed to bring the knight into play to 7c and black won the game.
Having learned from this experience, Goda plays the Mukaibisha here and makes sure
that the knight on 7c is ready to attack when black makes an attempt to change the
Yagura castle into an Anaguma.

21.K5i-6i    01:15:00  00:24:00
22.K5a-6b    01:15:00  01:05:00
23.G4i-5h    01:24:00  01:05:00
24.P7c-7d    01:24:00  01:08:00
25.G5h-6g    01:30:00  01:08:00
26.P4d-4e    01:30:00  02:03:00
27.P3g-3f    02:11:00  02:03:00
28.K6b-7b    02:11:00  02:09:00
29.B7i-5g    02:20:00  02:09:00
30.N8a-7c    02:20:00  02:24:00
31.K6i-7i    02:26:00  02:24:00
32.G4a-5b    02:26:00  02:43:00
33.K7i-8h!   02:57:00  02:43:00

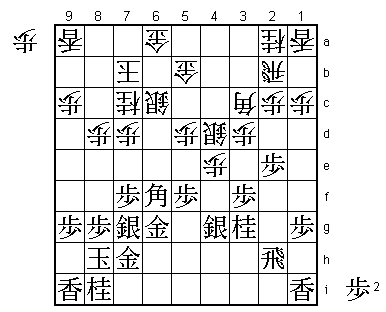
This was an unpleasant surprise for Goda. Moving the king in its natural spot on
8h seems very dangerous because it is now in the diagonal of the bishop on 3c.
Goda therefore thought that Habu had to play the formation S8h-N7g-K8i, which
makes it much easier to get to the black king in the endgame. That is exactly
the reason why Habu preferred 33.K8h, but he needed to make sure that the attack
S4c-5d followed by P6e is not possible. Habu saw that after 34.S4c-5d L9h N9e S6h
P6e black can play K7i! next after which the white attack fails to force a
breakthrough. Goda realized that here as well, but just a little too late.

34.P5c-5d    02:57:00  04:26:00
35.N2i-3g    03:51:00  04:26:00

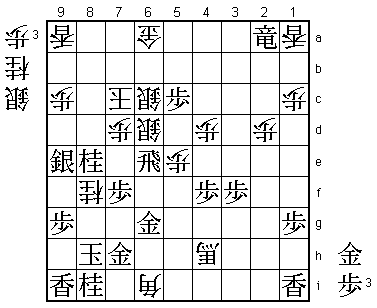
The sealed move. This now forces white to close the diagonal of the bishop leading
to the black king.

36.S4c-4d    03:51:00  04:29:00
37.P4g-4f    04:23:00  04:29:00
38.P4ex4f    04:23:00  04:31:00
39.B5gx4f    04:23:00  04:31:00
40.P*4e      04:23:00  04:32:00

Another position where Goda has to change his plans. He intended the natural 40.R4b,
but realized that after 41.P*4e Sx4e Nx4e Rx4e S5g white has no good moves. Goda may
have regretted his choice of the Yodo-Furibisha opening here, because he has to deal
with oversights on multiple occasions, mainly because of his lack of familiarity with
this type of position.

41.B4f-5g    04:34:00  04:32:00
42.P6d-6e    04:34:00  04:35:00
43.S4h-4g    05:07:00  04:35:00
44.P6ex6f    05:07:00  04:40:00
45.B5gx6f    05:14:00  04:40:00

46.P*6e?     05:14:00  04:40:00

Goda realizes that his opening has been a failure and tries to force the issue here.
However, losing the pawn on 8d which weakens the head of the white king is only good
for black. He should have been patient here with 46.K8c. For example, 47.P4f Px4f
Sx4f P*6e and both players agreed that there would be a long and complicated fight
ahead. At the end of the post-mortem analysis the players concluded that 46.P*6e
may have been the losing move.

47.B6fx8d    05:24:00  04:40:00
48.P3d-3e    05:24:00  04:45:00
49.P3fx3e    05:35:00  04:45:00
50.B3c-4b    05:35:00  04:49:00
51.S4g-3f!   05:46:00  04:49:00

This strong move cements the black advantage.

52.R2b-3b    05:46:00  06:33:00
53.P2e-2d?   06:28:00  06:33:00

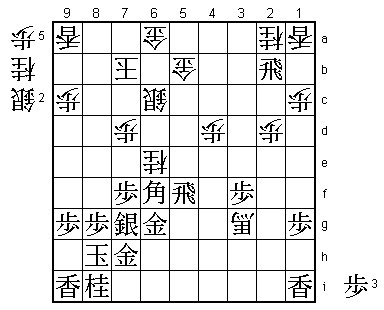
But this is a mistake that makes things very close again. Correct was 53.R3h and
54.Sx3e is then answered by 55.P*3c Rx3c Nx4e and after 54.B6d P*6f Px6f Sx6f P*6e
Sx6e Nx6e P*6f black has a strong counter attack on the 6th file which was supposed
to be the attacking base for white.

54.P2cx2d    06:28:00  06:34:00
55.B8d-5g    06:29:00  06:34:00
56.R3b-2b    06:29:00  06:45:00
57.P*4f      06:36:00  06:45:00
58.B4b-6d    06:36:00  06:47:00
59.P*6f      06:37:00  06:47:00
60.P4ex4f    06:37:00  07:01:00
61.R2h-4h    06:44:00  07:01:00
62.R2b-3b    06:44:00  07:03:00
63.P6fx6e    07:03:00  07:03:00
64.N7cx6e    07:03:00  07:03:00
65.B5g-6f    07:03:00  07:03:00
66.P5d-5e    07:03:00  07:20:00
67.R4hx4f    07:07:00  07:20:00
68.P*4c      07:07:00  07:20:00
69.P*4e      07:09:00  07:20:00
70.S4dx3e    07:09:00  07:29:00
71.S3fx3e    07:11:00  07:29:00
72.R3bx3e    07:11:00  07:29:00
73.P*3f      07:13:00  07:29:00
74.R3e-3d    07:13:00  07:29:00
75.P4e-4d    07:21:00  07:29:00
76.R3dx4d    07:21:00  07:31:00
77.S*4e      07:28:00  07:31:00
78.P5ex5f    07:28:00  07:37:00
79.R4fx5f    07:29:00  07:37:00
80.B6dx3g+   07:29:00  07:37:00
81.S4ex4d    07:30:00  07:37:00
82.P4cx4d    07:30:00  07:37:00
83.R*2b      07:31:00  07:37:00

84.P*8f?!    07:31:00  08:25:00

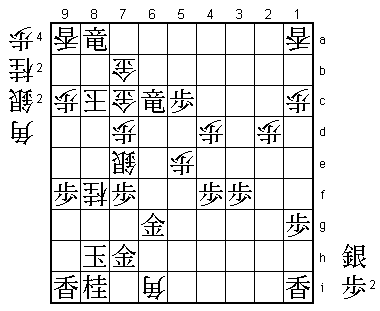
Black has a slim lead with the three major pieces, but the attack is not decisive
yet. Here Goda should have dug in his heels with 84.S*6d or 84.P*8f Sx8f S*6d. After
84.S*6d R5fx5b+ Sx5b P*5c S6dx5c P*5d S6d G*5c P*5a P*6b black finally can go for
the white king, but winning from here is far from straightforward.

85.S7gx8f    08:06:00  08:25:00
86.N*9d?     08:06:00  08:25:00

This was Goda's final chance to play S*6d.

87.P*4f?     08:19:00  08:25:00

Habu uncharacteristically misses the best way to attack. Correct was 87.Rx2a+.

88.S*6d      08:19:00  08:36:00
89.P*5c?     08:22:00  08:36:00

Again not the best move. Here 89.R5fx5b+ Sx5b P*5c S6dx5c B5e would have won quickly.

90.G5b-6b    08:22:00  08:37:00
91.B6f-8d    08:23:00  08:37:00
92.P*5e      08:23:00  08:44:00
93.R5f-6f    08:40:00  08:44:00
94.S*7c      08:40:00  08:44:00
95.S8f-9e    08:40:00  08:44:00
96.P*8f      08:40:00  08:45:00
97.B8dx7c+   08:41:00  08:45:00
98.K7bx7c    08:41:00  08:45:00
99.P8gx8f    08:41:00  08:45:00
100.+B3g-4h  08:41:00  08:46:00
101.R2bx2a+  08:42:00  08:46:00
102.B*6i     08:42:00  08:52:00
103.N*8e     08:45:00  08:52:00
104.K7c-7b   08:45:00  08:52:00
105.R6fx6e   08:45:00  08:52:00

106.N9dx8f   08:45:00  08:54:00

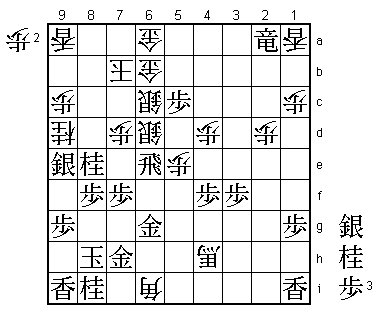
White cannot take the rook because 106.Sx6e is answered by 107.N*8d K7a P5b+! and
Sx5b S*7b G6bx7b Nx7b+ Kx7b G*7c leads to mate. The game seems over, but it is not
quite finished yet.

107.S*7c     08:53:00  08:54:00
108.G6bx7c   08:53:00  08:58:00
109.N8ex7c+  08:53:00  08:58:00
110.K7bx7c   08:53:00  08:58:00
111.N*8e     08:54:00  08:58:00

112.K7c-8c?  08:54:00  08:58:00

Goda seems to have given up on this game for quite some time and lets himself be
mated here. In fact, only with 112.K8c he throws away his last chance to win this
game. If he would have played 112.K8b, things would still have been complicated.
Black plays 113.P*8c next but after 114.K7a (not 114.Kx8c P*8d and black wins) Sx8f
P*8g Gx8g S*7h there is no mate against the white king. Also, Kx8g instead of Gx8g
is answered by Sx6e which is a mating threat. It seems that Goda thought that
112.K8b would also lose after 113.Sx8f Sx6e G*7c K9b P*6f but then P*8g Kx8g Sx7f
Kx7f (Gx7f Bx7h+ leads to mate) S*7e Sx7e Px7e K8f +B5i and it is not clear who is
winning here.

113.P*8d     08:56:00  08:58:00
114.+B4hx8d  08:56:00  08:58:00
115.S9ex8d   08:57:00  08:58:00
116.K8cx8d   08:57:00  08:58:00
117.B*7c     08:57:00  08:58:00
118.S6dx7c   08:57:00  08:58:00
119.G*9e     08:57:00  08:58:00
120.K8dx9e   08:57:00  08:58:00
121.N8ex7c+  08:57:00  08:58:00
122.S*7e     08:57:00  08:59:00
123.P9g-9f   08:58:00  08:59:00
124.K9e-8d   08:58:00  08:59:00
125.+N7c-8c  08:58:00  08:59:00
126.K8dx8c   08:58:00  08:59:00
127.R6ex6c+  08:58:00  08:59:00
128.G*7c     08:58:00  08:59:00
129.S*7b     08:58:00  08:59:00
130.G6ax7b   08:58:00  08:59:00
131.+R2a-8a  08:58:00  08:59:00
Resigns      08:58:00  08:59:00

A flurry of checks finally leading to mate after 132.S*8b +R8ax7b or 132.G8b S*7b so
Goda resigned here. It is probably correct to say that Goda lost this game because of
a failed opening experiment. The mistake at the end was invited by having to fight
with his back against the wall for such a long time. Habu saves the first match point,
but Goda will have another chance to become Meijin in the decisive seventh game.
