67th Meijin Match Game 5
[Black "Goda Masataka, Challenger"]
[White "Habu Yoshiharu, Meijin"]
[Event "67th Meijin-sen, Game 5"]
[Date "June 2nd and 3rd 2009"]
1.P2g-2f     00:03:00  00:00:00
2.P3c-3d     00:03:00  00:01:00
3.P7g-7f     00:03:00  00:01:00
4.P8c-8d     00:03:00  00:02:00
5.P2f-2e     00:03:00  00:02:00
6.P8d-8e     00:03:00  00:04:00
7.G6i-7h     00:04:00  00:04:00
8.G4a-3b     00:04:00  00:06:00
9.P2e-2d     00:05:00  00:06:00
10.P2cx2d    00:05:00  00:08:00
11.R2hx2d    00:05:00  00:08:00
12.P8e-8f    00:05:00  00:11:00
13.P8gx8f    00:05:00  00:11:00
14.R8bx8f    00:05:00  00:11:00
15.R2dx3d    00:23:00  00:11:00
16.B2b-3c    00:23:00  00:13:00
17.R3d-3f    01:59:00  00:13:00
18.S3a-2b    01:59:00  00:15:00
19.K5i-5h    02:01:00  00:15:00

The aim of this move is to bring the game into unknown territory as quickly as
possible. There are so many different moves that seem playable for both black
and white from here that is hard to determine the best way to play for either
side. It is a very popular way of playing, but it seems unlikely that a
conclusion will be reached about who is better anytime soon.

20.R8f-8d    02:01:00  00:42:00

The more often played alternative is 20.K4a. There are more than 100 games
played with this position, but most games continue with 21.P*8g R8e after which
one of the basic positions of the R8e-Yokofudori is reached. Still, it is not
a surprise that Habu picks 20.R8d instead because white won six of the seven
games where 20.R8d was played.

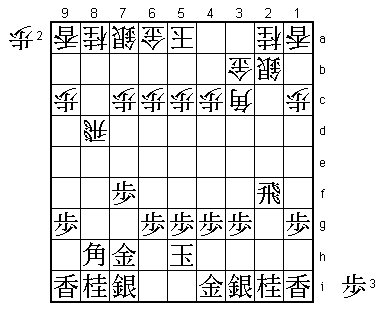
21.R3f-2f!?  02:38:00  00:42:00

This looks like a very risky move because of the fork after Bx8h+ Sx8h B*4d.
It is not a new move, but it was only played once before by Kitahama against
Fukaura in September 2003. That game continued 22.K4a P*8g S6b and the pace of
the game slowed down considerably. The fact that 21.R2f wasn't played for almost
six years after that shows that most professionals felt it was suspect. Goda has
prepared this well, though.

22.B3cx8h+   02:38:00  01:20:00

A "show-me-what-you-have" move and typical for Habu. There are a lot of professionals
who shy away from sharp variations because they fear the opening preparation by
their opponent, but Habu is not one of them. Unless he sees a problem, he will
usually pick the sharpest reply. Sometimes this works against him and this game
turns out to be one of those games.

23.S7ix8h    02:38:00  01:20:00
24.B*4d      02:38:00  01:20:00
25.R2f-2d    02:42:00  01:20:00
26.N2a-3c    02:42:00  01:21:00

The alternative is 26.S2c but is strongly countered by 27.Rx4d. Then 28.Px4d is
followed by 29.B*7e R5d P*2d Sx2d B*6e which is good for black and 28.Rx4d B*6f
and R2d is not possible because of B*1e.

27.B*5e!     02:54:00  01:21:00

Strong counter and the reason why 21.R2f is playable. 28.Bx5e fails of course
to 29.Rx8d.

28.S2b-2c    02:54:00  01:52:00
29.B5ex4d    02:55:00  01:52:00
30.S2cx2d    02:55:00  01:54:00
31.B4dx5c+   03:05:00  01:54:00
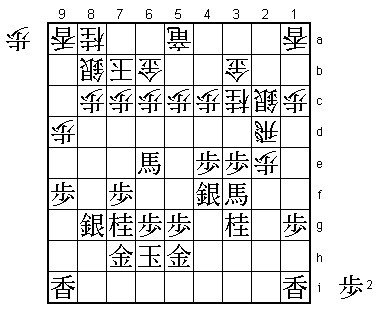
32.R*2g      03:05:00  01:56:00
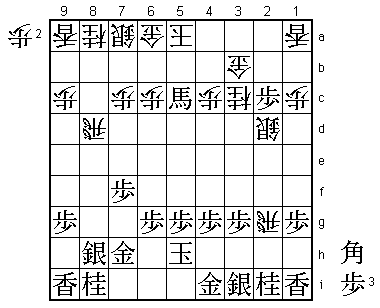
33.P*2c!     04:30:00  01:56:00

This pawn drop is very strong and was probably overlooked by Habu. The threat is
P2b+ because white cannot take this pawn because after Gx2b B*4b K4a B3a+ K5a +B4b
the white king is mated.

34.P*5b      04:30:00  04:38:00

Habu took 2 hours and 42 minutes for this move. It is very rare for Habu to think
for so long about one move. Not only that, it was the sealed move. After the announcement
that it is time to seal the move, Habu usually only takes a few minutes to put the move
in the envelope. Not this time. While the two arbiters were waiting, Habu took almost
an hour before finally deciding his move. It was clear that he was desperately trying
to find a way to get out of trouble. After the game he said that he was unable to find
any reasonable move for white here. 34.P*5b is clearly not a move that white wants to
play. Black has captured the pawn on the fifth file, so white wants to use this open
file to drop a pawn to start a counter attack, for example with P*5f. The problem is
that the promoted bishop on 5c is just too strong to keep there. Habu wanted to play
34.Rx2i+ here, but after 25.P2b+ G4b +Bx4b Kx4b B*7e R6d G*5d he concluded that there
was no defense. For example, after B*2g Bx6d Px6d R*3b K5a G5c there is no good defense
against the mating threat R4b+. It is interesting that Goda never intended to take the
gold on 4b after 24.Rx2i+ P2b+ G4b, but would have pulled the bishop back with +B7e.
Habu admitted that in that case he also had no confidence in the white position.

35.+B5c-7e   05:22:00  04:38:00
36.R8d-4d    05:22:00  05:02:00
37.P*8b      05:29:00  05:02:00
38.S7ax8b    05:29:00  05:03:00
39.B*1h      05:31:00  05:03:00
40.R2g-2e+   05:31:00  05:04:00
41.B1hx6c+   05:31:00  05:04:00
42.G6a-7a    05:31:00  05:05:00
43.+B7e-6f   06:03:00  05:05:00
44.R4d-9d    06:03:00  05:10:00
45.P2c-2b+   06:15:00  05:10:00
46.G3bx2b    06:15:00  05:14:00
47.P*2f      06:15:00  05:14:00
48.+R2ex2f   06:15:00  05:18:00
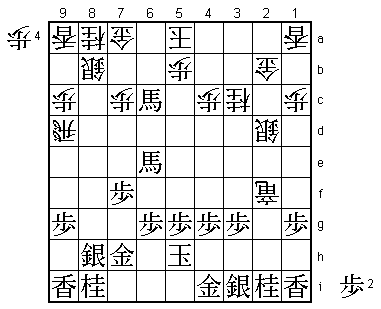
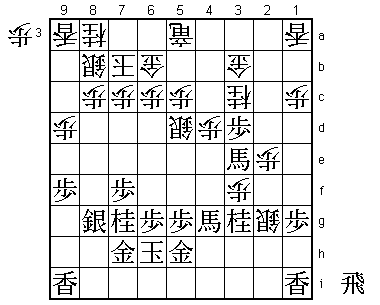
49.+B6f-6e!  06:15:00  05:18:00

Strong move. This threatens both P*8c and +Bx4c which is a mating threat that is very
hard to defend against. The two bishops are much stronger than the two rooks in this
position.

50.P*6b      06:15:00  06:12:00
51.+B6c-3f?! 06:24:00  06:12:00

After the game Goda admitted that he regretted this move, because it gave Habu a
chance to get back in the game. If black plays 51.+B8e here, it would have been
over quickly after 52.R4d P*8c Sx8c +Bx8c P*2h P*8b Px2i+ S4h.

52.+R2f-1e   06:24:00  06:12:00
53.N8i-7g    07:05:00  06:12:00
54.S2d-3e    07:05:00  06:27:00
55.+B3f-1h   07:44:00  06:27:00
56.P*8c      07:44:00  06:33:00
57.+B6ex4c   07:45:00  06:33:00
58.+R1e-2d   07:45:00  06:58:00
59.P3g-3f    07:48:00  06:58:00
60.S3e-4d    07:48:00  07:22:00
61.+B1h-2h   07:52:00  07:22:00
62.S4d-4e    07:52:00  07:32:00
63.P*2e      07:52:00  07:32:00
64.+R2d-2c   07:52:00  07:35:00
65.+B2h-5e   07:52:00  07:35:00
66.S4e-3d    07:52:00  07:41:00
67.+B4c-4d   07:52:00  07:41:00
68.P*4c      07:52:00  07:46:00
69.+B4d-2f   07:53:00  07:46:00
70.S3dx2e    07:53:00  07:48:00
71.+B2f-3e   07:53:00  07:48:00
72.S2e-3d    07:53:00  07:51:00
73.P*2d      08:02:00  07:51:00

74.+R2c-3b?  08:02:00  07:53:00

After this there is nothing but pain for Habu the rest of the way. He could have
turned this into a fight with 74.+R1d, because after 75.+B3e-4f P4d P5f +R2e S3h
P4e +B5g P2f +B3g P3e the promoted rook is supporting a counter attack. After
74.+R3b this rook gets stuck in the white position. This makes sure that the
white position doesn't collapse easily, but Goda can be trusted to perform a
slow but certain strangulation.

75.+B3e-4f   08:02:00  07:53:00
76.S3d-4e    08:02:00  07:53:00
77.+B4f-3e   08:03:00  07:53:00
78.S4e-3d    08:03:00  07:53:00
79.+B3e-2f   08:05:00  07:53:00
80.S3d-2e    08:05:00  07:54:00
81.+B2f-3g   08:07:00  07:54:00
82.P*2f      08:07:00  08:05:00
83.S3i-3h    08:07:00  08:05:00
84.R9dx2d    08:07:00  08:13:00
85.+B3g-4f   08:07:00  08:13:00
86.R2d-8d    08:07:00  08:13:00
87.N2i-3g    08:12:00  08:13:00
88.S2e-3d    08:12:00  08:15:00
89.P3f-3e    08:12:00  08:15:00
90.S3d-2c    08:12:00  08:15:00
91.+B4f-3f   08:12:00  08:15:00
92.K5a-6a    08:12:00  08:26:00
93.+B3fx2f   08:12:00  08:26:00
94.P6b-6c    08:12:00  08:26:00
95.+B2f-3f   08:12:00  08:26:00
96.G7a-6b    08:12:00  08:26:00
97.S8h-8g    08:13:00  08:26:00
98.P5b-5c    08:13:00  08:27:00
99.P9g-9f    08:14:00  08:27:00
100.K6a-7b   08:14:00  08:27:00
101.K5h-6h   08:14:00  08:27:00
102.+R3b-5b  08:14:00  08:29:00
103.+B5e-6f  08:14:00  08:29:00
104.R8d-6d   08:14:00  08:30:00
105.P4g-4f   08:14:00  08:30:00
106.P9c-9d   08:14:00  08:31:00
107.+B6f-7e  08:17:00  08:31:00
108.R6d-4d   08:17:00  08:32:00
109.S3h-4g   08:17:00  08:32:00
110.+R5b-5a  08:17:00  08:32:00
111.P4f-4e   08:18:00  08:32:00
112.R4d-5d   08:18:00  08:33:00
113.S4g-4f   08:18:00  08:33:00
114.G2b-3b   08:18:00  08:33:00
115.+B7e-6e  08:18:00  08:33:00
116.P*2e     08:18:00  08:36:00
117.G4i-5h   08:20:00  08:36:00
118.R5d-2d   08:20:00  08:36:00

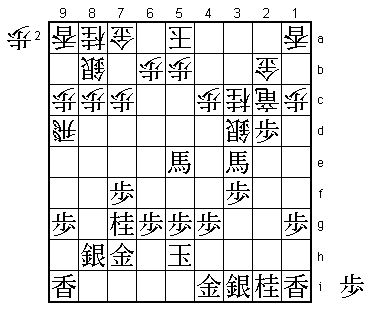
119.P3e-3d!  08:21:00  08:36:00

Finally, Goda has prepared his position to go for the kill.

120.R2dx3d   08:21:00  08:36:00
121.S4f-3e   08:21:00  08:36:00
122.R3d-8d   08:21:00  08:36:00
123.P*3d     08:25:00  08:36:00
124.S2cx3d   08:25:00  08:36:00
125.S3ex3d   08:25:00  08:36:00
126.R8dx3d   08:25:00  08:36:00
127.S*3e     08:25:00  08:36:00
128.S*2g     08:25:00  08:41:00

A last desperate try.

129.+B3f-4f  08:25:00  08:41:00

Simple reply to keep the pressure on white.

130.R3dx3e   08:25:00  08:41:00
131.+B4fx3e  08:25:00  08:41:00
132.P*3f     08:25:00  08:41:00
133.P4e-4d   08:30:00  08:41:00
134.S*5d     08:30:00  08:41:00
135.+B6e-4g  08:31:00  08:41:00
136.P4cx4d   08:31:00  08:42:00
137.P*3d     08:32:00  08:42:00
Resigns      08:32:00  08:43:00

Mate is not near yet, but here Habu lost the will to fight. The only move here
is 138.N4e, but after 139.Nx4e the knight that white so desperately wanted to
trap escapes. Habu had put all his hopes on the counter attack on this knight,
so this leaves him with nothing left to play for. Goda makes his risky choice
of opening work to win the most lopsided game of the match so far. He takes a
3-2 lead and needs only one more win to take the Meijin title from Habu.
