67th Meijin Match Game 4
[Black "Habu Yoshiharu, Meijin"]
[White "Goda Masataka, Challenger"]
[Event "67th Meijin-sen, Game 4"]
[Date "May 20th and 21st 2009"]
1.P2g-2f     00:01:00  00:00:00

After three games with 1.P7f, Goda opens with the rook pawn this time.

2.P8c-8d     00:01:00  00:00:00
3.P2f-2e     00:04:00  00:00:00
4.P8d-8e     00:04:00  00:00:00
5.G6i-7h     00:07:00  00:00:00
6.G4a-3b     00:07:00  00:00:00
7.P2e-2d     00:09:00  00:00:00
8.P2cx2d     00:09:00  00:00:00
9.R2hx2d     00:09:00  00:00:00
10.P*2c      00:09:00  00:00:00
11.R2d-2h    00:09:00  00:00:00
12.P9c-9d    00:09:00  00:31:00
13.P9g-9f    00:25:00  00:31:00
14.S7a-7b    00:25:00  00:33:00
15.S3i-3h    00:30:00  00:33:00

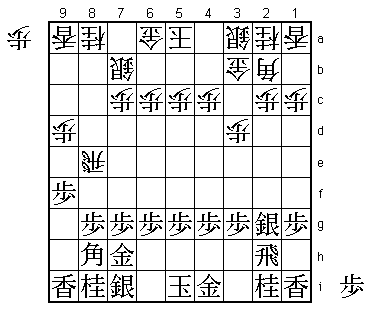
Pulling back the rook to 2h followed by the climbing silver attack is considered
one of the strategies where it is easiest to get an advantage with black. After
three wins by the player with the white pieces, Habu is determined to win with the
black pieces.

16.P3c-3d    00:30:00  00:36:00
17.S3h-2g    00:39:00  00:36:00
18.P8e-8f    00:39:00  00:55:00
19.P8gx8f    00:40:00  00:55:00
20.R8bx8f    00:40:00  00:55:00
21.P*8g      00:40:00  00:55:00
22.R8f-8e    00:40:00  00:58:00

This is quite a rare strategy. Nakata Hiroko (8-dan) is one of the few professionals
who has been playing this strategy. The idea is to make it more difficult for the
black silver to move up the board. The plan S3f-S4e is not possible with the rook
on 8e and in some cases white can push the pawn to 3e in answer to S3f, and the
silver must be pulled back to 2g. Finally, under some circumstances, the rook may
also switch to 5e to attack the black king. One of the games that shows how the white
position can benefit best from 22.R8e is the game between Yamasaki and Nakata that
was played on August 25th 2008 in the Asahi Cup. There black played 23.K6i and after
24.K5b P7f P7d G5h P7e Px7e Rx7e Bx2b+ Sx2b S8h N3c P4f P9e Px9e P*9f S3f R9e and
Nakata won. After the game Goda said that he had experience with this position. He
played it himself against Inaba in the Kisei tournament on December 17th 2008 and got
it played against him by Maruyama in the Oi tournament on February 10th 2009. Even
though black won both games, it seems like these games told him that this strategy
was interesting enough to try again.

23.S7i-6h    01:26:00  00:58:00

There are a number of alternatives here. Yamasaki's 23.K6i was already mentioned,
but 23.P7f is also a natural alternative as is 23.S2f. There are so many different
ways to play here and so many things that one has to be careful about that both
players took a lot of time for their next moves: 46 minutes, 38 minutes, 42 minutes,
2 hours and 32 minutes, 2 hours and 2 minutes, and 37 minutes.

24.P7c-7d    01:26:00  01:36:00
25.S2g-3f    02:08:00  01:36:00

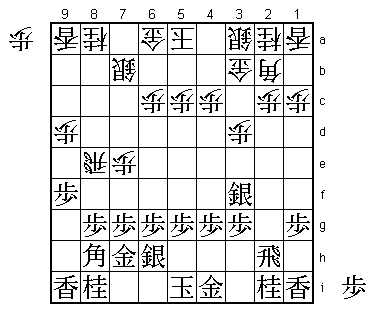
After the game Goda said that he had even looked at 25.B5e here to pull back the
bishop to 7c or 8b.

26.P7d-7e    02:08:00  04:08:00

Double edged move. It makes it harder for black to use the bishop, but also blocks
the sideways working of the rook. However, white has not much else because castling
with 26.K4b is dangerous after 27.S2e. Because of this, Goda felt that this was
quite a hard position to play with white and he admitted that he probably would
not try it again.

27.P5g-5f    04:10:00  04:08:00

The sealed move and played after 2 hours and 2 minutes. Goda had feared 27.S2e here,
and Habu said after the game that this was the move that he wanted to play, but he
couldn't see how this would play out. For example, 28.R8d P*2d Px2d Sx2d B4d and in
the press room S3e Px3e Rx2a+ was analyzed, but Habu didn't like this after P*2c.
Instead of S3e, both players had looked at P4f P*8f Px8f Rx8f P4e B5e P6f to take
the pawn drops P*2g-P*2f out of the position after which black can play S2c+. In
the post-mortem analysis this variation was analyzed for about 20 more moves, but
it seemed good for black and Habu agreed that this might have been better than 27.P5f.
Of course, 27.P5f is also not a bad move, aiming at restricting the movement of the
white rook with S5g followed by S6f.

28.N2a-3c    04:10:00  05:10:00

This looks risky because the head of the knight is a target for attack and also the
bishop is now blocked, but white is preparing for the counter attack with P1d
followed by B1c.

29.P4g-4f    04:47:00  05:10:00
30.S3a-4b    04:47:00  05:16:00
31.P6g-6f    04:58:00  05:16:00
32.S7b-7c    04:58:00  05:42:00
33.S6h-6g    05:03:00  05:42:00
34.S7c-7d    05:03:00  05:49:00
35.P7g-7f    05:24:00  05:49:00
36.P7ex7f    05:24:00  06:18:00
37.S6gx7f    05:25:00  06:18:00
38.R8e-8d    05:25:00  06:18:00
39.P6f-6e    06:24:00  06:18:00
40.P*7e      06:24:00  06:23:00
41.S7f-6g    06:25:00  06:23:00
42.G6a-6b!   06:25:00  06:38:00

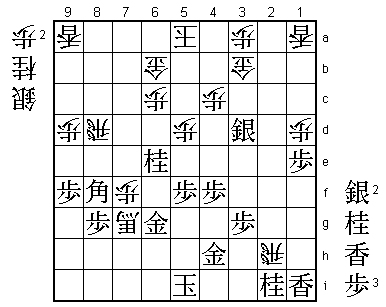
Without any move that looks like it may have been a mistake, the position has been
turning in white's favor. Goda is playing this position very precise. It is very
tempting to play 42.Sx6e here, but after 43.B5e P6d S4g followed by P3f and an attack
on the head of the knight on 3c, white is in trouble. Instead, Goda aims at bringing
the knight on 8a into play, which is very strong.

43.B8h-5e    06:36:00  06:38:00
44.N8a-7c    06:36:00  06:39:00
45.N8i-7g    06:36:00  06:39:00
46.P1c-1d    06:36:00  06:47:00
47.P1g-1f    06:54:00  06:47:00
48.P5c-5d    06:54:00  07:03:00
49.B5e-6f    06:54:00  07:03:00
50.N7cx6e    06:54:00  07:08:00
51.P1f-1e    07:30:00  07:08:00
52.N6ex7g+   07:30:00  07:21:00
53.B6fx7g    07:30:00  07:21:00
54.S7d-6e    07:30:00  07:21:00

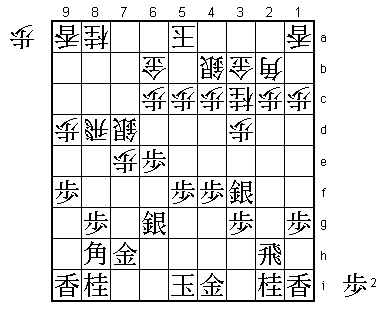
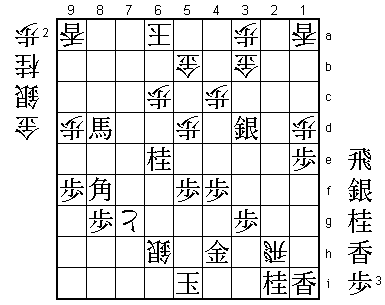
When this position appeared in the post-mortem analysis Habu commented: "This is
really bad, isn't it?". Black is suddenly in major trouble.

55.P*2d      07:37:00  07:21:00
56.P2cx2d    07:37:00  07:25:00
57.R2hx2d    07:37:00  07:25:00
58.P7e-7f    07:37:00  08:24:00
59.B7g-8f    07:38:00  08:24:00
60.N3c-4e!   07:38:00  08:25:00

White now has also managed to bring this knight into play.

61.R2dx3d    08:16:00  08:25:00

There are a number of moves here, but all are bad. Habu said after the game that he
most wanted to play 61.Px4e, but after 62.P*2c Rx3d S3c R3e P*3d the rook gets chased
around and white has the advantage. After 61.Sx4e, white cannot play 62.Bx9i+ because
of R2a+ G3a +Rx3a Sx3a Bx3a+ and black picks up two generals for the rook and the
white king is now also in a lot of danger. Of course, Goda had seen this and said he
would have played 62.P7g+ after 61.Sx4e, which is good for white after 63.Rx2b+ Gx2b
Bx7g N*5g G3i P*2h. Habu: "There was no good move after N4e".

62.P*3a      08:16:00  08:26:00
63.S3fx4e    08:16:00  08:26:00
64.B2bx9i+   08:16:00  08:27:00
65.N*5g      08:17:00  08:27:00
66.S6e-6f    08:17:00  08:30:00
67.N5g-6e    08:18:00  08:30:00
68.L*4g      08:18:00  08:40:00
69.G4i-5h    08:38:00  08:40:00
70.S4b-3c    08:38:00  08:41:00
71.G5hx4g    08:46:00  08:41:00
72.S3cx3d    08:46:00  08:41:00
73.S4ex3d    08:46:00  08:41:00
74.S6fx6g+   08:46:00  08:41:00
75.G7hx6g    08:46:00  08:41:00
76.R*2h      08:46:00  08:41:00
77.G4g-4h    08:47:00  08:41:00
78.+B9i-7g   08:47:00  08:51:00

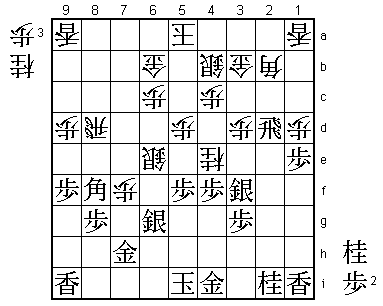
The decisive move. Goda also felt that he was winning here, because he "didn't see
how I could lose".

79.G6gx7g    08:48:00  08:51:00
80.P7fx7g+   08:48:00  08:52:00
81.S*5b      08:59:00  08:52:00
82.G6bx5b    08:59:00  08:54:00
83.B*7c      08:59:00  08:54:00
84.K5a-6a    08:59:00  08:56:00
85.B7cx8d+   08:59:00  08:56:00
86.S*6h      08:59:00  08:57:00
Resigns      08:59:00  08:57:00

A rather long but straightforward mate after 87.K5h S*6g K4g N*3e K3f R2g+ K4e G4d
or 87.K4i R2h+ K5h S*6g and a similar mate. This must have been a frustrating loss
for Habu because it is unclear what went wrong for black. Also, again the player
with the black pieces loses. One gets the feeling that this match will be won by the
player who manages to win a game with black. Kind of fitting after a season where
white won more games than black for the first time in history.
