67th Meijin Match Game 3
[Black "Goda Masataka, Challenger"]
[White "Habu Yoshiharu, Meijin"]
[Event "67th Meijin-sen, Game 3"]
[Date "May 7th and 8th 2009"]
1.P7g-7f     00:00:00  00:00:00
2.P3c-3d     00:00:00  00:01:00
3.P2g-2f     00:03:00  00:01:00
4.P8c-8d     00:03:00  00:03:00
5.P2f-2e     00:04:00  00:03:00
6.P8d-8e     00:04:00  00:04:00
7.G6i-7h     00:04:00  00:04:00
8.G4a-3b     00:04:00  00:05:00
9.P2e-2d     00:06:00  00:05:00
10.P2cx2d    00:06:00  00:06:00
11.R2hx2d    00:06:00  00:06:00
12.P8e-8f    00:06:00  00:07:00
13.P8gx8f    00:06:00  00:07:00
14.R8bx8f    00:06:00  00:07:00
15.R2dx3d    00:08:00  00:07:00
16.B2b-3c    00:08:00  00:09:00
17.R3d-3f    00:38:00  00:09:00
18.S3a-2b    00:38:00  00:12:00
19.P*8g      00:41:00  00:12:00
20.R8f-8e    00:41:00  00:22:00
21.R3f-2f    00:43:00  00:22:00
22.K5a-4a    00:43:00  00:28:00

23.K5i-6h    00:45:00  00:28:00

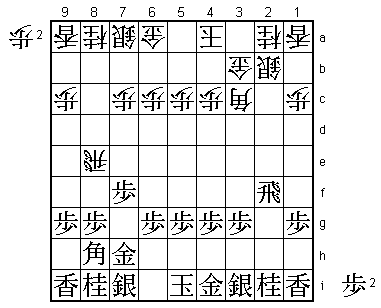
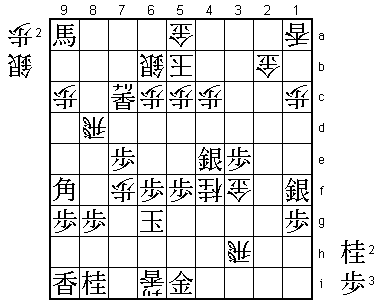
Not a Yagura for the third consecutive game, but the R8e Yokofudori. The position after
22.K4a is one of the basic positions of this opening and black has a number of ways to
play from here. The most popular way of playing is 23.S4h S6b P3f G5a N3g to keep the
black king on its original position as introduced by Yamasaki. Playing with a sitting
king is always a risk, but in this position it is an important advantage to keep the king
as far away as possible from the white attacking pieces. Goda plays it differently, moving
the king to 6h, defending the gold on 7h. With the king out of the center, the plan is to
move up the pawn on the fourth file, which is a focal point of the white position. The
disadvantage is that black no longer can develop the silver to 6h, so the black center
cannot be strengthened easily.

24.S7a-6b    00:45:00  00:52:00
25.S3i-3h    00:47:00  00:52:00
26.G6a-5a    00:47:00  01:11:00
27.P3g-3f    00:48:00  01:11:00
28.P7c-7d    00:48:00  01:20:00
29.N2i-3g    00:51:00  01:20:00
30.N8a-7c    00:51:00  01:24:00
31.P4g-4f    00:52:00  01:24:00
32.R8e-5e    00:52:00  02:30:00

This move was introduced by Matsuo against Kimura in the Oza tournament on November 19th
1999. It is the most direct way to try and exploit the fact that black cannot play S6h.
Black cannot take this rook because of the fork 33.Bx5e Bx5e S8h B*4d. The game between
Kimura and Matsuo continued 33.G5h R5d R2i P7e and black won. However, after this white
won six consecutive games with this attack and it became a very popular way of playing
for white. Nowadays, 33.P4e (aiming to play N2e next) is considered the best way for
black to counter 32.R5e.

33.P4f-4e    01:16:00  02:30:00
34.R5e-5d    01:16:00  02:42:00
35.B8hx3c+   01:18:00  02:42:00
36.N2ax3c    01:18:00  02:43:00
37.P6g-6f    01:18:00  02:43:00
38.P7d-7e    01:18:00  02:57:00
39.B*8c      01:41:00  02:57:00
40.N3cx4e    01:41:00  03:13:00
41.N3gx4e    01:47:00  03:13:00
42.B*4f      01:47:00  03:14:00
43.G4i-5h    02:14:00  03:14:00
44.B4fx1i+   02:14:00  03:16:00
45.P*2c      04:53:00  03:16:00
46.S2b-3a    04:53:00  03:20:00
47.P3f-3e    04:54:00  03:20:00
48.+B1i-5e   04:54:00  04:17:00
49.B8c-5f+   04:57:00  04:17:00

50.+B5ex5f   04:57:00  04:18:00

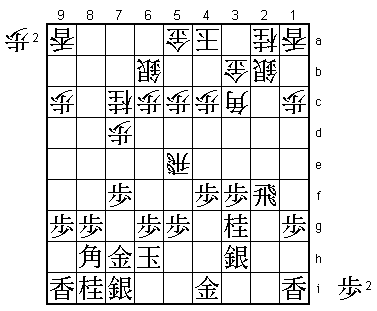
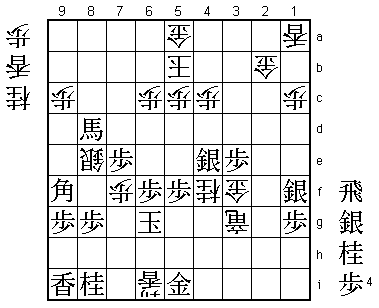
This is a new move, although the actual new idea is what comes next. Previously, the
bishop was pulled back to 4d, but after 50.+B4d +B4f Habu didn't like the fact that
white would no longer be able to get the knight on 4e.

51.P5gx5f    05:33:00  04:18:00
52.P*2e      05:33:00  04:19:00
53.R2f-3f    05:39:00  04:19:00
54.K4a-5b    05:39:00  04:53:00

This is the important new idea behind the exchange of the bishops on 5f. Black has the
strong attack P3d, but white sidesteps this with 54.K5b, making this attack much less
effective.

55.P7fx7e    06:15:00  04:53:00
56.B*1h      06:15:00  05:22:00
57.B*2g      06:15:00  05:22:00
58.B1hx2g+   06:15:00  05:29:00
59.S3hx2g    06:15:00  05:29:00
60.P2e-2f    06:15:00  05:29:00
61.P2c-2b+   07:05:00  05:29:00

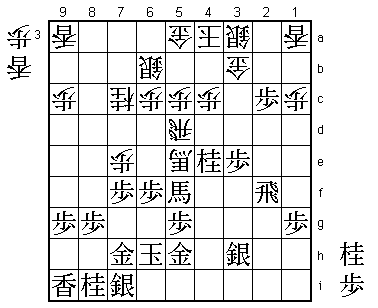
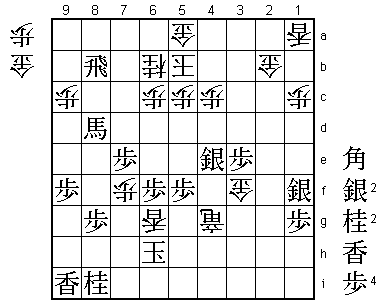
Goda was quite happy about his position here, while Habu wasn't really sure white had
any good moves to play. Interestingly, the mood in the press room was quite different,
giving white the advantage here. This pawn promotion sacrifice is important to prepare
for a lance drop on the second file, but it is not really what black wants to play,
because this pawn was dropped here on the 45th move.

62.S3ax2b    07:05:00  05:39:00
63.R3fx2f    07:05:00  05:39:00
64.B*3g      07:05:00  06:15:00
65.R2f-3f    07:29:00  06:15:00
66.B3g-2h+   07:29:00  06:17:00
67.S2g-1f    07:29:00  06:17:00
68.P*7f      07:29:00  06:52:00
69.B*8b      07:41:00  06:52:00
70.L*7g      07:41:00  07:15:00
71.B8bx9a+   07:45:00  07:15:00
72.L7gx7h+   07:45:00  07:19:00
73.S7ix7h    07:45:00  07:19:00
74.G*4f      07:45:00  07:22:00
75.L*2i      07:58:00  07:22:00
76.G4fx4e    07:58:00  07:24:00
77.L2ix2h    07:58:00  07:24:00
78.G4ex3f    07:58:00  07:24:00
79.L2hx2b+   07:58:00  07:24:00
80.G3bx2b    07:58:00  07:24:00
81.S*4e      07:59:00  07:24:00
82.N*4f      07:59:00  07:55:00
83.G5h-5i    08:01:00  07:55:00
84.R*3h      08:01:00  07:56:00
85.K6h-6g    08:34:00  07:56:00
86.L*7g      08:34:00  08:17:00
87.S7h-6i    08:40:00  08:17:00
88.R5d-8d    08:40:00  08:24:00
89.L*8f      08:41:00  08:24:00

90.R8d-6d?   08:41:00  08:25:00

If Habu would have lost this game, this would have been the losing move. Correct was
90.P*8e. For example, 91.P*4d Gx3e! Px4c+ Kx4c P*4d K3b B*4c K4a Bx7f+ Gx4e P4c+ P*4b
P*2c Gx2c and both Habu and Goda agreed that this looked very good for white. The move
Gx3e is important here to strengthen the top of the king and weaken the black attack.

91.L8f-8c+   08:58:00  08:25:00
92.L7g-7i+   08:58:00  08:48:00
93.+L8cx7c   08:58:00  08:48:00
94.R6d-8d    08:58:00  08:48:00
95.B*9f      08:58:00  08:48:00
96.+L7ix6i   08:58:00  08:53:00

97.+L7cx6c   08:58:00  08:53:00

A strong move praised by Moriuchi. The reflex move is to take the silver on 6b, but this is
much better, immediately putting the white king in a lot of danger.

98.S6bx6c    08:58:00  08:54:00
99.+B9a-7c   08:58:00  08:54:00
100.S*8e     08:58:00  08:55:00
101.N*5e     08:58:00  08:55:00
102.P*6b     08:58:00  08:55:00
103.N5ex6c+  08:58:00  08:55:00
104.P6bx6c   08:58:00  08:55:00
105.+B7cx8d  08:58:00  08:55:00
106.R3h-3g+  08:58:00  08:55:00

107.K6g-7h?  08:58:00  08:55:00

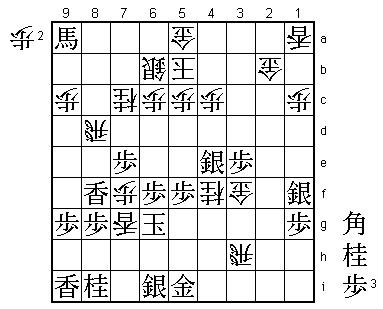
Here Goda thought that after 108.Sx9f black had a mate starting with 109.N*6d. However,
after 110.Px6d S*6c Kx6c R*8c K5b +Bx5a Kx5a Rx5c+ it looks like a simple mating position,
but actually after P*5b next there is no mate. Here black could have kept his advantage
with 107.N*5g 108.Sx9f 109.R*8b. Then 110.N*6b is answered by Sx3f and +Lx5i +Bx6b Gx6b
G*4b Kx4b (K6a N*7c) Rx6b+ L*5b N*3d K3c S*4b and mate. Or 110.L*6b S*7c and there is no
proper defense against Sx6b+ because black has no pieces that can move forward to drop on
6a. Therefore, white has nothing else but 110.B*6b, but then white has no way to win without
the bishop. Actually, these variations were found after the post-mortem analysis. During
the post-mortem analysis it was concluded that black could win with 109.P*4d instead of
R*8b because of 110.+Lx5i Px4c+ Kx4c S3d K3b S*3c K4a R*4c. However, if white plays K4b
instead of K3b after S3d there is no mate and white wins.

108.S8ex9f   08:58:00  08:55:00
109.R*8b     08:59:00  08:55:00
110.N*6b     08:59:00  08:56:00
111.P9gx9f   08:59:00  08:56:00
112.B*6g     08:59:00  08:56:00
113.K7hx6i   08:59:00  08:56:00
114.N4f-5h+  08:59:00  08:56:00
115.G5ix5h   08:59:00  08:56:00
116.B6gx5h+  08:59:00  08:56:00
117.K6ix5h   08:59:00  08:56:00
118.+R3g-4g  08:59:00  08:56:00
119.K5h-6h   08:59:00  08:56:00
120.L*6g     08:59:00  08:56:00
Resigns      08:59:00  08:56:00

And mate after 121.K7h +R5h K7i +R6h or 121.K7i G*7h Kx7h +R5h K7i +R6h, so Goda resigned
here. Another close game that again was won by the luckiest player. Goda may be 2-1 down,
but it could just as well have been the other way around. This match seems far from over.
