67th Meijin Match Game 2
[Black "Habu Yoshiharu, Meijin"]
[White "Goda Masataka, Challenger"]
[Event "67th Meijin-sen, Game 2"]
[Date "April 21st and 22nd 2009"]
1.P7g-7f     00:00:00  00:00:00
2.P8c-8d     00:00:00  00:00:00
3.S7i-6h     00:02:00  00:00:00
4.P3c-3d     00:02:00  00:00:00
5.P6g-6f     00:04:00  00:00:00
6.S7a-6b     00:04:00  00:00:00
7.P5g-5f     00:07:00  00:00:00
8.P5c-5d     00:07:00  00:01:00
9.S3i-4h     00:08:00  00:01:00
10.S3a-4b    00:08:00  00:01:00
11.G4i-5h    00:12:00  00:01:00
12.G4a-3b    00:12:00  00:01:00
13.G6i-7h    00:16:00  00:01:00
14.K5a-4a    00:16:00  00:01:00
15.K5i-6i    00:17:00  00:01:00
16.G6a-5b    00:17:00  00:02:00
17.S6h-7g    00:25:00  00:02:00
18.S4b-3c    00:25:00  00:02:00
19.B8h-7i    00:27:00  00:02:00
20.B2b-3a    00:27:00  00:02:00
21.P3g-3f    00:34:00  00:02:00
22.P4c-4d    00:34:00  00:02:00
23.G5h-6g    00:45:00  00:02:00
24.G5b-4c    00:45:00  00:08:00
25.S4h-3g    00:57:00  00:08:00

Challenger Goda may have never won against Habu with the black pieces, his overall
score with this opening against Habu is almost as bad: Habu has won 20 out of the 22
games they have played with this opening. Despite this, following the first game, Goda
is not shying away from the Yagura. The 25.S3g system is one of the most popular ways
of playing the Yagura these days. Black castles the king firmly before opening the
game, while white strengthens his defense and waits for a chance to counter.

26.B3a-6d    00:57:00  00:11:00
27.B7i-6h    01:06:00  00:11:00
28.K4a-3a    01:06:00  00:11:00
29.K6i-7i    01:07:00  00:11:00
30.P7c-7d    01:07:00  00:12:00
31.K7i-8h    01:09:00  00:12:00
32.K3a-2b    01:09:00  00:14:00
33.S3g-4f    01:30:00  00:14:00
34.S6b-5c    01:30:00  01:06:00
35.N2i-3g    01:34:00  01:06:00
36.P9c-9d    01:34:00  01:13:00
37.P1g-1f    01:40:00  01:13:00
38.P1c-1d    01:40:00  01:13:00
39.P2g-2f    01:40:00  01:13:00
40.S3c-2d    01:40:00  01:13:00
41.R2h-3h    01:59:00  01:13:00
42.P8d-8e    01:59:00  01:33:00
43.L1i-1h    02:16:00  01:33:00
44.S5c-4b    02:16:00  01:48:00
45.P9g-9f    02:49:00  01:48:00

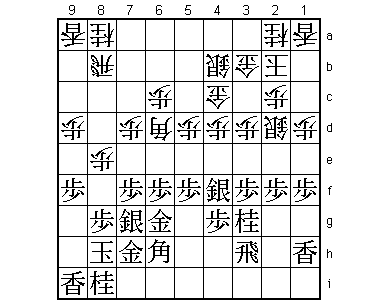
This move is not easy to play because it gives white the opportunity to play a future
edge attack. On the other hand, it gives the black king more space to escape. This
position has been played three times before in professional games with black winning
two games and white winning one. Actually, Habu played with the white pieces in one of
these three games, namely against Watanabe in the fifth game of last year's Ryu-O match.

46.N2a-3c    02:49:00  04:21:00
47.P6f-6e    03:19:00  04:21:00
48.B6d-7c    03:19:00  04:26:00
49.S7g-6f    03:54:00  04:26:00
50.P8e-8f    03:54:00  06:24:00

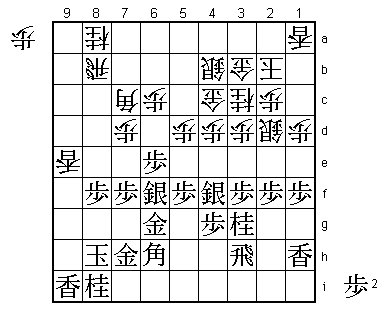
This is a new move by Goda. In the game against Watanabe Habu played 50.K2a here and
Watanabe won after attacking with 51.P7e.

51.P8gx8f    04:19:00  06:24:00
52.P9d-9e    04:19:00  06:25:00
53.P9fx9e    04:22:00  06:25:00
54.L9ax9e    04:22:00  06:25:00

Goda is going straight for the edge attack.

55.P*9f      04:55:00  06:25:00
56.L9ex9f    04:55:00  06:25:00
57.P*9g      04:55:00  06:25:00
58.L9fx9g+   04:55:00  06:26:00
59.N8ix9g    05:11:00  06:26:00

The alternative 59.Kx9g aims at winning the lance without any further problems at the
edge, but then 60.P4e Nx4e Nx4e K8h P*9f P*9d is not clear. With 59.Nx9g Habu aims
at riding the edge attack to put pressure on the white position on that side of the
board.

60.P*8d      05:11:00  06:27:00
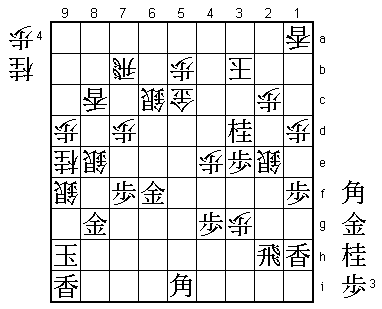
61.L*9f!     05:19:00  06:27:00

This is necessary concession, as black doesn't really want to drop back the lance
here, but the white attack with P*9f next is too strong.

62.R8b-7b    05:19:00  06:53:00
63.K8h-8g    06:22:00  06:53:00
64.P4d-4e    06:22:00  07:22:00
65.N3gx4e    06:28:00  07:22:00
66.N3cx4e    06:28:00  07:22:00
67.P*9d      06:28:00  07:22:00
68.P*9e      06:28:00  07:34:00
69.P9d-9c+   06:40:00  07:34:00
70.N8ax9c    06:40:00  07:34:00
71.L9fx9e    06:40:00  07:34:00
72.P*9b      06:40:00  07:34:00
73.P*9d      06:55:00  07:34:00
74.N*8c      06:55:00  07:34:00
75.K8g-9f    06:55:00  07:34:00

Habu uses the king to constrain the white edge attack. This looks very risky, but
white has no good way to get to the black king, so the general opinion in the press
room was that black had the better position here.

76.N8cx9e    06:55:00  07:35:00
77.S4fx4e    06:55:00  07:35:00
78.P*4d      06:55:00  07:51:00
79.S4ex5d    07:05:00  07:51:00
80.G4cx5d    07:05:00  07:51:00
81.N*4f      07:05:00  07:51:00
82.S4b-4c    07:05:00  07:58:00

83.P2f-2e    07:35:00  07:58:00

The simple 83.Nx5d is good after 84.Sx5d G*8c, but not clear if white plays 84.B1i+
next.

84.S2dx2e    07:35:00  08:10:00
85.P9dx9c+   07:48:00  08:10:00
86.P9bx9c    07:48:00  08:10:00
87.P3f-3e    07:48:00  08:10:00

This might not be the right way to play here, but no alternative was given.

88.G5d-5c    07:48:00  08:19:00
89.P5f-5e    07:51:00  08:19:00
90.P4d-4e    07:51:00  08:24:00
91.N4fx3d    07:59:00  08:24:00
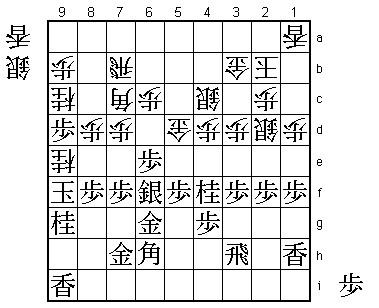
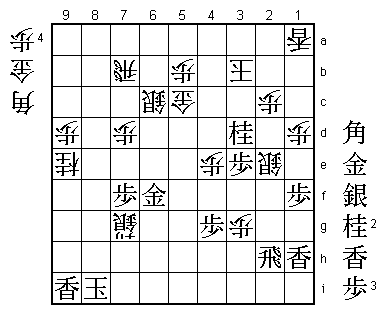
92.K2b-3a?   07:59:00  08:25:00

This aims at capturing the knight next with P*3c, but is a clear mistake. After
92.K3c black has no good way to attack the white king and has to settle for
creating space at the head of the king with 93.P7e.

93.P8f-8e!   08:04:00  08:25:00

After the game, Goda admitted that he overlooked this move. The point of this
will become clear soon.

94.L*8a      08:04:00  08:42:00
95.P8ex8d    08:15:00  08:42:00
96.P*8e      08:15:00  08:42:00
97.N9gx8e    08:32:00  08:42:00
98.B7cx8d    08:32:00  08:42:00
99.P*9d      08:33:00  08:42:00
100.P9cx9d   08:33:00  08:44:00
101.B6h-8f   08:35:00  08:44:00

This bishop is now in an ideal position for attack and defense.

102.P*5b     08:35:00  08:44:00

This is a very painful move to play, and in the press room a win by Habu was
expected here. However, Goda shows a lot of resilience from here, refusing to
fold despite being short of time.

103.P5e-5d   08:37:00  08:44:00
104.S4cx5d   08:37:00  08:44:00
105.N*4d     08:40:00  08:44:00

Habu is going for the win and should be one move faster, but...

106.P6c-6d   08:40:00  08:48:00
107.P6ex6d   08:47:00  08:48:00
108.P*3g     08:47:00  08:56:00
109.P6d-6c+  08:53:00  08:56:00
110.S5dx6c   08:53:00  08:56:00
111.R3h-2h   08:53:00  08:56:00
112.B8dx6f   08:53:00  08:56:00
113.G6gx6f   08:53:00  08:56:00
114.S*8d     08:53:00  08:56:00
115.P*8c     08:54:00  08:56:00
116.L8ax8c   08:54:00  08:56:00
117.N4dx3b+  08:56:00  08:56:00
118.K3ax3b   08:56:00  08:56:00
119.K9f-9g   08:57:00  08:56:00
120.S8dx8e   08:57:00  08:56:00
121.B8f-5i   08:57:00  08:56:00
122.P*8f     08:57:00  08:56:00
123.P*8h     08:58:00  08:56:00
124.S*9f     08:58:00  08:59:00
125.K9g-9h   08:58:00  08:59:00
126.P8f-8g+  08:58:00  08:59:00
127.P8hx8g   08:58:00  08:59:00
128.N9ex8g+  08:58:00  08:59:00
129.G7hx8g   08:59:00  08:59:00
130.N*9e     08:59:00  08:59:00

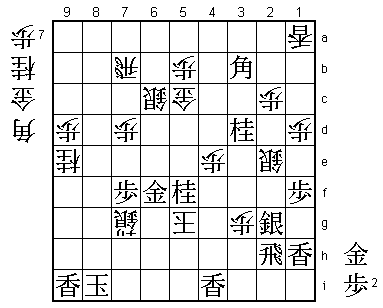
131.G8g-7g?  08:59:00  08:59:00

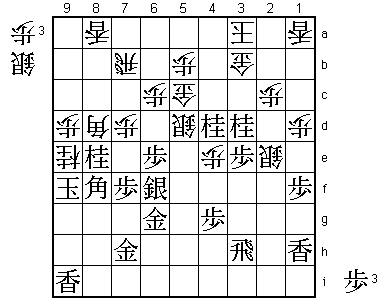
Shogi can be a cruel game, even for someone like Habu. He thought about this move
until the last second of byoyomi, but this turns a won game into a loss. 130.N*9e
is a very tough move to deal with, but it is not a mating threat. The conclusion
of the analysis in the press room was that Habu was winning this position because
if black would be given one move of breeding space, moves like B*2b or B*5a would
be impossible to defend against. After 130.N*9e it seems that black has a chance
to play either move, but the position is not that simple. Also bad would have been
131.B*2b after 132.Nx8g+ K8i Sx3d Px3d G4c G*3c K4a Gx4c K5a B4d+ N*5c and white
escapes. Correct was 131.B*5a and after 132.Nx8g+ K8i K4c black has N*5f S6d P*5e!
and white cannot defend. Actually, even if black didn't see this, defending was
possible with 131.G8h instead of G7g.

132.S8e-8f   08:59:00  08:59:00
133.G7gx8f   08:59:00  08:59:00
134.L8cx8f   08:59:00  08:59:00
135.B5ix8f   08:59:00  08:59:00
136.S9f-8g+  08:59:00  08:59:00
137.K9h-8i   08:59:00  08:59:00
138.N*7g     08:59:00  08:59:00
139.B8fx7g   08:59:00  08:59:00
140.+S8gx7g  08:59:00  08:59:00

It is very likely that Goda just closed his eyes here and hoped for the best (he didn't
have any other option, of course). Black has a mountain of pieces in hand, so this could
well have been a position where black has a mate. There isn't a mate here, even though
Habu gives it a try with a number of checks.

141.N*4d     08:59:00  08:59:00
142.K3b-4c   08:59:00  08:59:00
143.B*3b     08:59:00  08:59:00
144.K4cx4d   08:59:00  08:59:00
145.N*5f     08:59:00  08:59:00
146.K4dx3e   08:59:00  08:59:00
147.P*3f     08:59:00  08:59:00
148.K3ex3f   08:59:00  08:59:00
149.S*2g     08:59:00  08:59:00
150.K3fx4g   08:59:00  08:59:00
151.L*4i     08:59:00  08:59:00
152.K4g-5g   08:59:00  08:59:00
Resigns      08:59:00  08:59:00

White has the simple mating threat P*8h and even if black defends against this, white
can just continue making mating threats. On the other hand, black can give some more
checks after 153.G*6g +Sx6g Gx6g but after Kx6g there is no way to mate the white king.
Therefore, Habu resigned here and Goda evens the match. The Meijin match starts with
two very close Yagura games, basically won by the luckiest player. We have a very
interesting battle here.
