67th Meijin Match Game 1
[Black "Goda Masataka, Challenger"]
[White "Habu Yoshiharu, Meijin"]
[Event "67th Meijin-sen, Game 1"]
[Date "April 9th and 10th 2009"]
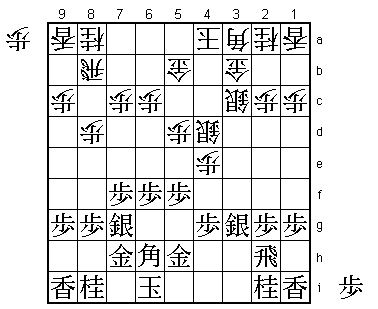
1.P7g-7f 00:00:00 00:00:00
The furigoma for this Meijin match results in three tokins, giving challenger
Goda the black pieces. Goda plays 1.P2f often, but in this game he starts with 1.P7f.
This is actually already a significant statement. After 1.P7f it is very likely
that this game will be a Yagura opening (indeed this is how it went). In general
the Yagura is considered good for black, but Goda has never won against Habu when
he played the Yagura opening with black. Still, Goda is a Yagura specialist and
with 1.P7f he tells Habu that he will not shy away from his favorite opening, just
because his results haven't been good against this particular opponent.
2.P8c-8d 00:00:00 00:01:00
3.S7i-6h 00:06:00 00:01:00
4.P3c-3d 00:06:00 00:04:00
5.P6g-6f 00:06:00 00:04:00
6.S7a-6b 00:06:00 00:05:00
7.P5g-5f 00:06:00 00:05:00
8.P5c-5d 00:06:00 00:10:00
9.S3i-4h 00:06:00 00:10:00
10.S3a-4b 00:06:00 00:17:00
11.G4i-5h 00:06:00 00:17:00
12.G4a-3b 00:06:00 00:19:00
13.G6i-7h 00:10:00 00:19:00
14.K5a-4a 00:10:00 00:24:00
15.K5i-6i 00:10:00 00:24:00
16.G6a-5b 00:10:00 00:31:00
17.S6h-7g 00:16:00 00:31:00
18.S4b-3c 00:16:00 00:35:00
19.B8h-7i 00:16:00 00:35:00
20.B2b-3a 00:16:00 00:35:00
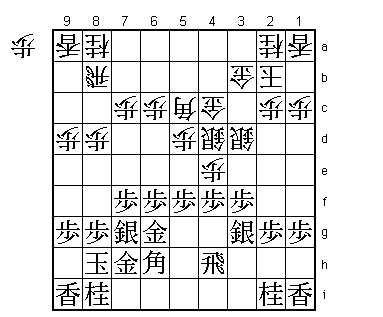
21.P3g-3f 00:17:00 00:35:00
22.P4c-4d 00:17:00 00:35:00
23.P3f-3e 00:50:00 00:35:00
This is a very common position. It has been played 141 times before in professional
games, with black winning 75 times, white winning 61 times, 1 sennichite and 4 jishogi.
24.P3dx3e 00:50:00 00:57:00
25.B7ix3e 00:50:00 00:57:00
26.S6b-5c 00:50:00 00:57:00
Interesting is that only three moves after 23.P3e, the results are completely
different. There have been 21 games with this position and black only won 5 of them!
Both players actually have experience with this position. Habu played it once with
black and Goda has played it once with white. Habu played this position in July 2002
in the Nihon Series tournament and play continued 27.S3g P4e B2f S3d S3f P2d N3g and
the game went in a completely different direction (Habu won that game).
27.B3e-6h 04:16:00 00:57:00
Goda spent no less than 3 hours and 26 minutes on this quite plain looking move. He
didn't spend this time on thinking about the alternatives in this position but about
how to proceed after 27.B6h.
28.P4d-4e 04:16:00 01:41:00
29.S4h-3g 04:19:00 01:41:00
30.S5c-4d 04:19:00 01:52:00
31.K6i-7i    04:29:00  01:52:00

One of the reasons Goda spent so long on 27.B6h, was that he spent a lot of time deciding
what to do in this position. The alternative is 31.R4h G5b-4c P4f and if black can
exchange the pawn on the 4th file this will be an advantage. In the end he decided against
it for a reason that remains unclear, but Tanigawa commented that this is a testimony to
Goda's thorough approach to the opening.

32.G5b-4c    04:29:00  02:19:00
33.R2h-4h    04:35:00  02:19:00
34.S3c-3d    04:35:00  02:43:00
35.P*3f      04:35:00  02:43:00
36.B3a-5c    04:35:00  03:34:00

Another reason Goda spent so long on 23.B6h is that he didn't like 36.P5e Px5e Sx5e here.
This seems like a difficult move to play because of P3e next, but Goda thought that after
S2e this is not a big deal. Having the silver on the strange square 2e and still judging
that this is not a problem for white shows Goda's special way of looking at shogi positions.

37.G5h-6g    04:35:00  03:34:00
38.K4a-3a    04:35:00  03:37:00
39.K7i-8h    04:35:00  03:37:00
40.K3a-2b    04:35:00  03:38:00
41.P4g-4f    04:35:00  03:38:00
42.P9c-9d    04:35:00  03:44:00
43.P9g-9f?! 04:57:00 03:44:00
After the game, Goda said that he regretted this move. It gives white the opportunity to
set up an edge attack which forces black's hand. Goda suggested 43.P1f here and after 44.P9e
P1e Px4f Sx4f P*4e S3g N9c S8f N8e S2f followed by N3g and although white has activated the
knight, there is immediate danger of an edge attack here.
44.L9a-9c 04:57:00 04:35:00
45.P6f-6e 05:02:00 04:35:00
46.P4ex4f 05:02:00 05:08:00
47.S3gx4f 05:02:00 05:08:00
48.P*4e 05:02:00 05:08:00
49.S4f-3g 05:02:00 05:08:00
50.P6c-6d 05:02:00 05:22:00
51.P6ex6d 05:09:00 05:22:00
52.B5cx6d 05:09:00 05:22:00
53.G6g-6f 05:27:00 05:22:00
54.R8b-6b 05:27:00 05:26:00
55.P*6e 05:28:00 05:26:00
56.B6d-4b 05:28:00 05:26:00
57.P7f-7e 05:37:00 05:26:00
58.B4b-2d 05:37:00 05:58:00
59.B6hx2d 07:04:00 05:58:00
60.P2cx2d 07:04:00 05:58:00
61.P9f-9e 07:04:00 05:58:00
62.P9dx9e 07:04:00 06:49:00
63.P*9d 07:04:00 06:49:00
64.L9cx9d 07:04:00 06:49:00
65.B*8c 07:04:00 06:49:00
66.P*3h 07:04:00 06:49:00
67.R4hx3h 07:45:00 06:49:00
68.P4e-4f 07:45:00 06:54:00
69.S3gx4f 07:46:00 06:54:00
70.B*4g 07:46:00 06:56:00
71.R3h-2h 07:52:00 06:56:00
72.B4gx3f+ 07:52:00 06:58:00
73.S4f-3g 08:00:00 06:58:00
74.+B3f-4g 08:00:00 06:59:00
75.P*3f 08:05:00 06:59:00
76.P*3e 08:05:00 07:23:00
77.P3fx3e 08:05:00 07:23:00
78.S3d-2c 08:05:00 07:23:00
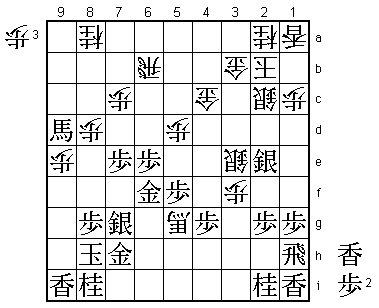
79.B8cx9d+ 08:14:00 07:23:00
White has a four general castle, both players have promoted the bishop and black has picked
up a lance in the process. This material advantage would normally give black the edge,
but in this position there is an important difference in the activity between the two bishops,
so the position is unclear.
80.P*3f 08:14:00 07:23:00
81.S3g-2f 08:14:00 07:23:00
82.+B4g-4f 08:14:00 07:29:00
83.R2h-1h 08:14:00 07:29:00
84.P2d-2e 08:14:00 07:31:00
85.P*4g 08:18:00 07:31:00
86.+B4f-5g 08:18:00 07:45:00
87.S2fx2e 08:18:00 07:45:00
88.S4dx3e 08:18:00 07:45:00
89.P5f-5e!   08:20:00  07:45:00

This doesn't look like a very good move, as it is slow and doesn't seem to do much to begin
with. However, after it was analyzed in the press room for a while, it became clear there
was an important hidden meaning.

90.+B5g-3i   08:20:00  08:08:00
91.P5ex5d    08:25:00  08:08:00
92.P*2d      08:25:00  08:10:00
93.S2e-1f    08:26:00  08:10:00
94.+B3ix2i   08:26:00  08:27:00
95.R1h-5h    08:27:00  08:27:00

This is the point of 89.P5e. This rook now supports a strong attack through the middle.

96.P*5b      08:27:00  08:27:00

White has to be careful here. 96.+Bx4g is good for black after 97.P5c+ +Bx5h +Bx5h Gx5c
B*7a P*6a Bx6b+ Px6b P*3c Nx3c R*5a.

97.P7e-7d    08:27:00  08:27:00

Unexpected but strong. Black wants to activate the promoted bishop. Still, this is not
an easy move to spot, as will become clear later. By the way, the alternative 97.R5i
also doesn't seem bad for black. For example, 98.+Bx4g +B6g P3g+ P*4d and Gx4d is
answered by P5c+ and G4c-4b by L*4c followed by P5c+ and the black attack seems to
continue.

98.+B2ix1i   08:27:00  08:33:00

Because this seems to be the perfect answer to 97.P7d. White picks up a lance and defends
the 7th file at the same time.

99.L*4f!     08:28:00  08:33:00

This is the more difficult move that Goda had to find when playing 97.P7d. The game is
too close to call here.

100.P*4d     08:28:00  08:36:00
101.P7dx7c+  08:29:00  08:36:00
102.N8ax7c   08:29:00  08:36:00
103.+B9dx8d  08:29:00  08:36:00
104.P3f-3g+  08:29:00  08:36:00
105.+B8dx7c  08:29:00  08:36:00
106.+P3gx4g  08:29:00  08:39:00
107.R5h-5i   08:32:00  08:39:00
108.+B1i-3g  08:32:00  08:40:00
109.R5i-3i   08:33:00  08:40:00
110.P*6a     08:33:00  08:41:00
111.R3ix3g   08:35:00  08:41:00
112.+P4gx3g  08:35:00  08:41:00
113.N*5e     08:35:00  08:41:00
114.L*7a     08:35:00  08:44:00
115.+B7cx6b  08:35:00  08:44:00
116.L7ax7g+  08:35:00  08:44:00
117.N8ix7g   08:35:00  08:44:00
118.P6ax6b   08:35:00  08:44:00
119.N5ex4c+  08:35:00  08:44:00
120.G3bx4c   08:35:00  08:44:00
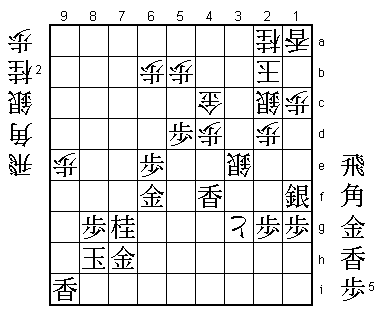
121.R*7c?    08:37:00  08:44:00

This is an important mistake. Goda felt that he was in trouble here and needed drastic
measures like this rook that works both in attack and defense. However, black still has
good chances when he goes straight for the white king with 121.R*5a. For example, 122.R*6i
is then answered by L*3d, cutting off the escape route of the white king.

122.B*3d     08:37:00  08:48:00
123.P*4e     08:44:00  08:48:00
124.S3ex4f   08:44:00  08:52:00
125.B*6d     08:52:00  08:52:00
126.R*4i     08:52:00  08:53:00
127.R7c-7a+  08:53:00  08:53:00
128.N*4b     08:53:00  08:54:00
129.G*3a     08:56:00  08:54:00
130.S*3b     08:56:00  08:56:00
131.G3ax3b   08:58:00  08:56:00
132.S2cx3b   08:58:00  08:56:00
133.S*3a     08:58:00  08:56:00
134.K2b-3c   08:58:00  08:57:00
135.G6f-5f   08:58:00  08:57:00
136.P*7b!    08:58:00  08:59:00

Very nice way to decide the game. The obvious threat is N*7f now the rook is blocked, but
black cannot take this pawn with the rook because that would end all threats against the
white king, so white can keep attacking.

137.G5fx4f   08:59:00  08:59:00

Not much else to do, but now white is one move faster.

138.N*7f     08:59:00  08:59:00
139.K8h-9h   08:59:00  08:59:00
140.L*9f     08:59:00  08:59:00
141.P*9g     08:59:00  08:59:00
142.R4i-6i+  08:59:00  08:59:00

Now there is no defense.

143.B6dx4b+  08:59:00  08:59:00

Goda goes for a last series of checks that are close to mate, but not close enough.
It seems like he could have picked up an extra lance here with 143.Px9f because after
144.Px9f there is no defense, but black can play the same checking sequence as in the
game with an extra lance, which might or might not have changed something. However,
this is just an illusion because white can answer 143.Px9f with 144.+Rx7h K9g +Rx7g
and taking out this knight on 7g makes sure that the white king can escape up the board.

144.G4cx4b   08:59:00  08:59:00
145.S3ax4b=  08:59:00  08:59:00
146.K3cx4b   08:59:00  08:59:00
147.L*4c     08:59:00  08:59:00
148.K4bx4c   08:59:00  08:59:00
149.N*3e     08:59:00  08:59:00
150.K4c-4b   08:59:00  08:59:00
151.S*4c     08:59:00  08:59:00
152.S3bx4c   08:59:00  08:59:00
153.N3ex4c+  08:59:00  08:59:00
154.B3dx4c   08:59:00  08:59:00
155.S*5c     08:59:00  08:59:00
156.K4b-3c   08:59:00  08:59:00
157.+R7a-3a  08:59:00  08:59:00
158.K3c-2c   08:59:00  08:59:00
Resigns      08:59:00  08:59:00
No mate after 159.G*2b K1d or 158.+Rx2a Bx2a N*3e K2b G*2c K3a so Goda resigned here.
A very close game to start the Meijin match, but in the end there aren't many good things
that Goda can take from this game. He lost with the black pieces and again wasn't able to
convert with black in the Yagura opening against Habu, which may play a role in the rest
of this match. Winning the second game with the white pieces already becomes very
important for Goda.