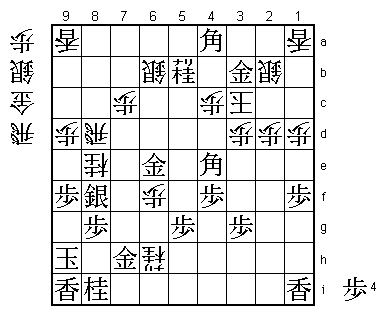
66th Meijin Match Game 6
[Black "Habu Yoshiharu, Challenger"]
[White "Moriuchi Toshiyuki, Meijin"]
[Event "66th Meijin-sen, Game 6"]
[Date "June 16th and 17th 2008"]
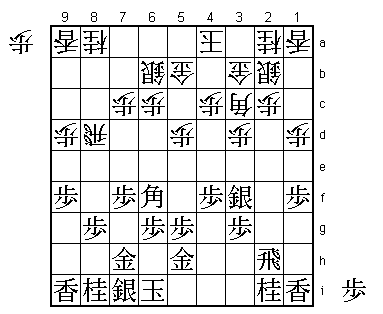
1.P2g-2f 00:00:00 00:00:00
2.P8c-8d 00:00:00 00:00:00
3.P2f-2e 00:03:00 00:00:00
4.P8d-8e 00:03:00 00:00:00
5.G6i-7h 00:05:00 00:00:00
6.G4a-3b 00:05:00 00:00:00
7.P2e-2d 00:09:00 00:00:00
8.P2cx2d 00:09:00 00:00:00
9.R2hx2d 00:09:00 00:00:00
10.P*2c 00:09:00 00:00:00
11.R2d-2h 00:09:00 00:00:00
It is interesting that Habu plays the same opening strategy here that Moriuchi
played with black in the fifth and the third game. Maybe Habu needed two games
with the white pieces to get the perfect feel for this opening. In any case, there
is no reason to be surprised, because this opening has been very popular among
professionals and has been deeply analyzed in the past couple of months.
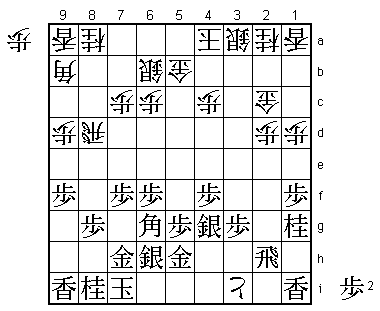
12.P8e-8f 00:09:00 00:04:00
13.P8gx8f 00:09:00 00:04:00
14.R8bx8f 00:09:00 00:04:00
15.P*8g 00:09:00 00:04:00
16.R8f-8d 00:09:00 00:04:00
17.S3i-3h 00:10:00 00:04:00
18.P3c-3d 00:10:00 00:08:00
19.S3h-2g 00:16:00 00:08:00
20.P9c-9d 00:16:00 00:12:00
21.P9g-9f 00:24:00 00:12:00
22.K5a-4a 00:24:00 00:13:00
23.S2g-3f 00:42:00 00:13:00
24.B2b-3c 00:42:00 00:28:00
25.P1g-1f 00:55:00 00:28:00
26.P1c-1d 00:55:00 00:31:00
27.P7g-7f 01:06:00 00:31:00
28.S3a-2b 01:06:00 00:31:00
29.K5i-6i 01:14:00 00:31:00
30.S7a-6b 01:14:00 00:32:00
31.G4i-5h 01:18:00 00:32:00
32.G6a-5b 01:18:00 00:40:00
33.P4g-4f 01:24:00 00:40:00
34.P5c-5d 01:24:00 01:11:00
35.B8h-6f 01:32:00 01:11:00
This bishop move invites white to play 35.Bx6f Px6f after which black can move into
a Yagura formation next. On the other hand, because of the black silver on 3f, white
cannot develop its pieces so smoothly. This is probably the reason that Moriuchi
tries something else.
36.R8d-8b?! 01:32:00 01:22:00
This sacrifices a pawn because 37.S4e attacks both the pawns on 3d and 5d. It seems
that Moriuchi prepared this at home, because he said after the game that 36.R8b is
a move that he "wanted to try", which is the shogi professionals euphemism for a
prepared opening. However, there must have been some mistake in his opening preparation,
because after the game he admitted that he didn't think that white had enough
compensation for the pawn.
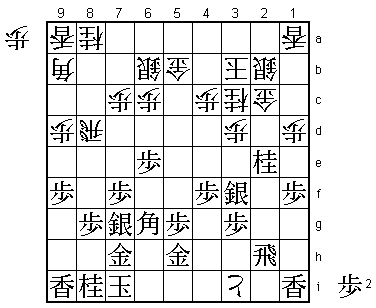
37.S3f-4e 02:35:00 01:22:00
38.B3cx6f 02:35:00 02:10:00
39.P6gx6f 02:35:00 02:10:00
40.P5d-5e 02:35:00 02:10:00
41.B*6g! 02:53:00 02:10:00
Maybe Moriuchi had overlooked this move. If black plays simply 41.Sx3d, then 42.P5f
S6h Px5g+ Sx5g shakes up the black position and is therefore unclear. 41.B*6g is
much better, giving the bishop a strong diagonal.
42.R8b-8d 02:53:00 02:27:00
43.S4ex3d 03:10:00 02:27:00
44.P2c-2d 03:10:00 03:07:00
45.S7i-6h 03:48:00 03:07:00
46.B*9b 03:48:00 03:44:00
Moriuchi felt that this bishop was working quite well, because white can now force
a tokin. Indeed, it seems that the position is very close here.
47.P*2c 04:18:00 03:44:00
48.S2b-3a 04:18:00 03:51:00
49.K6i-7i 04:21:00 03:51:00
50.P5e-5f 04:21:00 03:55:00
51.S3d-4e 04:25:00 03:55:00
52.P*3h 04:25:00 04:07:00
53.S4ex5f 04:44:00 04:07:00
54.P3h-3i+ 04:44:00 04:09:00
55.N2i-1g 04:44:00 04:09:00
56.G3bx2c 04:44:00 04:22:00
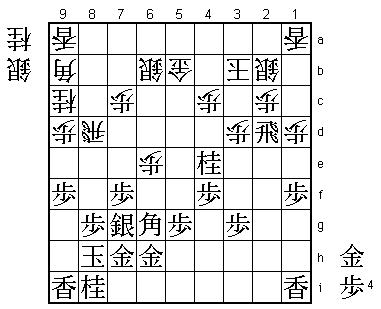
57.S5f-4g! 05:38:00 04:22:00
A move admired by Akutsu (6-dan). Black really wants to move this silver up the
board, so it takes a flexible mind to come up with pulling back the silver. Opening
up the diagonal of the bishop is the most important result of 57.S4g, but Habu
also has something else in mind.

58.K4a-3b    05:38:00  04:31:00
59.P*2e      05:40:00  04:31:00
60.S3a-2b    05:40:00  04:55:00
61.P6f-6e!   05:49:00  04:55:00

This pawn now blocks the bishop diagonal. White cannot take this pawn because of
62.Bx6e Bx2c+ Sx2c G*7e. This bishop sacrifice has been made possible by 57.S4g.
From now on, the black bishop is looking straight into the white position, while
the white bishop is blocked by the pawn on 6e. The power of the bishops has been
reversed, all because of 57.S4g. Black is a little better now, but there is still
a long way to go.

62.P2dx2e    05:49:00  05:38:00
63.S4g-3f    05:50:00  05:38:00
64.N2a-3c    05:50:00  05:44:00
65.S6h-7g    06:19:00  05:44:00
66.P*3d      06:19:00  06:03:00
67.N1gx2e    06:42:00  06:03:00
68.+P3i-3h?  06:42:00  06:27:00

Sacrificing the promoted pawn that was the anchor of white's plans is an important
and decisive mistake. If Moriuchi would have seen what is coming next, he would
have played 68.P*2d. The after 69.Nx3c+ Sx3c N*4e it seems that black is attacking
strongly, but after S2b P*2e +P3h R2f S1c Px2d Sx2d white can hold his position.
For example, Rx2d Gx2d S*3c K4a Sx2d+ R*2i K8h Rx2d+ P*2e +R2b and the promoted
rook is too strong to control.

69.N2ex3c+   06:46:00  06:27:00
70.S2bx3c    06:46:00  06:27:00
71.R2hx3h    06:46:00  06:27:00
72.P6c-6d    06:46:00  06:27:00
73.R3h-2h    06:50:00  06:27:00
74.P6dx6e    06:50:00  06:27:00

Moriuchi thought that this was good for white, because the bishop is being freed
and the knight drop on 6f is very inviting.

75.G5h-6h!   07:05:00  06:27:00

Black takes the time to strengthen his king position and the knight drop on 6f
is not such a problem anymore.

76.P*2d      07:05:00  06:37:00
77.K7i-8h    07:05:00  06:37:00
78.N8a-9c    07:05:00  06:44:00
79.N*4e      07:25:00  06:44:00
80.S3c-2b    07:25:00  07:48:00
81.P*2e      07:27:00  07:48:00
82.P2dx2e    07:27:00  07:48:00
83.S3fx2e    07:29:00  07:48:00
84.P*2d      07:29:00  07:48:00
85.S2ex2d    07:30:00  07:48:00
86.G2cx2d    07:30:00  07:48:00
87.R2hx2d    07:31:00  07:48:00
88.P*2c      07:31:00  07:48:00
89.N4e-5c+!  07:47:00  07:48:00

Habu has multiple ways to play it safe here, but doesn't hesitate when a chance
presents itself to finish the game early.

90.P2cx2d    07:47:00  07:53:00

Or 90.Sx5b Rx3d Rx3d Bx3d and the white position is helpless against a rook drop
(for example N8e R*8b). A major threat is R*7a followed by Rx9a+ and L*3f next.
Without pawns in hand, there is no proper defence for white and the black king
is very well protected, so Moriuchi decided to take the rook with 90.Px2d, but
it doesn't make much difference.

91.+N5cx5b   07:47:00  07:53:00
92.N9c-8e    07:47:00  07:54:00
93.S7g-8f    07:52:00  07:54:00
94.N*6d      07:52:00  08:17:00
95.G*7e      08:09:00  08:17:00
96.P6e-6f    08:09:00  08:18:00
97.B6g-4e    08:09:00  08:18:00
98.B9b-6e    08:09:00  08:29:00

This looks a little scary because the double knight attack is quite strong, but
Habu has seen that his attack is quicker.

99.G7ex6e    08:18:00  08:29:00
100.N6dx7f   08:18:00  08:29:00
101.K8h-9h   08:18:00  08:29:00
102.N7fx6h+  08:18:00  08:32:00
103.B*4a     08:23:00  08:32:00
104.K3b-3c   08:23:00  08:33:00
105.G*3b     08:23:00  08:33:00
Resigns      08:23:00  08:40:00
Moriuchi took seven minutes to say goodbye to his Meijin title. After 106.K2c Gx2b
Kx2b S*2c K3c Sx3d+ is mate and after 106.K4d B7b+ there is no defence. This Meijin
match was much closer than the score line indicates. If only Moriuchi would not have
blundered away the third game it could well have ended differently. Another entry
in the record books for Habu, who wins the Meijin title for the fifth time, becoming
the 19th Lifetime Meijin. He now has honorary titles in six of the seven major
professional tournaments. Only the Lifetime Ryu-O title is missing, but he needs to
win this title only one more time to have a full set. It only seems a matter of time
and maybe Habu may even achieve this extraordinary feat by the end of this year.