66th Meijin Match Game 5
[Black "Moriuchi Toshiyuki, Meijin"]
[White "Habu Yoshiharu, Challenger"]
[Event "66th Meijin-sen, Game 5"]
[Date "June 5th and 6th 2008"]
1.P2g-2f     00:00:00  00:00:00
2.P8c-8d     00:00:00  00:01:00
3.P2f-2e     00:01:00  00:01:00
4.P8d-8e     00:01:00  00:02:00
5.G6i-7h     00:01:00  00:02:00
6.G4a-3b     00:01:00  00:04:00
7.P2e-2d     00:02:00  00:04:00
8.P2cx2d     00:02:00  00:05:00
9.R2hx2d     00:02:00  00:05:00
10.P*2c      00:02:00  00:06:00
11.R2d-2h    00:02:00  00:06:00

Moriuchi plays the same opening as in the third game. Even though he lost this
game, this was only because of an endgame blunder, so there is no reason for him
not to play this opening. In the interview on the evening before the game, Moriuchi
had an interesting answer to the standard question what kind of strategy he was
going to play. Usually players just give no-answers like "I hope it will be a good
game" or white lies like "I will make up my mind at the start of the game", but
Moriuchi was much more open. He said that it had been a mistake to have a slow
build-up like in the fifth game and that he was aiming to open the game as quickly
as possible. Actually, this is not so easy with the Aigakari Hikihisha Bogin (Aigakari
Rook Pullback Climbing Silver), but Moriuchi finds a way.

12.P3c-3d    00:02:00  00:14:00
13.S3i-3h    00:05:00  00:14:00
14.P8e-8f    00:05:00  00:25:00
15.P8gx8f    00:05:00  00:25:00
16.R8bx8f    00:05:00  00:25:00
17.P*8g      00:05:00  00:25:00
18.R8f-8d    00:05:00  00:25:00
19.S3h-2g    00:09:00  00:25:00
20.P9c-9d    00:09:00  00:37:00
21.P9g-9f    00:09:00  00:37:00
22.K5a-4a    00:09:00  00:47:00

Habu changes the order of moves. In the third game he played 22.P7d here, which
is an important difference.

23.S2g-3f    00:21:00  00:47:00

This looks aggressive, but this silver is only aiming at making it hard for white
to develop its pieces.

24.B2b-3c    00:21:00  00:49:00
25.P7g-7f    00:23:00  00:49:00
26.S3a-2b    00:23:00  00:54:00
27.P1g-1f    00:31:00  00:54:00
28.P1c-1d    00:31:00  01:01:00

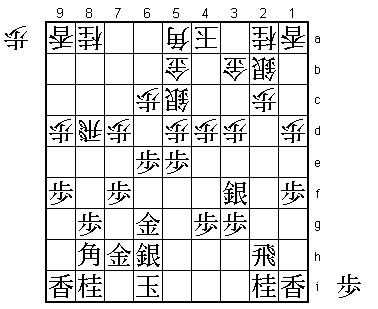
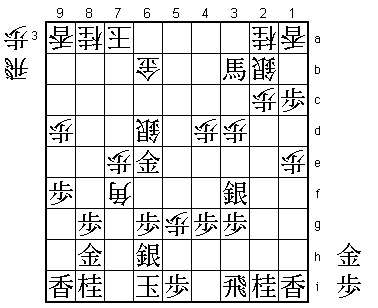
The main point of black's opening strategy becomes clear after 28.S6b K6i G5b G5h.
In this position, white wants to move up pawns to develop pieces, but every pawn
push has its problems here. P7d is answered by S4e, P6d is answered by S4e P6e S5f,
P5d is answered by Bx3c+ because with the pawn push to 5d, the white position is
weak against bishop drops. Finally, P4d is answered by R4h or S2e. Pushing the edge
pawn with 28.P1d creates a weakness as we will see later, but it also forces black
to make a decision.

29.G4i-5h    00:38:00  01:01:00
30.S7a-6b    00:38:00  01:16:00
31.K5i-6i    00:49:00  01:16:00
32.G6a-5b    00:49:00  01:24:00
33.P6g-6f    00:51:00  01:24:00

Moriuchi decides to close the bishop diagonal, which means that white can now play
P5d because the bishops cannot be exchanged.

34.P5c-5d    00:51:00  01:40:00
35.S7i-6h    00:51:00  01:40:00
36.S6b-5c    00:51:00  01:44:00
37.G5h-6g    01:27:00  01:44:00
38.P4c-4d    01:27:00  01:59:00
39.P5g-5f    01:34:00  01:59:00
40.P7c-7d    01:34:00  02:11:00
41.P6f-6e    02:01:00  02:11:00
42.B3c-5a    02:01:00  02:32:00

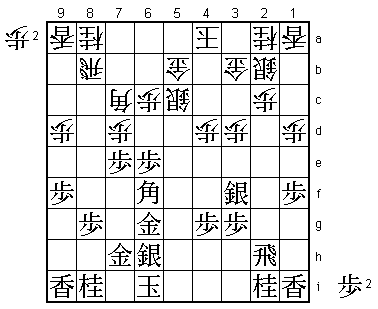
Normally this bishop goes to 4b, but Habu is aiming at B7c instead. If the white
bishop gets there, it will be better positioned than on 4b, so Moriuchi decides
that this is the moment to open the game.

43.P5f-5e    02:09:00  02:32:00

It is still quite early on the first day, so Moriuchi wasn't pulling up a smokescreen
in the pre-game interview. He attacks as soon as the opportunity presents itself.
His decision is helped by the fact that Habu still has a wall silver on 2b. Habu
also admitted after the game that he considered this a major liability.

44.P5dx5e    02:09:00  02:41:00
45.B8hx5e    02:18:00  02:41:00
46.B5a-7c    02:18:00  02:43:00
47.B5e-6f    02:53:00  02:43:00
48.R8d-8b?!  02:53:00  02:46:00

Looks risky. In the post-mortem analysis 48.R8c was suggested here, but it is unclear
which is better.

49.P7f-7e    03:30:00  02:46:00

A strong attack.

50.P7dx7e    03:30:00  04:33:00

Habu sealed this move after 101 minutes thought. Bad luck for the direct television
program on the end of the first day because the program ended without a single move
being played. The general opinion in the press room was that white has nothing else
but 50.B8d, so it was quite a surprise when the envelop was opened on the second day
and 50.Px7e was announced. So much so, that main arbiter Takahashi, who opened the
envelop with the sealed move, hesitated for a moment before reading it aloud. The
simple analysis was that 51.P*7d B8d B5e was too strong, but things are not so easy...

51.P*7d      03:58:00  04:33:00
52.B7c-8d    03:58:00  04:53:00
53.P1f-1e    04:19:00  04:53:00

Inserting the sacrifice at the edge is an important subtlety, but B5e is still the
move to play next.

54.P1dx1e    04:19:00  05:11:00
55.B6f-5e    04:19:00  05:11:00
56.P6c-6d    04:19:00  05:18:00
57.P6ex6d    05:16:00  05:18:00
58.R8b-9b    05:16:00  05:20:00

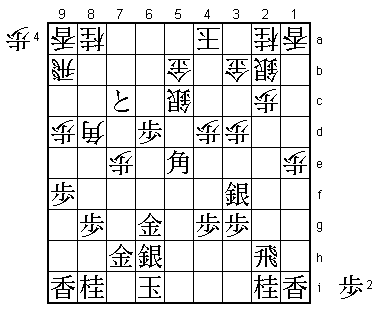
This position is not so good for black as it seems. For example, 59.P*1c looks like
the right way to attack, but after 60.P7f the bishop promotion on 3i next is a very
strong threat.

59.P7d-7c+!  05:22:00  05:20:00

Strong move. Giving up the pawn looks like a waste, but it forces the bishop back to
7c, so that the variation above with P7f followed by B3i+ is no longer possible.

60.B8dx7c    05:22:00  05:26:00
61.P*1c      05:24:00  05:26:00
62.B7cx6d    05:24:00  06:22:00
63.R2h-5h!   05:38:00  06:22:00

With the white silver on 2b, it is much better to attack through the centre, so this
rook switch is very strong.

64.B6dx5e    05:38:00  06:45:00
65.R5hx5e    05:38:00  06:45:00
66.P*6f      05:38:00  06:47:00
67.G6gx6f    05:44:00  06:47:00
68.B*3i      05:44:00  06:54:00
69.P*6g      06:17:00  06:54:00
70.P*8h      06:17:00  06:56:00
71.G7hx8h    06:19:00  06:56:00
72.S5c-6d    06:19:00  07:17:00
73.R5e-5d    06:25:00  07:17:00
74.R9b-6b    06:25:00  07:50:00
75.B*7a      07:00:00  07:50:00
76.R6b-7b    07:00:00  07:51:00

77.P*5c!     07:02:00  07:51:00

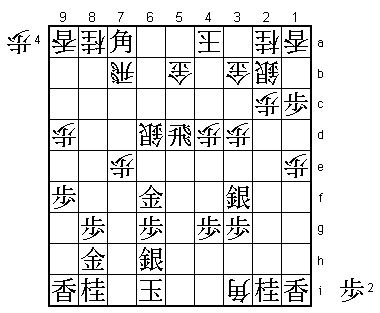
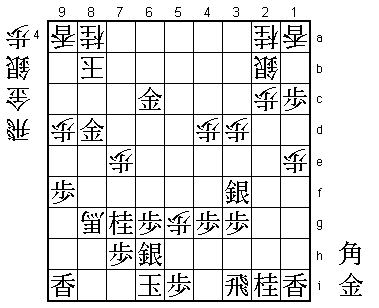
A strange position, because black seems to have a lot of choice here like 77.Rx6d
or 77.Bx4d+. However, 77.Rx6d is answered by 78.Rx7a P*5c Gx5c R6b+ R5a and the
white position remarkably hangs together quite well. In the press room 77.Bx4d+
was considered the best move, but after 78.G6c R5h P*6e G5f P*4h white has shut
out the rook and making a tokin near the black king is very strong. 77.P*5c is a
risky move, because it forces the exchange of the rooks and the black position is
quite weak against rook drops because of the position of K6i and G8h. Still, Moriuchi
makes the right decision. In this position there is no safe way to win, only a risky
one.

78.G5b-6c    07:02:00  07:52:00
79.P5c-5b+   07:04:00  07:52:00
80.R7bx5b    07:04:00  07:52:00
81.R5dx5b+   07:04:00  07:52:00
82.K4ax5b    07:04:00  07:52:00
83.R*5i      07:05:00  07:52:00
84.K5b-6a    07:05:00  08:19:00
85.R5ix3i    07:07:00  08:19:00
86.K6ax7a    07:07:00  08:20:00
87.B*4a      07:07:00  08:20:00
88.G6c-6b    07:07:00  08:32:00
89.B4ax3b+   07:12:00  08:32:00
90.P*5g      07:12:00  08:36:00
91.P*5i      07:24:00  08:36:00
92.P*6e      07:24:00  08:37:00
93.G6fx6e    07:27:00  08:37:00
94.B*7f      07:27:00  08:37:00

This forces black to give up the bishop on 3b. If black tries to save this bishop,
the white attack with P*8f is devastating.

95.G6ex6d    07:42:00  08:37:00
96.B7fx3b    07:42:00  08:37:00
97.S*6c      07:42:00  08:37:00

Black has just enough attacking power to make this work.

98.G6bx6c    07:42:00  08:38:00
99.G6dx6c    07:45:00  08:38:00
100.K7a-8b   07:45:00  08:38:00
101.G*7d     08:26:00  08:38:00
102.B*9b     08:26:00  08:40:00

Habu lays one final trap.

103.G7d-8d!  08:31:00  08:40:00

Moriuchi doesn't fall for it this time. 103.G*7c is tempting, because 104.K9c 105.N7g
looks very strong, but then 106.P*8d! stops the black attack.

104.B9b-6e   08:31:00  08:51:00
105.N8i-7g   08:35:00  08:51:00

The deciding move.

106.B6ex8g+  08:35:00  08:52:00
107.G8hx8g   08:38:00  08:52:00
108.B3bx8g+  08:38:00  08:53:00
109.P*7h     08:38:00  08:53:00
Resigns      08:38:00  08:53:00

No mate after 110.R*8i S7i and even if white takes out the gold on 8d after +Bx7h Kx7h
Rx8d+, black wins with B*7a K9b B*5f etc. A game played at a very high level where
Moriuchi seemed to have pressed home the tiny advantage of having the black pieces
because there were no obvious mistakes by either player. Moriuchi stays in this match,
but he will need a win with the white pieces in the next game to force an all-deciding
seventh game.
