66th Meijin Match Game 4
[Black "Habu Yoshiharu, Challenger"]
[White "Moriuchi Toshiyuki, Meijin"]
[Event "66th Meijin-sen, Game 4"]
[Date "May 20th and 21st 2008"]
1.P7g-7f 00:00:00 00:00:00
2.P3c-3d 00:00:00 00:00:00
3.P2g-2f 00:03:00 00:00:00
4.P9c-9d 00:03:00 00:01:00
5.P2f-2e 00:09:00 00:01:00
6.B2bx8h+ 00:09:00 00:04:00
7.S7ix8h 00:10:00 00:04:00
8.S3a-2b 00:10:00 00:04:00
9.S8h-7g 00:39:00 00:04:00
10.S2b-3c 00:39:00 00:06:00
11.S3i-3h 00:39:00 00:06:00
12.P9d-9e 00:39:00 00:17:00
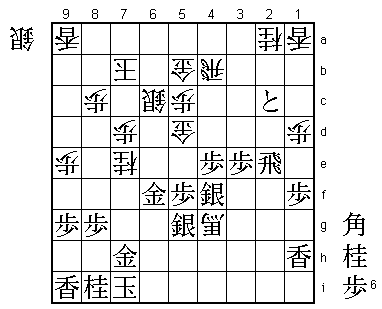
13.K5i-6h 00:40:00 00:17:00
14.R8b-2b 00:40:00 00:19:00
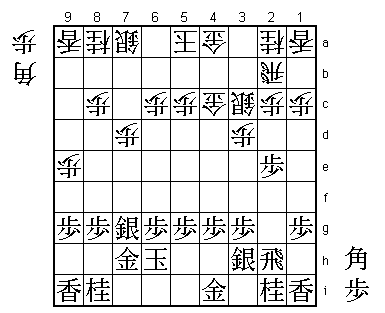
After blundering away the third game, Meijin Moriuchi comes out swinging. The
Kakugawari opening with tempo loss followed by the direct Mukaibisha with 14.R2b
can lead to very sharp opening variations. Even if the variations are not so sharp
and the pace of the game slows down, it is very likely that the game will get into
unknown territory very quickly. In that case it becomes a man-to-man fight and the
difference between black and white is minimized.
15.B*6e 01:17:00 00:19:00
16.B*7d 01:17:00 00:23:00
17.B6ex4c+ 01:20:00 00:23:00
18.G6a-5b 01:20:00 00:30:00
19.P7f-7e 01:21:00 00:30:00
20.G5bx4c 01:21:00 00:38:00
21.P7ex7d 01:21:00 00:38:00
22.P7cx7d 01:21:00 00:38:00
23.G6i-7h 01:21:00 00:38:00
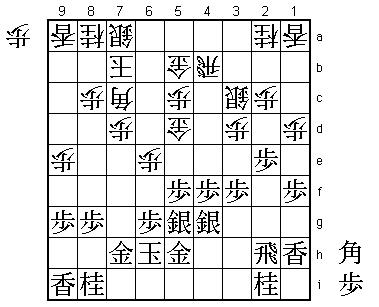
This looks like a wild variation, but it is all opening theory. Dropping the bishops
is not to force an early decision, but to add a pawn to the bishop in hand. Having
an extra pawn to drop opens all kinds of extra possibilities.
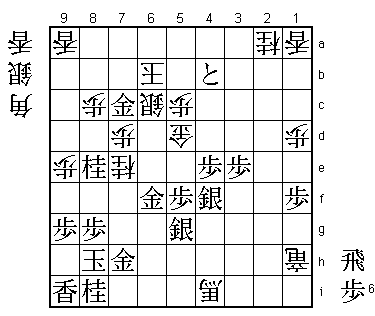
24.G4c-5d! 01:21:00 01:22:00
Moriuchi shows that he can also think out of the box. In the press room it was
expected that white would play 24.R7b here to get into a Yagura formation, but
Moriuchi didn't like his position after 25.P4f G3b S4g. He felt that it was hard
to get the silver on 7a into play and that if black makes a vanguard pawn formation
with P4e, the Yagura would be too weak. The move 24.G5d puts the gold in front of
the pawn, which is bad shape, but Moriuchi judged that it was more important to move
the gold away from a possible attack on the 4th file, while making room for R4b as
well. The white king will therefore move to the right side instead of the left.
After the game Habu admitted that this was a very good strategy and that he had a
hard time finding a good plan for black here.
25.P4g-4f 01:27:00 01:22:00
26.K5a-6b 01:27:00 01:51:00
27.S3h-4g 01:43:00 01:51:00
28.R2b-4b 01:43:00 01:54:00
29.S7g-6f 02:31:00 01:54:00
30.G4a-5b 02:31:00 03:05:00
31.G4i-5h 03:38:00 03:05:00
32.P6c-6d 03:38:00 04:34:00
The sealed move.
33.P5g-5f 04:27:00 04:34:00
34.K6b-7b 04:27:00 04:49:00
35.S6f-5g 04:56:00 04:49:00
36.P6d-6e 04:56:00 05:31:00
37.P3g-3f 05:07:00 05:31:00
38.B*8b! 05:07:00 05:39:00
Very good bishop drop. Black wants to move the knight to 3g, but white doesn't
allow that.
39.L1i-1h 06:27:00 05:39:00
40.P1c-1d 06:27:00 06:40:00
41.P1g-1f 06:39:00 06:40:00
42.B8b-7c 06:39:00 07:14:00
43.K6h-7i 07:23:00 07:14:00
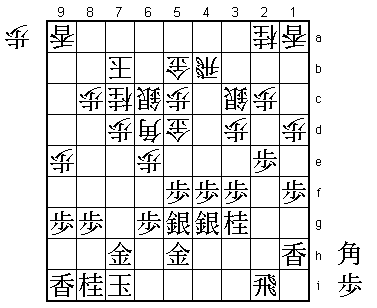
Clearly not how Habu imagined it. The black king is moved away from the centre, but
because the three black generals are on the 5th and 4th file, the king is moving
away from his defenders here, so moving the king to 7i is not necessarily good.
Black desperately want to play 43.N3g here, but this is not possible with the
white bishop on the long diagonal because after 44.P4e black cannot take this
pawn (Px4e Bx3g+ or Nx4e Gx4e). Black could try to move the rook away with 43.R2f
to play N3g next, but this is answered again by 44.P4e and then after 45.Px4e B1i+
L1g (or B*3g +Bx1h Bx9i+ S8b +B9b L*9a and black loses the bishop) Gx4e P*4f G4d
and the promoted bishop on 1i ties a lot of black pieces, so black cannot play a
proper attack.
44.S7a-6b 07:23:00 07:18:00
45.R2h-2f 07:27:00 07:18:00
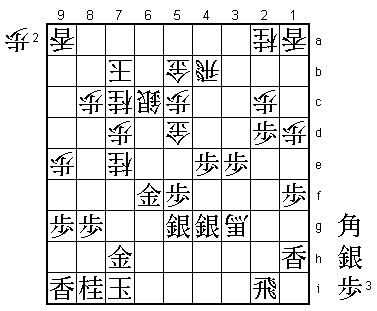
This now works because white has moved the silver to 6b. Therefore, after 46.P4e
Px4e B1i+ black can play B*3g and +Bx1h Bx9a+ is now alright because white cannot
play S8b.
46.S6b-6c 07:27:00 07:24:00
47.G5h-4h 07:30:00 07:24:00
48.B7c-8d 07:30:00 07:38:00
49.R2f-2h 07:33:00 07:38:00
50.N8a-7c 07:33:00 07:47:00
51.G4h-5h 07:43:00 07:47:00
52.B8d-7e 07:43:00 07:56:00
53.N2i-3g 07:45:00 07:56:00
54.B7e-6d 07:45:00 07:56:00
55.R2h-2i 07:47:00 07:56:00
56.P3d-3e?   07:47:00  08:23:00

We are still in the middlegame even though it is already past six in the evening on
the second day of play. An extremely slow game, caused by leaving the opening theory
early and the importance of winning this game. There is a huge difference between a
2-2 tie and a 3-1 Habu lead. Moriuchi decided to open the game here with 56.P3e,
but this is an overplay. Correct was to keep playing the waiting game with 56.P8d
and after K6h R2b G4h R4b K5h the most likely outcome of the game is sennichite.
This would not be bad for Moriuchi, because he is playing with the white pieces,
but he clearly felt (and Habu agreed) that white is a little bit better here. Therefore,
it would be a wasted opportunity to settle for a repetition of moves. Unfortunately
for Moriuchi, after 56.P3e his position quickly deteriorates.

57.P3fx3e    08:06:00  08:23:00
58.P6e-6f    08:06:00  08:23:00
59.N3g-4e!   08:17:00  08:23:00

Maybe Moriuchi overlooked this move. After 59.Px6f P*3f Sx3f Rx4f Sx4f Bx4f G5h-6h
Bx3g+ R*4a P*6a white is better. However, after 59.N4e black will break through on
the second file, which is too strong. Still, Habu needs a couple of good moves to
bring the game home.

60.S3c-4d    08:17:00  08:35:00
61.P2e-2d    08:32:00  08:35:00
62.S4dx4e    08:32:00  08:36:00
63.P4fx4e    08:33:00  08:36:00
64.P6fx6g+   08:33:00  08:40:00
65.G5hx6g    08:33:00  08:40:00
66.N*7e      08:33:00  08:40:00
67.G6g-6f    08:39:00  08:40:00
68.B6d-3g+   08:39:00  08:51:00
69.S*4h!     08:42:00  08:51:00

Not good is 69.S*3h because after 70.+B6d the three silvers are badly placed. However,
69.S*4h also seems bad because of 70.P*4f. However, Habu has seen more.

70.P*4f      08:42:00  08:51:00
71.S4gx4f    08:42:00  08:51:00
72.+B3g-3h   08:42:00  08:51:00
73.R2i-2f!   08:42:00  08:51:00

Although the white promoted bishop looks strong (tying multiple black pieces), there
is no good move here for white. On the other hand, black is still threatening to break
through on the second file.

74.N7c-6e    08:42:00  08:58:00

White's only option is to go for an all-out attack.

75.P2dx2c+   08:46:00  08:58:00
76.N6ex5g+   08:46:00  08:58:00
77.S4hx5g    08:46:00  08:58:00
78.P*2e      08:46:00  08:58:00
79.R2fx2e    08:53:00  08:58:00
80.+B3h-4g   08:53:00  08:58:00
81.R2e-2g!   08:53:00  08:58:00

The deciding move. Tempting is 81.+P3b, but after 82.+Bx2e +Px4b R*1h K8h +B6i the
white attack is very strong. The point of 81.R2g is to force the promoted bishop to
take the rook on 2g, after which this bishop can no longer participate in the attack.

82.+B4g-3f   08:53:00  08:58:00
83.+P2c-3b   08:53:00  08:58:00
84.+B3fx2g   08:53:00  08:58:00

No choice. 84.Rx3b Rx2a+ is even worse.

85.+P3bx4b   08:53:00  08:58:00
86.G5b-6b    08:53:00  08:58:00
87.B*5a      08:55:00  08:58:00

After the game, Habu said that only here he felt certain of victory.

88.R*1i      08:55:00  08:58:00
89.K7i-8h    08:55:00  08:58:00
90.R1ix1h+   08:55:00  08:58:00
91.N*8e      08:56:00  08:58:00
92.+B2g-4i   08:56:00  08:59:00
93.B5ax6b+   08:56:00  08:59:00
94.K7bx6b    08:56:00  08:59:00
95.G*7c      08:56:00  08:59:00
Resigns      08:56:00  08:59:00
Simple mate after 96.K6a R*5a or 96.K7a P*7b Sx7b Gx7b Kx7b S*7c etc. Moriuchi played
a fine strategic middle game, but in the end may have been just a little bit too eager
to make up for his blunder in the previous game. Habu takes a 3-1 lead and is now
only one win away from becoming Lifetime Meijin. Moriuchi must win with the black
pieces in game 5 to avoid an early end to this match.