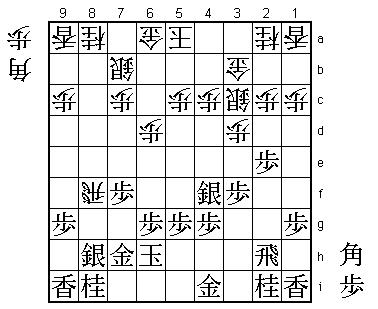
66th Meijin Match Game 2
[Black "Habu Yoshiharu, Challenger"]
[White "Moriuchi Toshiyuki, Meijin"]
[Event "66th Meijin-sen, Game 2"]
[Date "April 22nd and 23rd 2008"]
1.P7g-7f 00:00:00 00:00:00
2.P3c-3d 00:00:00 00:00:00
3.P2g-2f 00:00:00 00:00:00
4.G4a-3b 00:00:00 00:00:00
5.G6i-7h 00:00:00 00:00:00
6.P8c-8d 00:00:00 00:00:00
7.P2f-2e 00:00:00 00:00:00
8.B2bx8h+ 00:00:00 00:00:00
Moriuchi plays the Kakugawari with tempo loss in this game. A very popular opening,
so this will not have been a surprise for Habu.
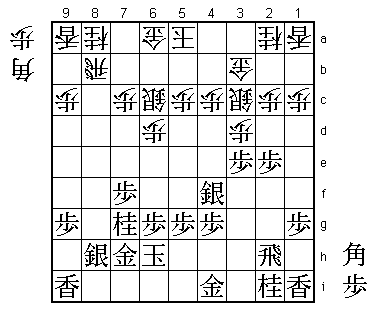
9.S7ix8h 00:00:00 00:00:00
10.S3a-2b 00:00:00 00:00:00
11.S3i-3h 00:10:00 00:00:00
12.S2b-3c 00:10:00 00:01:00
13.K5i-6h 00:40:00 00:01:00
14.S7a-7b 00:40:00 00:11:00
15.P3g-3f 00:43:00 00:11:00
16.P6c-6d 00:43:00 00:45:00
17.S3h-3g 00:49:00 00:45:00
Habu counters with a quick attack. This is also a well-known opening strategy against
the Kakugawari with tempo loss. Normally, white likes to keep the pawn back on 8d
in return for exchanging the bishops, but if black plays a quick attack, white is
forced to play P8e to set-up a counter attack. Therefore, the damage of giving
black an extra move is maximized. On the other hand, the black attack has not been
prepared properly, so it leaves the black position vulnerable as well.
18.P8d-8e 00:49:00 00:47:00
19.S3g-4f 01:35:00 00:47:00
Black likes to get rid of the wall silver on 8h before starting the attack, but
19.S7g is not possible here. The point is that if black attacks with S4f and P3e
next, then Px3e Sx3e is met with P8f and now Sx8f is answered by B*5e and Px8f by
P*8e and if Px8e then Rx8e is a fork on the silver on 3e and the knight on 8i.
Therefore, black has to attack with the silver on 8h, which is a potential problem.
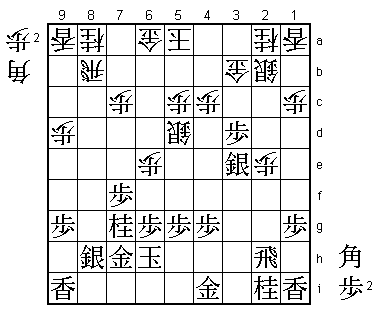
20.P8e-8f 01:35:00 00:48:00
21.P8gx8f 01:37:00 00:48:00
22.R8bx8f 01:37:00 00:49:00
23.N8i-7g 01:37:00 00:49:00
Almost all games with this position continued with B*7g followed by P3e or P3e
followed by B*7g. This bishop drop is important because after 23.P3e Px3e Sx3e
can play B*5e and take the silver on 8h after the rook moves. 23.N7g is not a new
move, because it was already played in the A Junisen game between Sato and Kimura
in March 2008. The idea is the same as B*7g, namely to take out the counter drop
B*5e after P3e. However, the head of the knight is a liability. If this was a new
move, it would be hard to find the right way to exploit that weakness over the
board, but because this move was already played before, there is the risk of walking
straight into Moriuchi's opening preparation. Habu's simple reaction: "There is no
way to be sure without playing it in an actual game". Of course, there is no doubt
that he looked at it at home and couldn't find any immediate problems.
24.R8f-8b 01:37:00 00:56:00
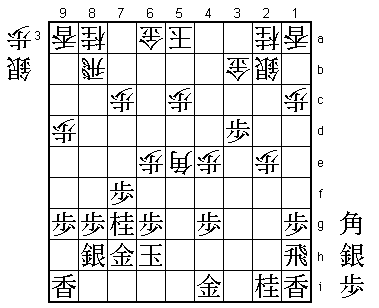
25.P3f-3e 01:38:00 00:56:00
26.P3dx3e 01:38:00 01:22:00
27.S4fx3e 01:38:00 01:22:00
28.P*3d 01:38:00 01:32:00
29.S3e-4f 01:38:00 01:32:00
Black obviously wants to play 29.P2d here, but because white has a pawn in hand,
this fails to 30.Px3e Px2c+ P*2g Rx2g B*4e and white wins material.
30.S7b-6c?! 01:38:00 01:32:00
The natural move, because white wants to attack the head of the knight with P7d
followed by P7e without being bothered by the black attack S5e followed by S6d.
However, in this position it might be a mistake. Further study will have to reveal
if there is a better move here or if the white position is already slightly suspect.
31.P*3e! 02:12:00 01:32:00
Shouts of disbelief from the professionals in the press room and Moriuchi will
have had similar feelings here. Dropping the pawn on 3e for the second time seems
like a waste of time and is therefore very hard to play for a professional. Again,
Habu shows great flexibility in realizing that the position of the white silver
makes an important difference as we will see shortly.
32.P3dx3e 02:12:00 03:05:00
33.S4fx3e 02:12:00 03:05:00
34.S6c-5d 02:12:00 03:31:00
The point of this position is that it is harder for white to play 34.P*3d here,
because this is answered by 35.P2d Px3e P*8c! Rx8c (R9b Px2c+ P*2g Rx2g B*4e B*1h)
Px2c+ P*2g R4h Gx2c B*5f which is now a fork on the rook on 8c and the gold on 2c.
The difference is that the silver is now on 6c and not defending the rook on 8c.
Note that R3h instead of R4h is not so good because after Gx2c B*5f B*7d Bx2c+ Bx4g+
white has plenty of attacking chances. Moriuchi didn't like the variation with R4h,
so he abandoned 34.P*3d and played 34.S5d instead, although he was not too wild about
that move either. The psychological damage of 31.P*3e seems to have been far greater
than the actual strength of this move. It has thrown Moriuchi out of his opening book
preparation and he starts using a lot of time for his moves from now on. The position
is still very close, but somehow Moriuchi felt that he was worse all the time.
35.P2e-2d 03:09:00 03:31:00
36.P2cx2d 03:09:00 04:17:00
37.P*3d 03:42:00 04:17:00
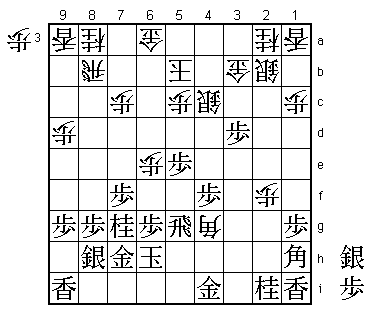
The sealed move.
38.S3c-2b 03:42:00 04:30:00
39.R2hx2d 03:49:00 04:30:00
40.P6d-6e 03:49:00 05:11:00
41.R2d-2f 04:23:00 05:11:00
42.P*2e 04:23:00 05:29:00
43.R2f-2h 04:24:00 05:29:00
44.P9c-9d 04:24:00 05:52:00
A typical Moriuchi move to make sure that there are no weaknesses to exploit. If white
starts to attack the head of the rook with P7d, this opens up a diagonal to the king
giving black moves like B*9e and P*8d. The move 44.P9d takes this out of the position.

45.P*8g      05:44:00  05:52:00

Habu wanted to play 45.P*8f here to move into a Silver Crown position with S8g next, but
he didn't like 46.G6b S8g P*8e Px8e P*8f S9h N9c and white seems to have a strong attack.

46.B*6d      05:44:00  06:02:00
47.S3e-4f    06:32:00  06:02:00

Black likes to keep this silver in an attacking position, but 47.P4f is bad because of
48.P7d and the attack P7e next is very strong. With 47.S4f, black can put pressure on
the white bishop.

48.P4c-4d    06:32:00  06:55:00
49.P5g-5f!   06:45:00  06:55:00

Great judgement by Habu. Opening a diagonal to the king is risky, but Habu has seen that
he needs to get rid of the central pawn to support his attack with pawn drops on the
central file. The safest way to play here would have been 49.P6f but after P4e Px6e the
position is unclear.

50.P4d-4e    06:45:00  06:58:00
51.S4f-5e    06:46:00  06:58:00
52.S5dx5e    06:46:00  07:03:00
53.P5fx5e    06:46:00  07:03:00
54.B6dx5e    06:46:00  07:03:00
55.R2h-1h    06:47:00  07:03:00
This is a bit of a strange position. Black has exchanged the silvers and now gives
white the next move. Handing over the initiative is a well-known professional technique
in positions where there are no good moves, thus forcing the opponent to further
weaken his position. However, in this position there seem to be plenty of moves and
Moriuchi really felt that he had turned the tables here. Strangely, there doesn't seem
to be a good plan here for white.

56.P4e-4f    06:47:00  07:14:00
57.R1h-5h    07:01:00  07:14:00
58.S*5d      07:01:00  07:30:00
59.B*2d      07:16:00  07:30:00
60.K5a-5b    07:16:00  07:37:00
61.B2dx4f    07:19:00  07:37:00
62.B5ex4f    07:19:00  07:50:00
63.P4gx4f    07:19:00  07:50:00
64.B*4g      07:19:00  07:51:00
65.P*5e      07:28:00  07:51:00
66.S5d-4c    07:28:00  07:55:00
67.B*1h      07:49:00  07:55:00
68.P2e-2f    07:49:00  07:56:00
69.R5h-5g    08:00:00  07:56:00
70.P2f-2g+?  08:00:00  07:59:00

Probably the only move in this game that could be considered a mistake by Moriuchi.
Probably better was 70.B1d+, threatening to play P*3f next to block the bishop on 1h,
but it is unclear if this would really have been better for white.

71.S*6c!     08:01:00  07:59:00

A move that might come up in a next move problem collection. After 71.Kx6c, black
captures the pawn on 2g with check after 72.Bx2g, so he can take the bishop on 4g
next.

72.K5b-4b    08:01:00  08:04:00
73.R5gx4g    08:02:00  08:04:00
74.+P2gx1h   08:02:00  08:04:00
75.P5e-5d    08:02:00  08:04:00

The second point of 71.S*6c, because this silver is now supporting the pawn on 5d.
From now on the endgame is an exhibition of combining the power of rook, bishop and
knight with a silver general only used at the very end.

76.S4cx5d    08:02:00  08:14:00
77.S6cx5d+   08:02:00  08:14:00
78.P5cx5d    08:02:00  08:14:00
79.B*7e      08:02:00  08:14:00
80.K4b-5a    08:02:00  08:27:00
81.N7gx6e    08:13:00  08:27:00
82.S*5f      08:13:00  08:31:00
83.R4g-2g    08:16:00  08:31:00
84.S5fx6e    08:16:00  08:35:00
85.P3d-3c+   08:16:00  08:35:00
86.N2ax3c    08:16:00  08:36:00
87.P*3d      08:16:00  08:36:00
88.N3c-4e    08:16:00  08:37:00
89.P3d-3c+   08:18:00  08:37:00
90.B*5g      08:18:00  08:47:00
91.B7ex5g    08:24:00  08:47:00
92.N4ex5g+   08:24:00  08:47:00
93.K6hx5g    08:24:00  08:47:00
94.G3bx3c    08:24:00  08:48:00
95.P*5b      08:38:00  08:48:00
96.R8bx5b    08:38:00  08:48:00
97.S*5c      08:38:00  08:48:00
98.P*2d      08:38:00  08:49:00
99.S5cx5b+   08:38:00  08:49:00
100.G6ax5b   08:38:00  08:49:00
101.N*6d     08:38:00  08:49:00
102.G5b-5c   08:38:00  08:50:00
103.K5g-6h   08:38:00  08:50:00
104.B*5e     08:38:00  08:52:00
105.K6h-7i   08:38:00  08:52:00
106.G5cx6d   08:38:00  08:53:00
107.R*8b     08:38:00  08:53:00
108.S*5b     08:38:00  08:53:00
109.L1ix1h   08:38:00  08:53:00
110.K5a-4b   08:38:00  08:53:00
111.B*6a     08:38:00  08:53:00
Resigns      08:38:00  08:53:00

Moriuchi resigned here because there is no proper defence against Rx5b+ with only
knights and pawns in hand. He can prolong his suffering by taking the silver on 8h
with the bishop, but that would leave him without any hope of getting an attack.
Instead, he decides to save his energy for the third game that is very important
for him because he wants to keep his service game with the black pieces.