66th Meijin Match Game 1
[Black "Moriuchi Toshiyuki, Meijin"]
[White "Habu Yoshiharu, Challenger"]
[Event "66th Meijin-sen, Game 1"]
[Date "April 8th and 9th 2008"]
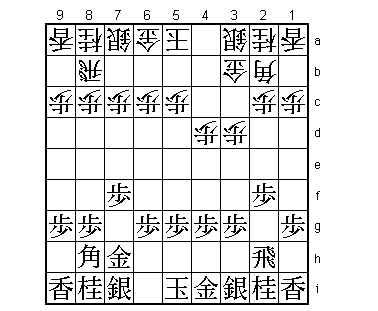
1.P2g-2f 00:00:00 00:00:00
Three pawns as the result of the furigoma give Meijin Moriuchi the first move in
a Meijin match that is a little bit special for several reasons. First of all, it
is the first time that the Meijin tournament (or any other professional tournament
for that matter) is sponsored by two major newspaper companies: Mainichi and Asahi.
An interesting compromise after Asahi made a higher bid than Mainichi (the current
Meijin sponsor) to try and get the rights to the Meijin tournament. A lot of negotiations
followed and the compromise pushed by Shogi Renmei president Yonenaga was to have a
mutual sponsor deal. This seems rather awkward, but both newspaper companies showed
their good will in this first game by having their respective CEOs present at the start
of this first game. Another reason this Meijin match is special is that Habu can become
the 19th Lifetime Meijin if he beats his childhood rival Moriuchi in this match. Moriuchi
has of course already qualified to become the 18th Lifetime Meijin last year by winning 5
Meijin titles. He can personally stop Habu from joining the exquisite company of Kimura,
Oyama, Nakahara and Tanigawa. Of course, Habu clearly belongs (probably more than Moriuchi),
but his success in the Meijin tournament has not matched his results in the other tournaments
far.
2.P3c-3d 00:00:00 00:02:00
3.P7g-7f 00:02:00 00:02:00
4.G4a-3b 00:02:00 00:03:00
5.G6i-7h 00:03:00 00:03:00
6.P4c-4d 00:03:00 00:06:00
Closing the bishop diagonal looks negative, but it has been a very popular way of
playing among professionals these days. No less that 17 games have already been
played in 2008 with this opening. Even the Kakugawari specialist Maruyama has used
this move three times. The position usually ends up being a kind of Yagura, but
outside the known joseki patterns. Moriuchi has faced 6.P4d once before in the Kisei
challenger tournament against Kimura.
7.P2f-2e 00:09:00 00:06:00
8.B2b-3c 00:09:00 00:07:00
9.S3i-4h 00:09:00 00:07:00
10.G6a-5b 00:09:00 00:12:00
11.P4g-4f 00:20:00 00:12:00
Moriuchi tries a different plan from the one he played against Kimura. In that game,
it followed 11.P5f S2b B7g P8d S8h P8e K6i K4a P3f G5b-4c B6h and after P2d later,
the bishops were exchanged and white switched to a Ginkanmuri position with S2c. Of
, there is no way of telling which plan is better, but 11.P4f looks good, because it
aims at the weak 4th file.
12.G5b-4c 00:20:00 00:24:00
13.S4h-4g 00:29:00 00:24:00
14.P5c-5d 00:29:00 00:32:00
15.K5i-6i 00:39:00 00:32:00
16.S7a-6b 00:39:00 00:43:00
17.B8h-7g 01:05:00 00:43:00
18.K5a-4a 01:05:00 01:16:00
19.G4i-5h 01:07:00 01:16:00
20.S3a-2b 01:07:00 02:19:00
21.S4g-5f 01:37:00 02:19:00
22.S6b-5c 01:37:00 02:34:00
23.R2h-4h 01:38:00 02:34:00
24.P7c-7d 01:38:00 03:21:00
25.S7i-6h 02:40:00 03:21:00
26.K4a-3a 02:40:00 03:42:00
27.K6i-7i 03:10:00 03:42:00
28.B3c-4b 03:10:00 04:12:00
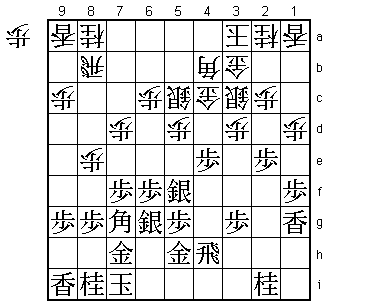
29.P4f-4e 04:03:00 04:12:00
The sealed move. This game is being played at a very slow pace, because in this
unfamiliar opening every move can be of the utmost importance.
30.S2b-3c 04:03:00 04:33:00
31.P4ex4d 04:16:00 04:33:00
32.S5cx4d 04:16:00 04:34:00
33.P*4e 04:16:00 04:34:00
34.S4d-5c 04:16:00 04:45:00
35.P6g-6f 04:20:00 04:45:00
36.P8c-8d 04:20:00 04:49:00
37.S6h-6g 05:01:00 04:49:00
38.P8d-8e 05:01:00 04:56:00
39.P1g-1f 05:02:00 04:56:00
40.P1c-1d 05:02:00 04:58:00
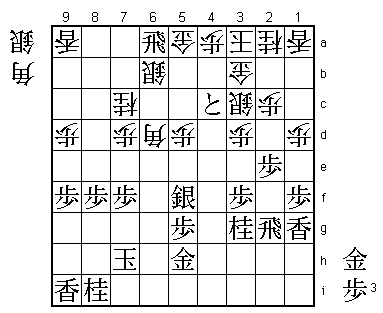
41.L1i-1g? 05:09:00 04:58:00
Probably as bad as it looks. It is not clear what Moriuchi was aiming for with
this lance move. Without the king on 2b, it seems unlikely that a Suzume-sashi
attack with R1h next will work. After the game, Moriuchi himself suggested that
41.P6e would have been better here. The reason why will become clear soon.

42.P9c-9d    05:09:00  05:12:00
43.P9g-9f    05:33:00  05:12:00
44.S5c-6b    05:33:00  06:11:00

This is the point of the white counter attack. This silver makes room for the bishop,
which moves to 5c next. From there it attacks the lance on 1g, which is important,
because black wants to play P3f followed by N3g, which is not possible now because
the knight has to keep defending the lance on 1c. It is now also clear why 41.P6e would
have been better than 41.L1g. If the bishop diagonal is opened, the silver cannot pull
back to 6b because of P4d.

45.P6f-6e    06:00:00  06:11:00
46.B4b-5c    06:00:00  06:11:00
47.R4h-2h    06:12:00  06:11:00
48.N8a-7c    06:12:00  06:23:00
49.P3g-3f    06:27:00  06:23:00
50.R8b-8a    06:27:00  06:27:00
51.R2h-2g    06:48:00  06:27:00
52.P6c-6d    06:48:00  07:11:00
53.P6ex6d    06:55:00  07:11:00
54.B5cx6d    06:55:00  07:11:00
55.N2i-3g    06:55:00  07:11:00
56.P8e-8f    06:55:00  07:13:00
57.B7gx8f    07:13:00  07:13:00
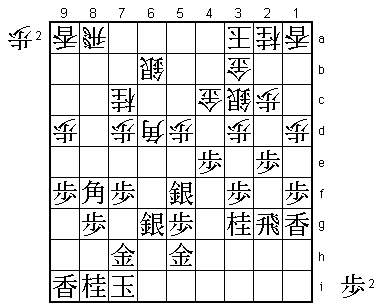
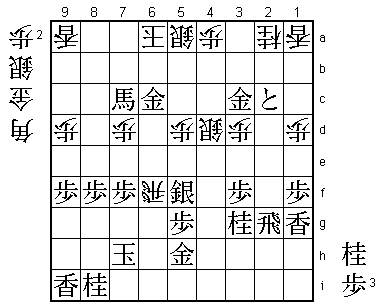
58.R8ax8f?   07:13:00  07:29:00

Strangely enough, both players thought they were in serious trouble here. Most
professionals in the press room agreed with Moriuchi that black had lost the opening
battle and that white was calling the shots here. Had Habu felt the same way, he
probably would have played 56.P*6e instead of 56.P8f, or took with the bishop here,
because after 58.Bx8f Px8f B*3h R2h B4i+ B*7b R8b B6a+ white has the option to escape
with sennichite if he doesn't like his position here: +B3i R1h +B2i R4h +B4i R1h etc.
Habu said after the game that 58.Rx8f was not planned, but that he felt that his position
was worse and that he had to force the issue. It was interesting that in the press
room none of the professionals really dared to condemn 58.Rx8f. If Habu plays a move
like that, maybe there is something...

59.P8gx8f    07:13:00  07:29:00
60.P*6f      07:13:00  07:29:00

If Habu counted on this move to make the rook for bishop sacrifice work, he is being
outplayed by Moriuchi.

61.R*6a      07:17:00  07:29:00
62.P*4a      07:17:00  07:30:00
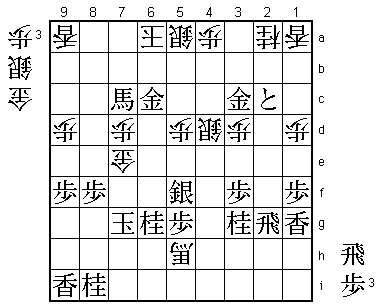
63.P4e-4d! 07:50:00 07:30:00
Bad would have been 63.Rx6b+ Px6g+ Sx6g S*5c and white takes the initiative which is
very important in this position. Also, 63.Sx6f fails to B*4i.
64.P6fx6g+ 07:50:00 08:08:00
No choice. 64.Gx4d fails to N4e, 64.Sx4d to P2d Px2d P*2c followed by Rx6b+ and
64.G4c-4b to Sx6f B*4i Rx6b+ B5c +Rx5c Gx5c R2h R*3i P*6i Rx3g+ R4h and black is
better.
65.P4dx4c+! 07:58:00 08:08:00
Again a strong reply. Black may have turned the tables, but cannot afford to hesitate
here. Only the sharpest attack will bring victory.
66.+P6gx7h 07:58:00 08:08:00
67.K7ix7h 07:58:00 08:08:00
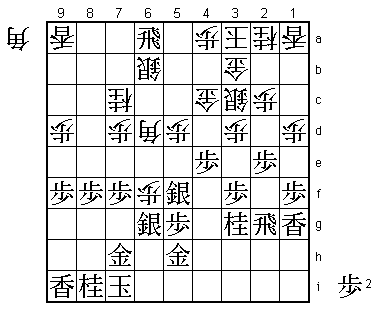
68.G*5a! 07:58:00 08:09:00
This is one of the reasons why Habu is so difficult to beat. Even when he is behind,
he will find anything to force a mistake. This defence only gold drop is very tough
to play for a professional, but black still has to be very careful here. The natural
69.+Px3b Kx3b Rx9a+ is not good because white gets a very strong counter attack after
B*4i.

69.P*4d!     08:47:00  08:09:00

Perfect. Moriuchi took 49 minutes of his remaining 62 minutes to make sure that he
played the right move here.

70.S3cx4d    08:47:00  08:22:00

Again, no choice. 70.Gx6a fails to 71.+Px3b Kx3b G*4c K2b G*3b K1b G4cx3c Nx3c P1e with
a winning attack for black and 70.P*4b to 71.P2d Sx2d Rx2d Px2d G*4a! Gx4a +Px3b Kx3b
S*4c etc.

71.P2e-2d    08:50:00  08:22:00
72.G3bx4c    08:50:00  08:22:00
73.R6ax5a+   08:54:00  08:22:00
74.S6bx5a    08:54:00  08:24:00
75.P2dx2c+   08:54:00  08:24:00
76.K3a-4b    08:54:00  08:24:00
77.G*6c      08:54:00  08:24:00
78.G4c-5c    08:54:00  08:30:00
79.G6cx6d    08:54:00  08:30:00
80.G5cx6d    08:54:00  08:31:00
81.B*3a      08:54:00  08:31:00
82.K4b-4c    08:54:00  08:32:00
83.B3ax6d+   08:54:00  08:32:00
84.R*6f      08:54:00  08:33:00
85.G*3c      08:57:00  08:33:00
86.K4c-5b    08:57:00  08:34:00
87.G*6c      08:58:00  08:34:00
88.K5b-6a    08:58:00  08:34:00
89.+B6dx7c!  08:58:00  08:34:00
Impressive end to this game. 89.P*6g would be the safest way to win, but Moriuchi has
made sure that there is no mate against his king and confidently chooses the most direct
route to victory.

90.B*6i      08:58:00  08:38:00
91.K7h-7g    08:58:00  08:38:00
92.R6fx7f    08:58:00  08:39:00
93.K7gx7f    08:58:00  08:39:00
94.B6ix5h+   08:58:00  08:39:00
95.N*6g      08:59:00  08:39:00
96.G*7e      08:59:00  08:50:00
97.K7f-7g    08:59:00  08:50:00
Resigns      08:59:00  08:50:00
White runs out of checks after 98.S*7f K7h G*8g K7i and the white king cannot be
defended, so Habu resigned here. A perfect start for Meijin Moriuchi, who seems to
have outplayed Habu in this game, which is no simple feat. There is now some serious
pressure on Habu to strike back with the black pieces in game 2, but there is probably
no-one better at putting a loss quickly behind him than Habu.