65th Meijin Match Game 7
[Black "Goda Masataka, Challenger"]
[White "Moriuchi Toshiyuki, Meijin"]
[Event "65th Meijin-sen, Game 7"]
[Date "June 28th and 29th 2007"]
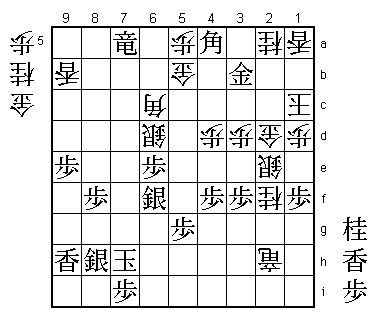
1.P7g-7f 00:00:00 00:00:00
2.P8c-8d 00:00:00 00:02:00
3.P2g-2f 00:05:00 00:02:00
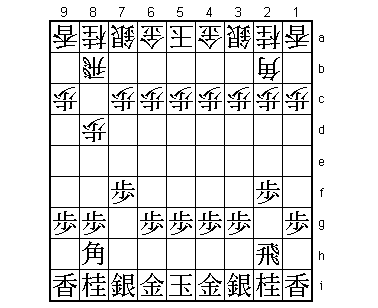
The furigoma for this deciding seventh game gives Goda the black pieces.
One would think that he would play something that he is familiar with, but
the first moves are already a surprise. Goda has opted to play the Kakugawari
opening, an opening he has not played in 20 months. Why would he play this in
such an important game? He is a specialist in the Yagura, which has a very
high winning percentage with black among top professionals. Aono, who was the
main arbiter for this game, explained why he wasn't surprised: "Becoming Meijin
is not about hiding away in your comfort zone, but showing that you can win
the title by playing anything". He continued by explaining that he felt much
the same way when he took a 2-1 lead against Nakahara in the Oza match, taking
Nakahara's favorite Aigakari opening head-on in the 4th and 5th games. He lost
both games, showing that even though the intentions may be noble, it is still
questionable if it also the wisest decision.
4.P8d-8e 00:05:00 00:03:00
5.B8h-7g 00:05:00 00:03:00
6.P3c-3d 00:05:00 00:03:00
7.S7i-8h 00:08:00 00:03:00
8.G4a-3b 00:08:00 00:03:00
9.G6i-7h 00:08:00 00:03:00
10.B2bx7g+ 00:08:00 00:05:00
11.S8hx7g 00:08:00 00:05:00
12.S3a-4b 00:08:00 00:05:00
13.S3i-3h 00:08:00 00:05:00
14.S7a-7b 00:08:00 00:05:00
15.P9g-9f 00:08:00 00:05:00
16.P9c-9d 00:08:00 00:05:00
17.P4g-4f 00:08:00 00:05:00
18.P6c-6d 00:08:00 00:08:00
19.S3h-4g 00:09:00 00:08:00
20.S7b-6c 00:09:00 00:08:00
21.P1g-1f 00:09:00 00:08:00
22.P1c-1d 00:09:00 00:09:00
23.K5i-6h 00:09:00 00:09:00
24.P7c-7d 00:09:00 00:27:00
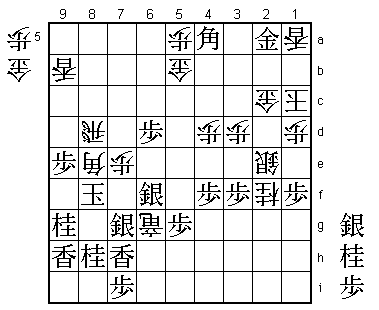
25.P3g-3f 00:29:00 00:27:00
26.S4b-3c 00:29:00 00:40:00
27.P2f-2e 01:06:00 00:40:00
28.K5a-4b 01:06:00 01:04:00
29.G4i-5h 01:08:00 01:04:00
30.N8a-7c 01:08:00 01:26:00
31.P6g-6f 01:57:00 01:26:00
32.S6c-5d 01:57:00 01:48:00
33.N2i-3g 01:58:00 01:48:00
34.P4c-4d 01:58:00 02:34:00
35.S4g-5f 03:09:00 02:34:00
36.K4b-3a 03:09:00 02:37:00
37.K6h-7i 03:38:00 02:37:00
38.R8b-4b 03:38:00 02:46:00
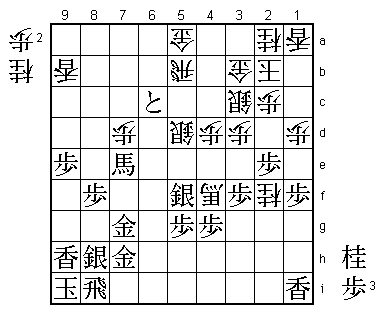
This move was first played by Sato Yasumitsu (who else?) and the aim of this
move is simple: make sure that black cannot start the attack with P4e. It is a
bit defensive, and the game has a high risk of ending in sennichite, but playing
for sennichite with white is not considered a bad thing. However, in this game
Moriuchi has no intention to try and escape with sennichite.
39.K7i-8h 03:44:00 02:46:00
40.K3a-2b 03:44:00 02:50:00

41.R2h-4h 04:46:00 02:50:00
The sealed move, but not new. There were three games with the position after
the 40th moves and in two games (Kimura-Namakata, November 2005, Junisen, won
by Namekata and Tanigawa-Sato, March 2001, Junisen, won by Tanigawa) the next
move was 41.G5h-6h. The other game (in which 41.R4h was also played) was the
game between Abe and Namekata played in July 2005 (also in the Junisen) and
won by Abe. Not many games, so there is still a lot of room for study here.
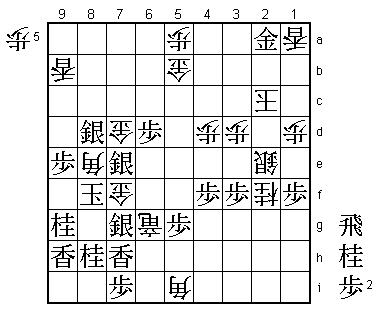
42.G6a-5a 04:46:00 02:56:00
43.G5h-6h 04:46:00 02:56:00
44.L9a-9b 04:46:00 03:44:00
45.R4h-2h 04:50:00 03:44:00
46.K2b-3a 04:50:00 03:49:00
47.L9i-9h 04:56:00 03:49:00
48.K3a-2b 04:56:00 04:20:00
49.K8h-9i 04:59:00 04:20:00
50.P6d-6e 04:59:00 05:11:00
51.P6fx6e 05:03:00 05:11:00
52.P9d-9e 05:03:00 05:19:00
53.P9fx9e 05:41:00 05:19:00
54.P7d-7e 05:41:00 05:23:00
55.S7g-8h 06:44:00 05:23:00
56.P8e-8f 06:44:00 06:14:00
57.P8gx8f 06:44:00 06:14:00
58.B*5i 06:44:00 06:14:00
59.R2h-3h 06:44:00 06:14:00
60.P7ex7f 06:44:00 06:16:00
61.B*6d 07:27:00 06:16:00
62.N7cx6e 07:27:00 06:22:00
63.B6dx5c+ 07:27:00 06:22:00
64.R4b-5b 07:27:00 06:29:00
65.+B5c-7e 07:43:00 06:29:00
66.P7f-7g+ 07:43:00 06:33:00
67.N8ix7g 07:43:00 06:33:00
68.N6ex7g+ 07:43:00 06:33:00
69.G6hx7g 07:43:00 06:33:00
70.N*2f 07:43:00 06:35:00
71.R3h-3i 07:43:00 06:35:00
72.B5i-4h+ 07:43:00 06:35:00
73.R3i-8i 07:44:00 06:35:00
74.+B4hx3g 07:44:00 06:36:00
75.P*6d 07:44:00 06:36:00
76.+B3gx4f 07:44:00 06:46:00
77.P*4g 07:46:00 06:46:00
78.P*7d 07:46:00 06:53:00
79.P6d-6c+ 07:52:00 06:53:00
Both players have been playing the middle game very positively, leading to the
current position in which no less than three major pieces are under attack.
Quite a rare occurrence.

80.P7dx7e    07:52:00  07:24:00
81.+P6cx5b   07:52:00  07:24:00
82.P7e-7f    07:52:00  07:24:00
83.G7g-6g    07:52:00  07:24:00
84.P*6f      07:52:00  07:27:00
85.P4gx4f    07:53:00  07:27:00
86.P6fx6g+   07:53:00  07:44:00
87.S5fx6g    07:53:00  07:44:00
88.G5ax5b    07:53:00  07:53:00
89.R*7b      07:53:00  07:53:00
90.N*7g      07:53:00  07:53:00
91.R8i-7i    08:04:00  07:53:00
92.S5d-6c    08:04:00  08:03:00
93.R7bx7f+   08:04:00  08:03:00
94.G*8i      08:04:00  08:03:00
95.R7ix8i    08:04:00  08:03:00
96.N7gx8i+   08:04:00  08:03:00
97.K9ix8i    08:04:00  08:03:00
98.R*3i      08:04:00  08:03:00
99.P*7i      08:12:00  08:03:00
100.R3ix1i+  08:12:00  08:03:00
101.P*6d?    08:22:00  08:03:00
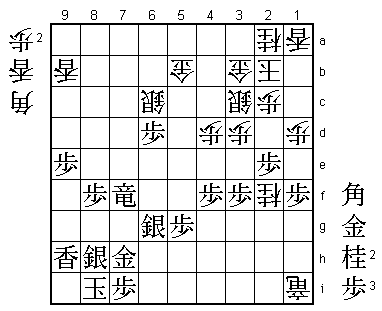
A common tactic to split two pieces that are defending each other, but Goda
marked this at the losing move and even stopped the post-mortem analysis after
 this move, considering the rest of the game not worth analyzing. He pointed
 out that he should have played 101.B*8c here. For example, 102.P*7e +R6f L*7f
 Sx7f Px7f +Rx7f B*5h P*6g Bx3f+ Bx9b+ +B5d G*6e which is good for black.
 Instead of aiming at a quick knock-out, black should have aimed at a long,
 drawn out fight. Here is where Goda's style of going for every opportunity
 to quickly finish his opponent backfired.

102.S6cx6d   08:22:00  08:05:00
103.+R7f-7b  08:24:00  08:05:00
104.B*6c!    08:24:00  08:24:00
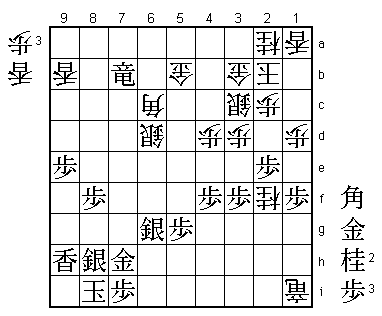
The point. 104.P*5a is the obvious reply, but Moriuchi plays something much
stronger. After 105.+Rx9b white can strike back with 106.L*7b, which both
blocks the sideways working of the promoted rook and attack strongly because
black has dropped a pawn on 7i. Also, 105.+Rx6c Gx6c B*4a is answered by P*8g
and it black cannot win the semeai.

105.+R7b-7a  08:35:00  08:24:00

This keeps the promoted rook on the 7th file, but...

106.P*6f     08:35:00  08:29:00
107.S6gx6f   08:35:00  08:29:00
108.L*7b     08:35:00  08:32:00

Here is the lance again. White now has a clear advantage.

109.N*2d     08:35:00  08:32:00
110.P2cx2d   08:35:00  08:43:00
111.P2ex2d   08:35:00  08:43:00
112.L7bx7h+  08:35:00  08:43:00
113.K8ix7h   08:35:00  08:43:00
114.P*5a     08:35:00  08:43:00
115.B*4a     08:38:00  08:43:00
116.S3cx2d   08:38:00  08:44:00
117.P*2c     08:41:00  08:44:00
118.G3bx2c   08:41:00  08:45:00
119.P*2e     08:44:00  08:45:00
120.S2dx2e   08:44:00  08:46:00
121.P*2d     08:44:00  08:46:00
122.G2cx2d   08:44:00  08:46:00
123.G*3b     08:44:00  08:46:00
124.K2b-1c   08:44:00  08:47:00
125.P*6e     08:45:00  08:47:00
126.+R1i-2h! 08:45:00  08:48:00
A powerful check at the perfect time, because black cannot drop a pawn in
defense after dropping the pawn on 6e.

127.K7h-8g   08:46:00  08:48:00

Puts the king in a lot of danger, but if black plays 127.N*6h, then 128.P1e
Px6d Bx3f and because black has too few pieces, white can just play for an
entering king and win either by mating the black king or by points difference,
clearly not a good way to finish the final game of the Meijin match.

128.P*7e     08:46:00  08:50:00
129.L*7h     08:46:00  08:50:00
130.+R2h-6h  08:46:00  08:52:00
131.S8h-7g   08:52:00  08:52:00
132.+R6h-6g  08:52:00  08:52:00
133.N*8h     08:52:00  08:52:00
134.P*8e     08:52:00  08:55:00
135.P8fx8e   08:52:00  08:55:00
136.N*7d     08:52:00  08:56:00
137.+R7ax7d  08:52:00  08:56:00
138.B6cx7d   08:52:00  08:56:00
139.P6ex6d   08:52:00  08:56:00
140.G2d-2c   08:52:00  08:57:00
141.G3bx2a   08:53:00  08:57:00
142.B7dx8e   08:53:00  08:57:00
143.K8g-8f   08:54:00  08:57:00
144.R*8c     08:54:00  08:58:00
145.P*8d     08:54:00  08:58:00
146.R8cx8d   08:54:00  08:58:00
147.N*9g!    08:56:00  08:58:00
Goda has tried everything to keep the game close and in the press room there
was talk about having another unbelievable comeback by Goda, after he snatches
victory from the jaws of defeat in the sixth game. In the press room, only
147.S*7c was analyzed after which white wins easily with 148.R8c P*7d Rx7c.
147.N*9g is much nastier.

148.G*7d     08:56:00  08:59:00
149.S*7c     08:57:00  08:59:00
150.R8d-8c!  08:57:00  08:59:00

The correct reply. Moriuchi could have lost it all had he played 150.Gx7c here,
because then 151.Nx8e G7d B*3a suddenly wins for black!

151.B4ax2c+  08:59:00  08:59:00
152.K1cx2c   08:59:00  08:59:00
153.G*8d     08:59:00  08:59:00
154.B*5i     08:59:00  08:59:00
155.S6fx7e   08:59:00  08:59:00
156.R8cx8d   08:59:00  08:59:00
157.S7cx8d=  08:59:00  08:59:00
158.G*7f     08:59:00  08:59:00
Resigns      08:59:00  08:59:00
Mate in 3 moves after 159.Nx7f +Rx7f (the silver on 7g is pinned by the bishop on 5i),
but Moriuchi still took almost all of his byoyomi time to play the final move. Winning
a tough match and becoming the 18th Lifetime Meijin, joining the shogi legends Kimura,
Oyama, Nakahara and Tanigawa must have made his hand a little heavy. Looking back at
this match, Moriuchi showed himself very worthy of the honorary title. He didn't panic
after losing 2 games in a row, dominated the next four games and recovered brilliantly
from the devastating loss in the sixth game, winning the final game with the white
pieces. Moriuchi may not have a list of honors as long as Habu, but then again, who
has? Beating his childhood rival to the Lifetime Meijin title must be very satisfactory
for Moriuchi.